Tag: grid-lesson-planning

  • Teaching English to Children: 8 Tips For The Classroom

    Teaching English to Children: 8 Tips For The Classroom

    The vast majority of TEFL jobs are about teaching English to children and young learners.

    If you love kids, you can choose between thousands of jobs in language centers or public schools.

    But teaching a gang of little rascals can be… at least challenging.

    This article will aid you in understanding what it takes to teach English to children and will give you valuable tips for the classroom.

    Teaching English to Children: 8 tips for the classroom

    Teaching Children: What it Takes

    A position to teach young learners or even toddlers may be perfect for you if:

    • You have a lot of energy.
    • You enjoy having creative tasks.
    • You possess patience.
    • You love children.
    • You prefer active teaching.

    If that sounds like your personality profile, fantastic! There is a school eagerly waiting to scoop you right up.

    Also read our guide on teaching different age groups of learners.

    8 Tips for Teaching English to Children

    How do you connect with a large group of younger students, keep them excited, focussed and on your side for the whole lesson?

    Let’s look at 8 effective ways of teaching English to children and managing your classroom.

    1. Get Down to Their Level

    Imagine how you’d feel if you were in a classroom with a giant, twice your height towering over you. I’d imagine you wouldn’t feel that comfortable right? It’s no different for your students.

    You need to consider what you look like through their eyes, especially when meeting you for the first time.

    • Try crouching down. 
    • Try sitting down on a chair, stool etc. 
    • Even try sitting on the floor if you have to! 

    Anything to bring your height down will help. 

    You are no longer a scary giant but a friend leading the lesson. You are also closer to their eye level now which helps things even more with connecting!

    2. Be Fun And Keep Them Engaged

    Imagine the field trips galore! Do you remember how fondly you looked forward to field trips when you were younger?

    Now, your students will be looking forward to those same experiences with you. You will have the opportunity to help them solidify fun memories that they will remember for the rest of their lives.

    Children are imaginative, creative, and brutally honest – they are an endless source of entertainment and energy. They love games, songs, dancing, and let’s face it, do we as adults ever really grow out of that? I don’t think so.

    The big difference now is that you get paid to have fun with some of the coolest human beings on the planet!

    3. Promote Their Progress

    Kids soak up information swiftly. If you care about results and teaching to make a difference, teaching children may be the perfect option for you.

    They don’t see learning a language to an end, but often love school and think of the experience as fun. As a teacher, do not only watch your students grow, but help them to develop intellectually over time and show them ways to use the information they have learned in the classroom outside.

    4. Use TPR

    TPR (total physical response) is a way of using actions to help learn a language. 

    For example, if you teach them the word jump then get them to do exactly that… jump! It has been found to be very effective with younger students and best of all, it’s really fun.

    Younger children naturally have more energy and can feel stifled and bored sitting silently in one place for too long. Why fight this tendency when you can work with it?

    Get them moving around, using actions to learn in class and you’ll be known as the fun teacher that they can’t wait to have lessons with.

    https://www.youtube.com/watch?v=Co1orcNxd6Q

    5. Always Come Up With New Activities

    Young learners respond to a variety of different activities and stimuli. The more creative an activity may be, the kids are likely to enjoy it. Use a variety of approaches while teaching and constantly try something new.

    Whether it’s a hands-on activity like making a craft, sharing a funny educational YouTube video, using regalia in the classroom, or including sports activities as part of a lesson, children tend to gravitate toward those activities.

    Here are more tips especially on how to teach English online to kids.

    6. Be Patient But Firm

    No two students are the same, and that can lead to some interesting situations. Not all students will enjoy learning, though most of them likely will. Some students will be unmotivated, lazy, boisterous, or naughty in the classroom.

    As a teacher working with children you will have to be adaptable, patient but firm at the same time, and have to be strongly focused on classroom management to make sure lessons are completed properly and in the proper time frame.

    Learn 7 strategies to become more patient in the classroom.

    7. Use Vocal Dynamics

    Have you ever seen a young child quite content watching the news? No, right?

    They usually gravitate towards cartoons. What is different about cartoons (besides the bright colors)?

    The voices!

    Watch a cartoon aimed at kids and just listen to the voices. They are never monotonous, flat, dull, etc. 

    They: 

    • Are dynamic (going between loud and quiet) 
    • Use a wide vocal pitch range (low pitched to high pitched) 
    • Vary the pace (sometimes speaking fast, sometimes slow)

    Why does this happen?

    Because it’s interesting! This is what hooks kids and keeps them entertained.

    We can employ the same tactics with our own speech. Experiment with different sounds and see the results you get. 

    Don’t be afraid to sound silly either. 

    Which is more embarrassing? 

    Colleagues and parents seeing a class full of bored children while you drone on in a monotonous fashion?

    Or… a room full of excited, happy kids hooked on every wacky utterance and noise you make? Exactly!

    8. Reward Your Students

    Learning for the sake of learning and the enjoyment of it is a foreign concept to young learners at this stage.

    To keep them interested in learning, teachers will need to focus on giving stickers, prizes, toys, and other means of reward to teach children that learning is a good thing.

    Teaching proper behavior during this stage is just as important as teaching spelling to young learners and can take up a good amount of time in the classroom.

    Bonus: Find Jobs to Teach Children

    The traditional classroom, one-to-one lessons, and even online lesson options can allow you to supplement your income while doing rewarding work if you know where to look to find those jobs.

    Options include:

    VIPKID is one of the best companies if you want to teach English online to kids. Read our comprehensive guide on how to become a teacher for VIPKID.

    As you can see, there is a little something for everyone no matter your teaching style. Whatever environment or age range of children you prefer, an opportunity is waiting for you to grab.

  • Material Magnetism: How to Keep Your ESL Students Coming Back for More

    Material Magnetism: How to Keep Your ESL Students Coming Back for More

    What’s the most important thing that will keep your students coming back for more lessons?

    Is it your well designed grammar exercises? Your refined pronunciation drills? Or maybe your charisma?

    These are all great, but unless you build lessons that are relevant to your students, you will eventually lose them.

    In this article you will learn exactly how to find the perfect material and match it with your students, keeping them happy and making your retention rates stay sky high.

    How to Create Magnetic  ESL Lessons: The Teacher Guide

    How to Find Magnetic Material

    1. Learn About Your Students

    Each student has their own reasons for learning English, they have their own interests and own motivations. They are investing their time and money in you because they believe that you can help them move towards their goals.

    So, how do you find out what your students’ goals and interests are? Well, there’s this beautiful thing called conversation that can be used to ask these things called questions… 

    Joking aside, I use the first part of a trial class to do my investigation. One of the earliest questions I ask is

    “Why do you want to improve your English?”

    Now, this is quite simple and you will usually get similar basic answers:

    • “For work”
    • ”For study”
    • “Want to speak with friends”

    This will give you a rough idea, but you will need to dig deeper. 

    For example, if they say they are learning for work then you need to find out how they use English.

    • Do they just send the occasional email to foreign clients?
    • Do they have to give presentations?
    • Do they have to manage a team?

    Get as much information as you can. This will help you much more when you structure your lessons later on.

    Paul… the Software Engineer (A)

    Paul is a software engineer. He works in a local team where he speaks his native language (German) but occasionally has to send emails to English speaking workers from divisions in other countries. He isn’t sure about his grammar and would like to appear as professional as possible when communicating with these people.

    It’s also vital to ask what they do for work / study. Once you know the field of study / work then you can use vocabulary / terms that are specific to that field. This will add massive value to your students who are taking one-to-one lessons. Even if you are teaching a group class, you can find areas that are relevant to as many of your students as possible.

    Janet… the Architect (B)

    Janet is a college student who wants to one day be an Architect. She has decided to study Architecture in the UK (providing she passes her IELTS). As well as helping her with her exam it turns out that expanding her vocabulary relating to Architecture is something she would be interested in.

    Finally, find out your students’ hobbies. Tying lesson material to a student’s interests is a quick way to get them hooked on your lessons!

    Ben… a Fan of Sitcoms (C)

    After some discussion, it turns out that Ben is a huge fan of American sitcoms. He finds them funny but can’t always understand what’s happening. Although he didn’t say he is specifically wanting to improve his English for the purpose of watching sitcoms, he seems much more interested when you mention you would like to include these things into your lessons.

    2. How to Build ESL Lessons

    Once we have plenty of information to go on, we are ready to make our lesson plans. First, it’s a good idea to think about which area you want to develop and then get the materials to fit that.

    Let’s look at our examples again:

    Paul… the Software Engineer (A)

    Paul mentioned already that he wants to improve his grammar. With regard to him needing to improve it for work emails, it makes sense to focus on writing ability.

    Now, from here, what would you do?

    We could set some exercises and role play some scenarios for Paul to reply to. However, if Paul has some past emails from work or ones that he needs to work on then it makes sense to use this as your source material. This is as relevant as it gets, you are using material that the student would be using on a regular basis in their English-speaking world.

    This is now moving on to our second step, finding the right material. This was fairly simple with Paul as we already had the material to work with.

    What could we do with Janet in Example B though?

    Janet… the Architect (B)

    We mentioned already that Janet would benefit from expanding her vocabulary relating to architecture. For this, it’s as simple as finding material that has a lot of relevant vocabulary. This can be found in Architectural news articles and magazines. We can have Janet read these articles, check her comprehension of certain words and then get her to use these words in a sentence to drill them to memory.

    Finally let’s look at the kind of student who has a hobby (such as watching sitcoms) you want to incorporate into a lesson and the ways of doing this:

    Ben… a Fan of Sitcoms (C)

    The student could write a review or summary of a lesson. You could discuss the episode in class, favourite parts etc. for the purpose of speaking. Your student could read scripts (found online) to check pronunciation and comprehension when reading. You could also have your student listen to the episode without looking at the screen and then summarise the situation to focus on listening.

    Not only are these developing the students’ skills in a relevant way but because it’s fun for them you will find them to be highly motivated and more likely to keep going with their studies!

    3. Reviewing Your Lessons

    This last step is equally as important as the other two. We need to review and refine what we do.

    Sometimes the activities we are doing aren’t as effective as they could be and need some tweaking. Often our students’ life situations change and we need to adapt to keep ourselves relevant. Let’s look at those examples one last time:

    Paul… the Software Engineer (A)

    After studying with you for a year it turns out that Paul doesn’t actually send that many emails anymore but he now reports to a different boss who speaks in English. We asked how he was finding the lessons when we discovered this news. Now we can adapt the lessons and focus more on speaking to keep things relevant.

    Janet… the Architect (B)

    After asking how things were going for Janet at the start of the lesson we discover that she has an interview for her dream university, great! The interview is in English so let’s put the vocabulary on hold for now and we can practise interview techniques and have a few mock interviews in class.

    Ben… a Fan of Sitcoms (C)

    Although Ben likes using a wide range of skills in class, he still struggles with speaking the most. Due to this we can focus more on his speaking fluency and pronunciation. We can still have the lessons focus on sitcoms but we are now making the skill being developed more relevant to him.

    In each of these cases we found out about these changes just from asking questions.

    In example B (Janet) we discovered this news just from some light chit chat at the start of the lesson. This is a great time to find things out in a natural way. Just by asking about your student’s week and what’s happening, they will tell you plenty to inform your decisions about future lessons.

    In example A (Paul) and example C (Ben) we got this information by having a review session at the end of class. It’s also important to have more structured reviews occasionally. Pick a certain frequency (for example every 5 lessons) and then ask questions such as:

    • How are you finding the lessons?
    • Are the lessons the right difficulty?
    • Are there any exercises you would prefer to do more or less of?

    Asking these things and adjusting the lesson accordingly will ensure your lessons are perfectly tuned to your students and will keep your retention sky-high!

    Bonus Tips for Business ESL Lessons

    As we saw in Example A (Paul), these principles work really well when teaching business English.

    Let’s take this one step further and see how we can provide even more value to these students.

    Occupational Niche

    Learning about a student’s occupational niche is what will really make you stand out from general online courses or other online teachers regurgitating the same cookie-cutter business lessons.

    You have a student that wants to improve their English to help with their work. Sure, they will need the basics:

    • Making arrangements
    • Sending Emails
    • Answering the phone

    But to really help them shine, you need to learn about your student and what it is they actually do at work.

    Learn About Your Students’ Role in the Workplace 

    Make sure to ask these questions:

    • What do they do? 
    • Who do they have contact with? 
    • What equipment do they use?

    From here, we can find vocabulary that is going to be extremely useful and relevant to their role. 

    You don’t need to learn everything there is to know about the role. Just a little background reading will go a long way in showing your students that you care about their language development.

    Let’s look at 3 different example students and how we can find the right vocabulary for them:

    Jane… the Doctor (D)

    Jane is studying to become a Doctor and will study in an English speaking country soon. She will need a lot of specialist vocabulary.

    Even without being specialists in the subject, we can find articles on medicine and health online. We can then have her read these articles to check her pronunciation and find new words for her vocabulary.

    Dennis… the Web Designer (E)

    Dennis has just started work as a web designer for a large multinational company. He deals with clients and colleagues from English speaking countries often, and wants to build his confidence when speaking with them.

    With a bit of background research into web design through a google search, we’ve managed to find some useful vocabulary to test him on in class.

    We can also make sure to have conversations on topics related to web designing for him to practise this new vocabulary.

    Thomas… the Finance Manager (F)

    Thomas is applying for a few jobs in the finance sector and wants to be prepared for his interviews.

    After getting him to send over the details for the jobs he is applying for, we have some very niche vocabulary that we can test him on.

    We can also include this vocabulary in a mock interview so he has even more relevant practice with the vocabulary.

    It’s worth noting that none of this takes a massive amount of preparation time. You can find this stuff in minutes but the good impression of being a prepared teacher will last with your student forever! If you’re still struggling to find material for these lessons then here are 20 business activities and topics to help you get started.

    Conclusion

    This is the stuff that really makes one-to-one lessons different from a group class.

    If you use generic material that doesn’t connect with your students then expect them to find someone else that does.

    However, spend a little time learning about your students, their dreams, their motivations. This small investment of time and energy at the beginning will pay dividends so many times over later down the line!

  • How to Make a Lesson Plan for Teaching English (The Definitive Guide)

    How to Make a Lesson Plan for Teaching English (The Definitive Guide)

    How can you build effective lessons and feel in control of the class?

    Lesson plans are essential to planning and ultimately giving great ESL lessons.

    But isn’t making lesson plans long and arduous? Well… not if you do things the right way!

    In this article, you will learn to make a lesson plan for teaching English from scratch that is both effective and won’t eat up all of your time and energy!

    ESL Lesson Planning: The How-To Guide

    Can You Teach Without a Lesson Plan?

    The short answer is yes, you can teach a lesson without a plan. However…

    You shouldn’t!

    With one-to-one students, you usually have more freedom. If things don’t go quite right you can usually just keep talking and keep the flow going while working out what to do next.

    In fact, I have a few students who just want to practise their free conversation and I just turn up and talk for an hour without anything planned.

    However, for the majority of students (especially groups), not planning a lesson is not an option.

    You need a clear idea of what you want your students to learn and how you are going to help them achieve that goal. The only way to do this is with a lesson plan.

    Remember that you may think you’re saving time by not planning anything (or planning minimally) but you’ll regret it when you are in the middle of a stressful, unplanned lesson.

    As Benjamin Franklin once said,

    “By failing to prepare, you are preparing to fail.”

    How to Create a Lesson Plan From Scratch

    Does it matter which tool you use to create your lesson plan?

    Not really, no.

    The important thing is that you can easily and quickly create your plan, make adjustments (if necessary) and bring it to class with you.

    You could…

    Use Pen & Paper

    This is the low-tech option but still popular, especially if you can’t get access to a computer.

    You also have the advantage that you don’t have to worry about making a printout or bringing a laptop with you to class etc.

    Use Word Processing Software

    You can use Microsoft Word or any other popular application you would use for writing anything else.

    Simply type it up and then either print a copy at the end or find some way of bringing it to class (laptop, mobile phone, classroom computer, etc.)

    Use an Online Storage System

    I started using Google Drive for my lesson plans a few years ago and haven’t gone back since!

    The documents app has everything I need to type up my lessons and I know that everything is stored online which makes it easy to access.

    Think About Presentation

    Bear in mind that you should think about who will be looking at your plan. If you are working in a school or with an assistant then it is likely that others will see it.

    Make sure it is neat enough that others can understand it and maybe spend some time on the presentation and making it look pretty. 

    However, if you are a freelance teacher then presentation doesn’t matter so much. As long you can make out what’s written and can follow it easily, you can have it look however you want!

    Once you have decided on your tool to make your lesson plan, you then need to focus on what you actually will include in your plan.

    Essential Parts to Include in an ESL Lesson Plan

    Once you have the right tool for the job it’s important to focus on what you will include in your lesson plan. Some of these can be optional but pay attention to the essentials that will be marked.

    In theory, you can do these in any order you want. However, going through in the order provided here will make your life a lot easier.

    Parts of a Lesson Plan

    • Date and time
    • Class and Student Name, Number of Students
    • Lesson Aims
    • Lesson Duration
    • Lesson Activities
    • Bonus Activities
    • Resources Needed

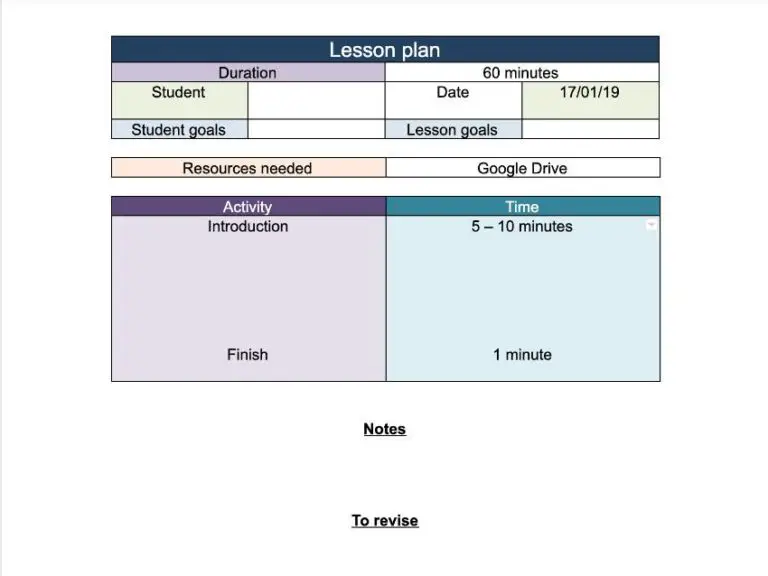
    Here’s how a simple lesson plan template could look like:

    plan

    Date and Time

    It may seem trivial but you want to make sure you have the right lesson plan for the right lesson.

    Get into the habit of including date and time to avoid confusion and turning up to class with the wrong plan!

    This is also useful when the lesson plan needs to be filed after class (e.g. in a school).

    Class and Student Name

    Again, it comes down to making sure you are matching the right plan to the right class. This also helps you visualise your learners as you are making your lesson plan.

    Number of Students

    This one isn’t important if you just teach one-to-one lessons (obviously). However, if you are teaching group classes then the number of students in your class will need to be taken into consideration when planning activities.

    Lesson Aims (Essential)

    Ask yourself:

    “What do I want my students to do at the end of this class that they couldn’t do before?”

    This is your lesson aim and is one of the most important considerations when designing a lesson plan.

    This can be seen as “What is the point of this class?”.

    For vocabulary lessons, the lesson aim may be a list of words or maybe a certain concept if teaching a grammar lesson.

    Whatever the reason is, make a note of it and always keep it in mind when you make any other decisions about the lesson plan.

    Lesson Duration (Essential)

    How long do you have to do the lesson?

    In order to effectively plan your activities in class, you need to know how much time you have to work with.

    Lesson Activities (Essential)

    Create a list of every activity you plan to do in class. This needs to be precise and include things such as warm up, free conversation, explaining homework at the end, etc.

    State how long each activity will take in minutes.

    Obviously it is unlikely you will be able to stick to this exactly, things change and you need to go with the flow. However, try to stick as closely as you can to it and you will find your life will be much easier.

    It doesn’t need to be said but, this needs to be done after your lesson aims, as they will dictate what activities will be appropriate for that class.

    Bonus Activities

    As well as planning your lesson activities, it’s a good idea to include some bonus activities that can be done in case you finish the class early.

    You don’t want to run out of planned activities halfway through a class and have to improvise a class to a room of 30 students!

    Get a couple of backup activities planned and take them to each class. A small amount of planning now will give you peace of mind in the long run.

    Resources Needed (Essential)

    Make a list of everything you need and pay attention to the details. 

    As well as noting down that you need printouts for that crossword, did you think about whether the students have pens or will you need to bring them? Do you have backups of lesson materials? A backup USB drive of the presentation etc?

    Be prepared with all of this because there’s nothing worse than having to run out of class 5 minutes in because you forgot something small!

    How to Structure an ESL Lesson

    Ok so we know all of the details needed for the lesson plan but… how do we actually structure the activities in the class?

    This is very much dependent on the type of class you are teaching and your style. As I’m teaching mostly one-to-one advanced students and my students require different things, my lesson plans vary quite a bit.

    However, for “traditional” classes (groups from beginner to intermediate level) you will likely want to follow the classic PPP model which is mentioned extensively in TEFL courses.

    What is PPP?

    PPP is an acronym for presentation, practice, and production.

    It is a popular model for teaching foreign languages and is one of the most popular teaching models used in TEFL courses.

    Let’s look at each section in more detail with 5 great ideas for each!

    Presentation

    In our first section, presentation, we show the students something. It could be:

    Ideas for Presentation

    • A short, fictional story
    • A video
    • An object (a piece of fruit, a toy, etc.)
    • A roleplayed conversation between the teacher and the assistant
    • A news story

    It could be anything, as long as it can stimulate a discussion about what you want to teach in the class. 

    For example, if I want to teach the past simple tense vs the past continuous, then I could find a story that uses both of these and highlight them.

    Practice

    In the next section practice, we give students a chance to use the new concept in a controlled environment. We could use:

    Ideas for Practice

    • Gap-fill exercises (a sentence with a word missing that a student has to fill)
    • Sentence correction (students find the mistakes in an incorrect sentence)
    • Sentence rearrange (students have to put the jumbled words of a sentence in the right order)
    • Synonym matching (students have to match a word with its synonym)
    • Word select (again, there’s a gap in a sentence but there are a selection of words to choose from)

    The idea is that students can play with the new concept but they still have the “training wheels” on.

    Production

    The final stage, production, is much freer and allows the student to use the new concept with less help. Think of exercises like: 

    Ideas for Production

    • Writing an essay (set an essay question; can be very good for homework assignments, too)
    • Free conversation (split students into pairs and have them talk freely while incorporating the new concept)
    • Asking questions (either ask the students yourself or split them into groups)
    • Roleplays (split students into pairs and give them roles to act out)
    • Information exchange (split students into pairs and have them find out certain information from the other)

    This section is usually the most challenging as the students have much less support compared to the practice stage. However, it is essential for preparing students to use these new concepts in the real world.

    Useful Tips for Lesson Planning

    It’s Better to Overplan

    When you are first starting out it is much better to over-plan everything.

    Where will the students be sat? How long will it take to hand out the exercise sheets? Will you allow time for questions?

    Start by overplanning and as you get more comfortable teaching, you can start taking out things that you don’t feel you need.

    Don’t Reinvent the Wheel

    There are plenty of pre-existing lesson plans out there just begging for you to use.

    If your school or establishment has its own then you can use those and adapt them. 

    Have a look online for any free or paid downloadable lesson plans and even share them with other teachers.

    You can keep these lesson plans as but you will likely want to tweak them to fit your class. 

    The point is, why struggle when the work is already done for you?

    Browse our section of ESL teacher resources for lesson plans, worksheets, and other printables.

    Include Lots of Student Activities

    Make sure to include plenty of activities that get the students involved. 

    It’s difficult to write a lesson where you are talking for an hour straight and still managing to keep your students hooked and learning well.

    When you include more student activities you find it’s easier to write the lesson, reduces teacher talk time and your students are more likely to learn effectively.

    Make a Template

    Once you have a lesson plan design that works, you can then use that as a template for the next lesson plan.

    This can be a big timesaver as you don’t have to make everything from scratch each time.

    Make Backups

    Make sure you have a backup in case you lose your main plan. I used to keep digital copies of my lesson plans on my mobile phone so that I could check that in case anything happened.

    Also, make sure your assistants have their own copy of the plan so they know what should be happening at each step in the class.

    Practise the Activities

    It’s especially important to practise the activities if it’s the first time doing them. As well as being able to perform the task properly in class, it allows you to see how long it will take.

    This timing is important when planning your lessons as it allows you to be more precise with organising the timing of the activities and have a smoother flowing lesson.

    Don’t Skip the Warmup

    Whether you are teaching one-to-one or a room full of students, you shouldn’t skip the warmup. This is a chance to prepare the students for the lesson and flow naturally into the topic of the day.

    Make sure to factor this into your plan. For larger classes, you may way to keep things a little more controlled and spend one or two minutes on the warmup.

    For one-to-one classes, I usually aim for around 5-10 minutes as it allows me to personalise things a little more and build rapport. 

    The important thing though is this needs to be built into the timing of the lesson plan!

    Need ideas? Read our posts on warm-up activities and icebreaker activities.

    Make Room for a Review Section

    I have found it to be vital to include review sections in class.

    A lot of language learning is a memory game, this means that not only does a student have to learn a definition of a word or grammar concept but they have to remember it too.

    If your student doesn’t revise then these things will escape the memory frighteningly quickly.

    For this reason, I always build in a review section nearer the start of the lesson to check their knowledge of what we did in the previous lesson.

    You can check pronunciation and definition of words or even a “Can you remember what we did in the last lesson?”.

    As long as you are getting the students’ brains to reactivate some memories from what has been done before then they are more likely to remember these things in the long run.

    Example Lesson Plan

    Now we’ve covered everything that you need to create effective lesson plans.

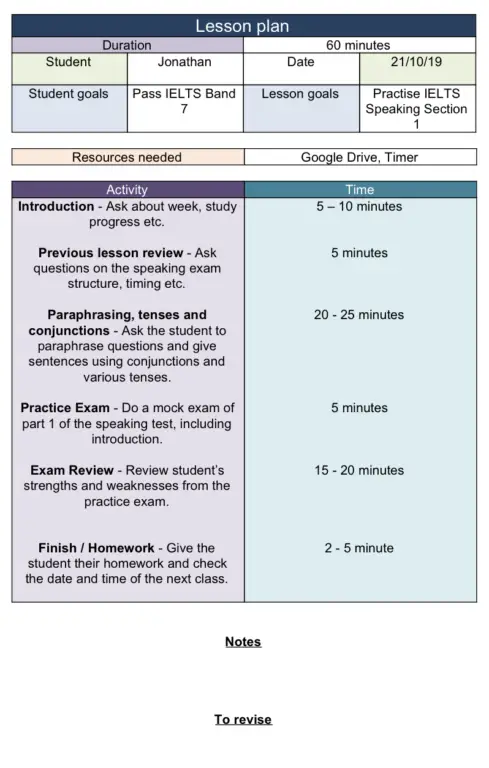
    Let’s look at an example lesson plan about IELTS Speaking Practise to give you an impression of how (simple) a lesson plan can look like!

    example-lesson-plan

    Conclusion

    There we have it, everything you need to start building your very own lesson plans from scratch.

    Remember to experiment with the different parts you need for a lesson plan.

    Once you have something that works, use that as a template for future lesson plans to make your life even easier!

  • 15 Tips to Limit Teacher Talk Time and Get Students Talking in the ESL Classroom

    15 Tips to Limit Teacher Talk Time and Get Students Talking in the ESL Classroom

    A good teacher should try to say as much as possible in a lesson to give as much information as possible… right?

    WRONG! 

    In this article we will look at why limiting teacher talk time in a class is a good thing.

    You will also find 15 essential tips on how to start limiting your own teacher talk time and create better ESL speaking lessons for your students.

    So… let’s dive in!

    How to Limit Teacher Talk Time: 15 Tips

    Why Should You Limit Teacher Talk Time?

    Just because you are the teacher it doesn’t mean you need to be in front of a blackboard talking at your students for an entire lesson.

    This can maybe work well with certain concepts like grammar or when training listening ability but for building speaking skills we need more input from the students.

    Naturally, in a conversation, there can only be one person speaking at a time. If you are speaking then the student is not and if they aren’t talking then how can they build their speaking ability?

    Limiting teacher talk time will create the void needed for students to speak. Allow yourself to step back and listen to your students. Make notes on how they can improve and then guide them the right way.

    This may be a different mindset than what you’re used to but is essential for students who want to focus on building their speaking fluency.

    And… if you are teaching online then newsflash, this will be a large proportion of your students! Get this right and they will keep coming back for more.

    The Tips to Get Your ESL Students Talking as Much as Possible

    Now you are in the right frame of mind to begin helping your students build those speaking skills.

    Let’s look at some top tips to get us speaking less and get them speaking more!

    1. Ask Open-ended Questions

    This first one is simple. Instead of asking closed-ended questions that are going to elicit… well… short answers at best, we should ask open-ended questions.

    Look at the difference between these:

    “Do you prefer chocolate or vanilla ice-cream?”

    “What would you do if you won the lottery?”

    How many possible answers could a student give for the first one? Two at most with some variation on sentence structure, right? 

    The second question, however, has so many possibilities and the type of answer will usually be a lot longer.

    Here’s a list of interesting conversation starter questions you can use to get a student talking.

    2. Use the Words Because and But

    Now, having open-ended questions is great and all but it doesn’t guarantee success.

    In our last section, we looked at answering what a student would do if they won the lottery. They could still answer with a short “I would invest it.”

    This is where our magic words because and but come in.

    Whenever a student gives you an answer that is too short, you can get a little more out of them by adding one of these words on the end.

    Again, back to our example:

    Teacher: “What would you do if you won the lottery?”

    Student: “I would invest it.”

    Teacher: “Because…”

    Student: “Because that way I would get even more money.”

    It can also take a different direction when we use but:

    Teacher: “What would you do if you won the lottery?”

    Student “I would invest it.”

    Teacher: “But…”

    Student: “But maybe not all of it because I would want to buy some clothes first.”

    3. Use the Words Tell Me and Describe

    This is where things start to open up even more. When you tell a student to tell you about something or describe something then you are likely to get a fairly lengthy answer. 

    Coupled with the fact that the teacher really doesn’t need to say that much, this is a powerful tool for levelling the student / teacher talk time balance.

    We can add on follow up “tell me / describe” questions like so:

    Teacher “Tell me about where you live.”

    Student “I live in a small house in the city.”

    Teacher “Describe the layout of your house.”

    Student “It has three bedrooms, a bathroom and a kitchen… etc.”

    4. Have the Students Ask You Questions

    It’s very easy for things to sound like an interview when students follow your lead and only answer your questions.

    Try mixing things up by getting them to ask you questions and engage more of their speaking side than just answering things.

    Make sure your answers aren’t too long though. Remember that the shorter your answer, the more questions your student will have to think up to keep a conversation going.

    I like to use this at the beginning of a class when doing some warm-up chitchat. I spend 5 minutes or so asking about my student’s week and then tell them to ask about mine.

    5. Step Into a Supervisory Role

    Consider your role in the classroom. In order to get the teacher talk time down, you will need to switch into a supervisor role. 

    In this position, the students will have been set a task (roleplay, interview each other, free talk, etc.) and your job is to simply make sure they are doing the right thing and only step in when necessary to make occasional corrections. 

    Finding the right balance for how often you should intervene is a skill you will develop with time.

    You want to give your students enough space to be able to work things out but at the same time, you need to correct any major errors. 

    You will also need to check that they aren’t doing things such as speaking in their mother language or simply staying silent and not trying!

    6. Have the Students Read the Lesson Explanations

    I like to do this in my grammar lessons. Instead of reading everything out to a student and having them nod along, I like to get them to read it.

    Not only are they learning grammar but we are getting them to read these things themselves which allows us to check their pronunciation at the same time, very effective!

    Bear in mind that reading aloud tends to lower comprehension ability. For this reason, you may want to take over explaining when you get to really tough parts.

    Alternatively, you can tell your students that they can read it again in their head if they struggled to understand something when speaking out loud.

    7. Be Encouraging!

    Speaking English can be very intimidating for some students.

    They might not be naturally confident speakers in their own language, let alone in a language they don’t feel confident in!

    The biggest worry is likely to be making mistakes.

    Some students want their work to be perfect and the thought of making a mistake means that they will think it’s better to say fewer things well than risk saying more and messing everything up.

    You need to explain from the beginning that this is the best environment for them to make mistakes.

    It’s better to make those mistakes now where an English Teacher can correct them than later down the line in a more critical situation.

    8. Be Strict With Bullies

    Coming back to groups, this can be worse as not only are students thinking about what their teacher thinks but also their peers.

    Again, make it clear to your students that making mistakes is fine but making fun of others will not be tolerated.

    This is vital as if your quiet students get picked on for their mistakes by others then they are going to be even less likely to want to speak up.

    Be strict with any bullies from the beginning!

    Learn how to set classroom expectations effectively in this post.

    9. Use a Ratio of 3:1 for Talk Time

    This is the ratio of student to teacher talk time that you can aim to keep to for a specific exercise.

    Tell your students that for every sentence you speak, they must speak for three sentences when replying (3:1). 

    If your student replies with less than this ratio, simply wait…

    It may feel awkward at first but your students will soon get the hang of it and realise that they have to fill that gap. Which leads on to another important tip…

    10. Enjoy the Silence in Conversations

    In order to get some students talking, you will need to create some gaps in the conversation and this can feel awkward at first, very, very awkward.

    You may be used to having to fill this gap with more speaking but you will have to turn that mindset off.

    For a conversation to work you will obviously need to say some things, ask questions, etc.

    But if a student gives an answer that is too short, if they try to quickly pass the “talking baton” back almost immediately then you will need some pauses in there.

    Nobody likes this awkward feeling of “somebody should be talking” and sooner or later your student will say at least a little something else to keep the conversation going. 

    In order to get to this point though you will need to desensitise yourself from that awkward feeling and try to become comfortable with it so that only the student feels slightly awkward.

    We need to shift the thinking from “nobody is talking so the teacher is making things awkward” to “nobody is talking so the student is making things awkward”.

    11. Split the Class Into Smaller Groups

    Obviously, in order to practise speaking in a group class, you will need to split everyone into smaller groups. 

    Now, you could split people into groups of 4-5 students and have them speak that way. If you do this then you’ve reduced teacher talk time but we are still left with students waiting for their turn to speak.

    However, if you split your class into pairs then this increases the student talk time even more.

    Something to consider the next time you do group work in class!

    12. Have the Students Teach the Teacher

    This is something I’ve started doing recently and am enjoying good results with it.

    When going through your lesson, check your student’s comprehension of a word, phrase or concept by getting them to explain it to you (as if you didn’t know).

    This can be quite difficult for them as they may only have a rough grasp of what it is anyway.

    That being said, if they can power through and find a way to explain it to you then not only will they have boosted their speaking ability (explaining difficult things) but you should also find that their concept of that thing will have deepened as a result.

    As the Roman philosopher Seneca said: “While we teach, we learn”

    13. Have the Students Teach the Class

    Similarly, you can have students explain things to other students. I’ve been using this to wonderful effect in my group classes.

    Conduct your class, as usual, let’s say you are doing some reading practise. Your student comes across an interesting word that you want to check their comprehension of.

    Simply ask them if they know what that word means. If they know it, then great, they can explain it to you (as mentioned in the point above).

    If they don’t know it then don’t just give them the answer, open it up to the rest of the class…

    “Does anybody else know this word?”

    Now you are not only enlightening student A on the definition of a word but student B is building their ability to explain things (and strengthening their understanding of the word in the process).

    Is there such a thing as killing three birds with one stone?

    14. Get Out the Timer

    This is something that would work better in a one-to-one class but could see some benefit in a group class.

    Bring out a timer so it is in sight of both you and the student.

    You will then ask questions and the student will need to talk for a set amount of time. You will only begin speaking again once the time is up, which forces the student to keep going even if they get stuck.

    This is great as it gives you a measurable target you can use to increase speaking stamina.

    Start with a short time such as thirty seconds and over time bring the time up until it’s up to several minutes.

    As well as being great for general speaking practice, this is a great tool for anyone studying the IELTS where examinees are expected to speak for up to several minutes without any aid from the other person.

    15. Always Have Backup Conversation Activities Prepared

    You will inevitably finish a lesson earlier than expected at some point and need to find some way to fill the time.

    Have some simple conversation activities prepared, for example:

    • Split the students into pairs and get them to find out 5 things about the other person.
    • Split the students into pairs and have them find out about the other’s day.
    • Split the students into pairs and have them plan an ideal holiday.

    Add some more to your list, and you will have your own, great “get out of jail free” cards!

    Check our section of ESL teacher resources for more speaking activities.

    Conclusion

    Again, one of the biggest things you can do is become comfortable with the idea of not having to speak all of the time.

    Once you create that space then you will start to see it filled with your students’ words instead and that’s where their speaking ability really grows!

    Experiment with these tips, don’t be afraid to mix and match or even try some of your own ideas out!

  • The Definitive Guide on Teaching English Pronunciation (PDF)

    The Definitive Guide on Teaching English Pronunciation (PDF)

    How often do your students say they struggle with pronunciation… It’s a lot, right?

    English can be really tough in this area and mastering how to teach it will really step up your game as a teacher.

    By the end of this article, you will know the pronunciation fundamentals that every teacher needs to know.

    You will learn effective activities and be given the resources needed to get the most from your student’s pronunciation. 

    So, without further ado, let’s get started!

    Objectives of Teaching Pronunciation

    When focussing on pronunciation it’s important that we focus on that… pronunciation. 

    This is different from accent reduction where the aim is to sound “like a native”. This goal can take many many years as well as a very high level of immersion.

    The point of pronunciation is that we understand which word the speaker is trying to say.

    We do this by focusing on things such as word stress, vowel sounds and consonant sounds.

    As mentioned, English is tough because although there are some rules, they tend to get broken so often. Added to that, there are plenty of words that sound different to how they are written and it’s a recipe for confusion!

    Incorrect pronunciation can lead to mild discomfort at best, and at worse, we could have some incredibly dangerous mistakes.

    E.g. A Dr that tells a Nurse to give a patient eighty milligrams of a drug instead of eighteen (because they missed out the n sound at the end!)

    International Phonetic Alphabet

    One invaluable tool that you will want to familiarise yourself with (if you haven’t already) is the International Phonetic Alphabet (IPA).

    This is a method of spelling words based on how the word sounds as opposed to how it is represented in a language.

    For example, cough is spelled /kɒf/. Here it is very easy to see that the final consonant sound is an /f/ and not some kind of g.

    Let’s look at other ways gh is used:

    • Ghost = /ɡəʊst/
    • Through = /θruː/ (silent)
    • Laugh = /lɑːf/
    • Bighead = /ˈbɪɡ.hed/
    • Hiccough = /ˈhɪkʌp/

    If you can introduce this to your students and show them how to find the phonetic spelling of words on a website like the Cambridge Dictionary then it’s similar to teaching them how to fish (rather than simply handing the fish over).

    How to Teach Word and Sentence Stress

    Teaching stress can be difficult depending on your student’s mother language. 

    For a student whose mother language is Russian, it can be fairly simple to explain which syllable the stress should fall on in a particular word. This is because Russian uses variable stress; this is similar to English where the stressed syllable can change in a non-predictable way.

    For students from languages such as Polish or Finnish where the stress is on a fixed syllable each time, you will need to explain the difference first.

    Then there are languages such as Mandarin or Thai where you will need to explain the concept of stress from the beginning as they more or less lack lexical stress altogether.

    Word Stress (Lexical Stress)

    For most intermediate and advanced students you will simply need to pronounce a chosen word with the correct stress and then have your students memorise it.

    Make sure to test these on a regular basis or have your students use some form of memory aid such as ANKI.

    ANKI

    ANKI is a free piece of software that is incredibly efficient at helping someone memorise large amounts of information. Very useful in language learning!

    It would be a good idea to look at some constants, such as how compound nouns will have the stress on the first syllable of the first word most of the time.

    You can also use the IPA spelling which gives the stress of a word with an apostrophe, useful for your students to check while doing self-study.

    For beginner students, you will need to explain things from the beginning.

    Pick a couple of words that have the stress on different syllables, say them out loud and ask your student if they can hear the difference.

    This works better if it’s a verb / noun pair.

    Examples: Verb-Noun-Pairs to Practise Word Stress

    to increase (verb) /ɪnˈkriːs/ — Increase (noun) /ˈɪn.kriːs/

    to record (verb) = /rɪˈkɔːd/ — Record (noun) = /ˈrek.ɔːd/

    to permit (verb) = /pəˈmɪt/ — Permit (noun) = /ˈpɜː.mɪt/

    to accent (verb) = /əkˈsent/ — Accent (noun) = /ˈæk.sənt/

    to digest (verb) = /daɪˈdʒest/ — Digest (noun) = /ˈdaɪ.dʒest/

    to overlap (verb) = /ˌəʊ.vəˈlæp/ — Overlap (noun) = /ˈəʊ.və.læp/

    They should be listening for a slight raise in pitch as well as raise in volume on the stressed syllables. Once they can hear it, get them to repeat what you are saying.

    Sentence Stress (Prosodic Stress)

    Although word stress is arguably the more important of these two to get right, eventually your more advanced students will benefit from learning about sentence stress.

    A great way to do this is to take a sentence that has plenty of variations of meaning depending on where the stress falls.

    Example: Sentence Stress Excercise

    Jim stole the chocolate cookie. = It was Jim who stole the cookie (not someone else).

    Jim stole the chocolate cookie. = It was theft that was done (not something else).

    Jim stole the chocolate cookie. = It was a chocolate cookie that was stolen (not another flavour).

    Jim stole the chocolate cookie. = It was a cookie that was stolen (not another chocolate flavoured thing).

    After using some examples you can ask your students to give you a sentence that has a particular meaning.

    E.g. Who was it that stole the cookie? Which cookie was stolen? etc.

    How to Teach Vowels

    When teaching vowels it’s important to consider your student’s mother language. 

    A lot of European languages have the same words with similar spelling. However, vowel sounds can shift in English. 

    A common example is the word chocolate. In many European countries, this word has a more pronounced ‘a’ vowel sound, this will often sound like the ‘a’ in late. However, in English, this is pronounced as a schwa: /ˈtʃɒk.lət/. 

    A schwa

    …is the unstressed vowel sound found in words such as the, about and pencil.

    This will not be the first time you will have to tell your students that a vowel is pronounced as a schwa instead of the vowel they are used to pronouncing in their own language.

    We can split our vowels into two groups: monophthongs and diphthongs. Let’s take a look at the differences and how to teach them.

    Monophthongs

    Monophthongs are the simple vowel sounds that you might find in words such as cat, boom and tree. 

    You will know when you are producing a monophthong as the shape of the mouth will stay the same.

    Have a look at your mouth as you produce the vowel sound in the words not (monophthong) and no (diphthong). In the vowel sound of not, your lips will stay in the same place. However, when you produce the vowel sound in no, you will find that the opening of the lips reduces.

    Get your students to do the same so that they can see and hear the difference.

    It would be handy to have a list of words that cover all of the monophthongs used in English. This way you can quickly test that your student can make all of the sounds.

    After this, you will need to do reading practise so that your students can associate those sounds with words when they read by themselves.

    Diphthongs

    Diphthongs are often known as gliding vowels. To make these sounds we take two monophthongs and then move between them to get our final sound.

    Examples are the vowels in words such as buy, lay, bow.

    Although many languages utilize diphthongs, they are non-existent in languages such as Japanese.

    For this reason, your students may struggle when introducing these sounds as they will naturally hear them as two different vowels and may give them too much separation.

    To break this habit you can have the student pronounce each monophthong separately and then gradually reduce the gap between them until you have a fast, smooth glide.

    How to Teach Consonants

    When looking at consonants it is common practise to separate these into two groups: voiceless and voiced sounds. Let’s look at the difference.

    Voiceless Sounds

    Voiceless consonants are sounds that nearly exclusively use just the teeth, tongue and lips to make the sound.

    These usually sound “harsher” and include:

    Voiceless Consonants

    • /k/
    • /f/
    • /p/
    • /s/
    • /t/
    • /ʃ/(sh)
    • /tʃ/(ch)
    • /θ/ (th)

    Most students shouldn’t have any problems reproducing these sounds. That being said, if the sounds they are producing seem too soft then you can ask them to really force the air out. Start by exaggerating and producing an overly forced sound and then soften it until it sounds natural.

    Voiced Sounds

    Voiced consonants are a lot softer in comparison. They still utilise the teeth, tongue and lips but the difference is that they bring the voicebox into play.

    You can check if you are making a voiced sound by placing your fingers on your voice cords. If you feel them vibrate quite a bit then it is likely a voice sound.

    Voiced consonants in English include:

    Voiced Consonants

    • /b/
    • /d/
    • /g/
    • /dʒ/ (j)
    • /m/
    • /n/
    • /v/
    • /w/
    • /j/ (y)
    • /z/

    Voiced and Voiceless Pairs

    Once you have established the difference between voiced and voiceless sounds you can introduce voiced and voiceless pairs. 

    Some voiced and voiceless sounds go together. They have the same teeth, tongue and lip movements. The only difference is that one doesn’t use the voicebox and has a more forceful sound.

    An example of this is /d/ and /t/. Get your students to say both of these sounds and notice the difference between them. When producing these it is important that there is enough of a difference so that the listener can differentiate them. 

    You can demonstrate this importance by using a phrase such as “He is Ted.” vs “He is dead.”

    As you can see, this slight change in consonant sound produces a very drastic difference in sentence!

    You can then give a list of other example pairs: 

    Examples: Voiced/Voiceless Pairs

    “My car has a dent.” vs “My car has a tent.”

    “I sent her a card.” vs “I sent her a guard.”

    “I need a pill.” vs “I need a bill.”

    “This is a gold chain.” vs “This is a gold Jane.”

    “I will visit the zoo.” vs “I will visit the Sue.”

    Activities

    After teaching the basics of pronunciation you will need ways to drill this information to memory.

    Remember that your students will often be unlearning habits from their native tongue which are ingrained in their minds as well as their muscles.

    This can take time so always reassure them when they make mistakes that it doesn’t need to be rushed.

    You find a selection of activties here – and even more in our dedicated list of ESL pronunciation activities.

    Tongue Twisters

    Advantage: Very targeted practice for specific sounds

    Disadvantage: Sentences are less natural and not likely to be encountered in English

    Tongue Twisters are one of my favourite ways to drill pronunciation.

    You can take a very specific sound or pair of sounds (e.g R/L for Japanese students or V/W for students of Slavic languages). You then get your students to read through the sentences slowly and each time they read, try it a little faster.

    Examples: Tongue Twisters

    “She sells seashells by the seashore.”

    “Red lorry, yellow lorry, loud lorry, run!”

    “Peter Piper picked a peck of pickled peppers.”

    “Veronica went away to view a vase”

    “They thought the thistles touched their tongues though.”

    These will be difficult at first because there are so many tricky sounds but the idea is doing focussed difficult practice like this will make everything else seem easier. Similar to how lifting heavy weights in a gym makes everything else feel lighter after.

    Word Lists

    Advantage: Can be used for very common words with a particular sound

    Disadvantage: Can get boring quickly

    Word lists are much simpler in nature. We now just have a list of words that have the target sound in them.

    These are great for examples and are essential in associating certain sounds with certain spellings.

    That being said, reading a list of words can get a little boring quickly. For that reason maybe pick 10 or so, spend a few minutes on practising the pronunciation and then move on.

    Reading

    Advantage: Can test a wide range of sounds

    Disadvantage: The sounds are so varied so it’s not great for practicing a specific sound

    Now, this is a much more natural activity. Find a piece of text from the news, a story or wherever you want.

    Have your student read out loud and just make a note of any words that aren’t quite right. After a few paragraphs, check these words with your students. 

    Sometimes a student doesn’t know the correct pronunciation of a word and sometimes they just made a one-off mistake.

    For this reason I like to ask them to read that word again without saying the pronunciation myself to see whether we need to spend time memorising it later.

    Movie Mimicking

    Advantage: Great for practising with a reference

    Disadvantage: Less mentally engaging

    Take a movie clip (youtube is a great source for this) and play a sentence and then have your student copy along.

    This is called mimicking and is great at achieving correct pronunciation and can also be used for accent reduction.

    This one can work well in class for short periods of time but I prefer to set this type of activity for homework when the student can do it in their own time.

    Flashcards

    Advantage: Incredibly efficient

    Disadvantage: Takes a bit of time to set up

    This is a very powerful way of memorising pronunciation (a must in English where the words can be spelt so differently from how they sound.)

    We will use ANKI for this. First, help your student to set up ANKI and create their first cards.

    On side A: Write the target word (e.g. challenge)

    On side B: You can either spell the word phonetically, get a recording of the word and attach it to the card or both! (e.g. /ˈtʃæl.ɪndʒ/)

    Now, your student will have a reminder to revise these words as well as the reference for each one. For each review, they will be shown either side A or B and will have to recall what the other side is.

    I recommend helping them set up ANKI in class and then sending them the reference files etc as homework.

    Go this way if you need activities to teach English grammar, too.

    Resources

    When teaching pronunciation you are going to need text… a lot of text!

    This section will give you the places to find articles, stories etc to practise with your students.

    I’ve also curated a list of the best books to help develop your pronunciation teaching skills and get the very best out of your students.

    News Websites

    BBC News

    As mentioned already, BBC news is a great resource.

    It is continually being updated with new stories, it is well written and uses a wide range of vocabulary that is ideal for testing all sounds that are pronounced in British English.

    Wired Magazine

    I like Wired magazine as it is more specific to technology.

    This is great if you have a student that has a passion for this area or works in this industry. It allows you to test their pronunciation on niche words that they will often use, very useful!

    News in Easy English

    News in Easy English is my go-to website when I need to check the pronunciation of a beginner student.

    Most of the language used is fairly simple and is a great way to get the foundations locked down.

    Books

    How to Teach Pronunciation

    This is essential reading for teaching pronunciation. [amazon link=”0582429757″ title=”How to Teach Pronunciation”] covers the basics (such as vowels and consonants) all the way to more advanced topics such as intonation and connected speech. 

    It also includes sample lessons to give you immediate ideas on how to start applying these concepts in your lessons.

    Cambridge English Pronouncing Dictionary

    Exactly as it sounds, the [amazon link=”0521765757″ title=”Cambridge English Pronouncing Dictionary”] contains over 230,000 words and gives the IPA spelling for each. Extremely useful if you are learning how to read and write using the IPA and if you need to check the pronunciation of a word without access to the internet. 

    As well as the pronunciation list, it contains essays, notes and a glossary explaining various aspects of pronunciation.

    Pronunciation Contrasts in English

    [amazon link=”1577666410″ title=”Pronunciation Contrasts in English”] is a great book for highlighting the differences between certain sounds.

    The authors have brought together the experience of 50 ESL teachers as well as their own experience in teaching and present clear concepts and patterns to help teach non-native students. 

    This is the ideal choice for teaching minimal pairs and other such similar sounds.

    Summary

    So you should now have a much clearer idea of how to teach English pronunciation to your students.

    Remember that you will find a lot of students who choose to self-study and are happy building their grammar and reading skills alone.

    However, pronunciation is one of the areas that has been the most in-demand with my students.

    Being able to provide feedback and explain pronunciation concepts in a concise and easy to understand way has kept my students coming back for more.

    Get this right and you will find the same happening for your lessons!

    Browse the full archive of ESL teaching resources.

  • 33 Sure-Fire Strategies & Activities for Teaching English Grammar

    33 Sure-Fire Strategies & Activities for Teaching English Grammar

    Grammar… how do we teach it?

    Is it just reciting monotonously from a textbook and hoping that the students are on board?

    Can we make it more interactive and dare I say, even fun?

    Read on and find out yourself!

    Whether you’re new to teaching English (ESL) or are just looking for new ways to keep things fresh in the classroom, there is something in this guide about teaching grammar for everyone.

    After using some of these 33 strategies and activities, don’t be surprised if you’re soon being harassed by other teachers who want to know your secrets!

    Why Inspiring Grammar Lessons Are So Important

    Grammar in any language is important, that’s a fact and English grammar is no exception. Learning grammar can be no easy task and teaching it can be even harder!

    There are a number of reasons that can make teaching grammar a difficult task, including fossilized errors, irregularity of verbs, plurals, etc and vast differences between English and the student’s mother tongue.

    Another issue can come from the mindset of the students. If they have experienced dry, boring grammar lessons in the past then they will likely expect the same this time around.

    It is important for you to break the mold and allow your great grammar lessons to captivate and inspire your ESL students to get the best results from them.

    So… How do we do this?

    7 Sure-Fire Strategies and Survival Tips for Your Grammar Lessons

    Let’s have a look at some “survival tips” to help you and your students navigate the jungle that is English grammar.

    1. Teaching Grammar in Context

    One method of teaching which has had a lot of success is teaching grammar in context.

    This makes sense as we created “grammar rules” as a way to make sense of the patterns that we use in the language. They are not arbitrary systems imagined out of thin air.

    For this reason, it makes sense to see how these rules apply in the language.

    Use different example sentences so that students can see how we can use these rules. It’s important to show why these are useful and why someone would want to use these.

    It’s all well and good teaching a student the intricacies of the past perfect tense but if it hasn’t clicked in the student’s mind why they would want to use such a device then it most likely won’t get used in their active language skills.

    2. Teaching Grammar Rules Inductively

    Inductive teaching is a very useful tool when it comes to teaching grammar. Let’s have a look at how it works.

    We start with specific examples, such as sentences that all use a particular grammar point. The students then use these examples to come to their own conclusions about what the rule is.

    This is in contrast with deductive teaching, which starts by teaching the rule/s first and then looking at examples afterward.

    This teaching style is great as it starts with a real-world example that already gives the grammar device relevance. It then forces students to engage cognitively instead of passively taking in a presentation which they may or may not be on board with.

    The idea is that a student who engages in this way is more likely to understand and retain a particular point.

    That being said, while this method can be very successful with some aspects of grammar which are generally straightforward (such as adjectives), there are some areas of grammar (such as articles) where it may not be as effective due to the large number of rules and irregularities that can occur.

    3. Grammar Placement Testing

    One thing that needs to be known before we start teaching grammar is what the students actually know.

    For a class learning English as a foreign language from the very beginning, this is a lot simpler. We can somewhat assume the students are a blank slate and we just need to stick to the syllabus.

    Maybe some have had some prior outside tuition and have covered certain areas, these students can be assigned harder tasks to avoid boredom but the vast majority will be at the same level.

    If we are teaching one-to-one classes though, our job becomes a little more tricky. Not everyone learns grammar in a fixed order so the things a student knows can be a bit “random”.

    Even if they showed you a syllabus of what they have covered, there may be some areas that require doubling back on if they have forgotten or didn’t understand properly in the first place.

    How do we know which topics these are?

    This is where placement testing becomes extremely useful. The student is given a test designed to test them on a variety of different grammar points. From this, the teacher is able to see where the student’s weaknesses are and use that to form a plan of what needs to be studied.

    You’ll can take the online English placement test by Macmillan here.

    4. Teaching Grammar Through Writing

    Writing is fundamental for teaching grammar. When explaining structure you and your students need to see what is happening in order to make sense of it.

    The nice thing about practicing writing (compared to speaking) is that it gives the students time to think and work things out. You can plan worksheets beforehand to work through and these can also be used to set homework.

    Browse our archive of grammar worksheets here on JIMMYESL.

    5. Teaching Grammar in the Conversation

    There is something to using grammar by using conversation too.

    It may be worth doing this after the student has had a chance to practise with writing first to boost their confidence.

    A good idea is to have a free conversation session at the end of the lesson where you can use the new grammar concept. This is more likely to have the concept “stick” when the student speaks in the language in the future.

    Need ideas for conversational lessons? Here are 7 easy ESL speaking activities and a huge list of ESL conversation starters and questions.

    6. Teaching Grammar to Kids vs. Adults

    Teaching children and teaching adults can be two very different things!

    Let’s look at some of the differences.

    When teaching children, a big challenge is engagement. Expecting a class of 6-year-olds to sit still for an hour and watch you explain grammar points on a board is not realistic.

    Doing activities that get them physically involved (games), mixing up activities often and using examples with things like pictures will help draw them into the subject.

    Also, it’s a good idea not to drop too much on them at once. Maybe introduce the present simple tense into a class on verbs, instead of bombarding them on all of the simple tenses and their rules for a whole class.

    Teaching adults with regards to grammar can sometimes be easier. Adults tend to have a little more patience and are usually ok taking their time to focus on each point without needing a new activity every few minutes or a game to liven things up.

    That being said, some variety is still needed to keep them interested but there is less pressure in this area than with children.

    Adult beginners will usually go along with the tasks set and will only really ask things if they don’t understand something.

    Be aware though that the more advanced students can ask you a lot of background questions about a particular topic especially if they are very interested — e.g “why would we use the past perfect continuous instead of the past simple?” — so it’s a good idea to make sure you are prepared!

    7. Tackling Common Grammar Mistakes

    It’s important to tackle common mistakes early before they become fossilized, otherwise, it can be an uphill battle!

    Here are some of the common grammar mistakes you should watch out for with your students:

    • Adding “s” to noncount nouns
    • Missing articles
    • Improper placement of adverbs
    • Subject / verb agreement

    If you are teaching a particular grammar point then it is important to stop a student and correct them immediately if they make a mistake related to that grammar point.

    I’ve seen students self-correct after just a few of these interruptions so it doesn’t take long!

    To reinforce these points you can set homework (such as essay questions) that are designed to get the student to use the taught grammar.

    13 Great Games and Activities to Teach Grammar Rules

    Having a list of fun games and activities for your class is a necessity.

    Not only will you have great material for your lesson plans but you will also feel confident knowing you have something to fall back on if things don’t go according to plan or if you start losing the students’ attention.

    1. (Reverse) Taboo

    Subject: Adjectives

    A student has to get either the teacher or other students to guess a particular word by only using adjectives to describe what it is.

    Example:

    A ball – “round, bouncy”

    2. Sentence Expansion

    Subject: Adverbs

    Write a simple sentence. Then get the student to insert an adverb.  

    Example:

    “He eats sandwiches.” – “He eats sandwiches noisily.”

    3. Article Drop

    Subject: Articles

    Take a section of a text and remove all of the articles from it. The students have to put the articles back in where they think they should go.

    For a more competitive element, you could split the class into two teams who have to work together to complete the task first.

    Example:

    “[…] man went to […] shop and bought […] ice cream.”

    4. I want…

    Subject: Determiners

    Split the students into groups and get them to ask the other group for things like “that pen” or “those sweets” etc.

    Example:

    “Have you seen that boy over there?”

    “Do you like this pair of jeans?”

    5. He/she said…

    Subject: Direct and Indirect Speech

    Pair students up. Have student 1 say a sentence. Get student 2 to tell us what student 1 said. Carry on from student to student.

    If you are teaching one to one lessons then you could always use a scene from a movie and get the student to tell you what the actors said.

    Example:

    Student 1 “Yesterday I went to school.”

    Student 2 “Student 1 said he went to school yesterday.” – “I want an apple.”

    Student 3 “Student 2 said she wants an apple.” – “I like cats.”

    6. Fact Finder

    Subject: Gerunds or Present Participle

    Pair students up and get them to find out five facts about the other. These facts must be made up of at least one gerund or present participle.

    Example:

    “Jane likes snowboarding”

    “Ben is studying English”

    7. I Spy With My Little Eye

    Subject: Nouns

    A classic for beginners. Use the phrase “I spy with my little eye, something beginning with…” followed by the first letter of a noun that is in the room. The other students have to guess what the word is.

    Example:

    Student 1 “I spy with my little eye something beginning with ‘a’.”

    Student 2 “Is it an axe?”

    Student 1 “No.”

    Student 3 “Is it an apple?”

    Student 1 “Yes!”

    8. Voice Switch

    Subject: Active and Passive Voice

    Ask the students to convert a sentence from an active voice to the passive voice and vice versa.

    Example:

    “The man ate the cookie.” -> “The cookie was eaten by the man.”

    9. Whose Is It?

    Subject: Possessives

    Give an object (e.g. a ball) to a student and ask the others whose it is (“his”, “Jim’s”, etc).

    Repeat this a few times and then move on to splitting the class into groups so that this time it is now “theirs” / “ours” etc.

    Example:

    “Whose is this?”

    “It is Jane’s”

    “Good, and whose is this?”

    “It is mine.”

    10. Guess Who

    Subject: Relative Clauses

    You can use the classic game “guess who”. The rules are the same as the original. Each person has a collection of faces in front of them, they also have a card with one particular face on. They then each take it in turns to ask questions and find out which card the other player has.

    The difference with this game is that we have to use a relative clause in our questions.

    Example:

    The students have a selection of faces in front of them.

    They have to find out the chosen face by asking questions:

    “Do they wear glasses?” – “Is it someone who wears glasses?”

    11. Interview

    Subject: to-Infinitives

    Pair the students up and one can be the interviewer while the other can be the interviewee. The aim is to find out what the person being interviewed “likes to do”.

    After they have a few answers, students swap roles. This is designed to test “to-infinitives” so make sure the students use the “to verb” format in their answers.

    Example:

    “What do you like to do?”

    “I like to ski.”

    12. Delegation

    Subject: Causative Verbs

    Split the students into groups of three: the boss, the boss’s assistant, and the worker. The boss needs to get the assistant to ask the worker to do a task.

    Example:

    Boss: “Have Student C stack the documents.”

    Assistant: “Stack the documents.”

    Worker: “Ok.”

    Rotate this so everybody gets a turn.

    You can also have the students use “get” after a few repetitions. (Make sure to explain that “get” is more casual.)

    13. Simon Says

    Subject: Verbs and Verb Tenses

    This is a great one for getting the attention of younger learners when teaching verbs. Say the sentences “Simon says…” and then add a phrase after it such as “jump up”. The students then have to do what you say.

    Example:

    “Simon says ‘stand up’”

    *Class stands up

    “Simon says ‘sit down’”

    *Class sits down

    How to Teach Specific Grammar Areas

    Now that we have gone over an overview of grammar overall, it’s time to look at the methods of delivery for each specific area.

    It goes without saying that you need to be comfortable with whatever topic you are delivering so that you are prepared in case you get any of those “curveball questions”. These sections will look at the teaching of each topic. For the background information, there is a more in-depth resource list at the end of the article.

    1. Adjectives

    What are adjectives?: Describing words for nouns.

    “The tall building.” / “The ball is red.” / “That car is expensive.”

    Adjectives are quite straightforward. Most languages will have an equivalent so it is quite an easy concept to grasp. Getting the student/s to use the adjectives will prove very useful and will help them “stick” a bit better when they can be visualized.

    More info on adjectives.

    2. Adverbs

    What are adverbs?: Describing words for verbs, adjectives and other adverbs.

    “He suddenly woke up.” / “The car is very small.” / “She sings really well.”

    Now adverbs get a little trickier. Students often struggle with getting the order of words right with adverbs. A good idea is to split the adverbs up into groups (degree, time, manner, etc) and teach each group individually before moving on to the next.

    Seeing these adverbs used in context will be very useful and getting the students to identify which type of adverb is being used in a sentence will also help get them to think about their own word order.

    More info on adverbs.

    3. Articles

    What are articles?: They tell us if a noun is specific or general.

    “I have a car.” / “Do you want an apple?” / “I will take the day off work.”

    Articles are a simple concept to begin with. Most students who have spent any time with the language knows that we have to use them but they do get a fair amount of misuse. More exposure to the language and seeing lots of example sentences help to see how they are used.

    More info on articles.

    4. Determiners

    What are determiners?: Pointing words.

    “I want that one.” / “Do you want these?” / “No, I want those ones.”

    These are some of the first things a student will learn on their English journey. As it is likely to be children you are teaching, it may help to be a little more interactive and use props to help engage them in the lesson.

    More info on determiners.

    5. Direct and Indirect Speech

    What is direct and indirect speech?: Quoting speech

    “He said ‘hello’.” / “She said she would text me.” / I said that yesterday.”

    This is a great area to get your students interacting with each other and testing their listening skills at the same time.

    More info on direct and indirect speech.

    6. Gerunds and Present Participle (ing-form)

    What are gerunds and the present participle?: Making nouns from verbs

    “He is running down the street.” / “I am working in a school.” / “I like playing football.”

    These are good to teach at the same time. As they both have the same ending it is easy for students to get the two confused.

    This is where inductive teaching can play a valuable part.

    Put two sentences on the board, one of these sentences uses a gerund and the other has a sentence in the continuous tense.

    First, ask students if they can spot the difference. If they can’t guess it then start asking questions such as “where is the verb in this sentence?” or “where is the noun?”.

    Once you’ve drawn their attention to that and explained the difference then they should be able to guess any more examples you send their way.

    More info on gerunds and present participles.

    7. Nouns

    What are nouns?: Names / objects.

    “This is a ball.” / “Hello, my name is Tim.” / “There is a lot of information here.”

    It’s very easy to explain these to beginners and nouns are some of the first words that students learn. In English there are certain rules that have to be obeyed though such as:

    • Capitalization
    • Singular / plural nouns
    • Count vs Non-count

    We can also open things up by talking about topics such as compound nouns, collective nouns as well as abstract nouns.

    More info on nouns.

    8. Passive Voice

    What is the passive voice?: When something is done to the subject.

    “The cookie was eaten.” / “The signature was forged.” / “The person was murdered.”

    The passive voice is extremely useful when teaching students who are studying for things such as IELTS (that requires a high level of academic writing). It is worth setting these students essay questions for homework on a regularly basis and getting them to use the passive voice in their answers.

    More info on the passive voice.

    9. Possessive

    What are possessives?: Belonging words.

    “That is my car.”/ “This is yours.” / “The summer of love.”

    For beginners we can use flashcards or the students themselves to demonstrate the possessive form and it shouldn’t take too long to grasp. The difficulty usually comes in when trying to decide where the apostrophes go in things like singular and plural nouns. For this reason it’s a good idea to teach these around the same time as singular vs plural.

    More info on possessives.

    10. Relative Clauses

    What are relative clauses?: A clause that adds additional information to a sentence.

    “I went to the place where I was born.” / “I bought a dress that looks really nice.” / “This is that person who I told you about.”

    Relative clauses can be a messy area. It’s a good idea to take things slowly and lay the groundwork. First look at sentence structure, look at the differences between phrases, clauses and sentences. Once you have this locked down then you can build that and introduce relative clauses.

    As you get into more technical aspects of grammar like this it is a good idea to get the students to make their own sentences using the construct. With simpler aspects of grammar it’s very easy for them to see the value in a certain point and find the motivation to use it.

    When things get more difficult though they will need an extra push in seeing why it has use and why they should use a more difficult sentence structure (compared to using two separate simple sentences.)

    More info on relative clauses.

    11. The To-Infinitive

    What are to-infinitives?: Verbs that can be used as nouns or paired with other verbs.

    “I want to go.” / “He needs to do his homework.” / “She has to buy a ticket.”

    When tackling the topic of to-infinitives it is most likely a good idea to bring gerunds into the mix as they can sometimes act in similar ways. Start by introducing two sentences, one using a to-infinitive and one using a gerund:

    • I like skiing.
    • I like to ski.

    Once they have seen that you can use both in similar ways then the next obvious question is “why should we use one or the other?”. At this point you can introduce sentences where one is a preferable choice:

    • I want to play football.
    • I want playing football.

    You can explain the situations where gerunds are prefered and situations where to-infinitives are preferred. After that you can get them to correct mistakes, choose between a gerund or to-infinitive and then finally give them scenarios where they get a chance to form their own sentences with either type of verb.

    More info on to-infinitives.

    12. Causative Verbs

    What are causative verbs?: Making somebody else do an action.

    “I had my haircut.”/ “I got Jim to fix the car.” / “I got my house cleaned.”

    Causatives are usually a little more advanced but you can still have a lot of fun with them especially as there’s a lot of opportunity to get movement involved and act things out.

    More info on causative verbs.

    13. Verbs and Verb Tenses

    What are verbs and verb tenses?: Actions and when they happen in time.

    “I went to the shop.” / “I am going to the shop.” / “I will go to the shop.”

    You’re going to have a much easier time explaining things like tenses with a diagram related to time. It doesn’t matter whether it’s a timeline on a board or a clock, as long as it’s something visual to point at it will make your life a lot easier.

    More info on verbs and verb tenses.

    More Resources for Teaching English Grammar