Author: Jonathan Race

  • 180 ESL Conversation Starters and Questions (from Beginner to Pro)

    180 ESL Conversation Starters and Questions (from Beginner to Pro)

    Do you ever run out of ideas to keep your students speaking in English?
    These ESL conversation starters and ESL conversation questions will help you inspire fun, natural, and engaging discussions in class—no matter your students’ level.

    This list of 180 English conversation topics covers everything from everyday situations to creative “what if” questions, so you’ll always have something interesting to talk about. Use them as warm-ups, group activities, or full lessons to build fluency, confidence, and real-world communication skills.

    Whether you teach beginners or advanced learners, these speaking prompts will make your lessons more interactive and enjoyable—for both you and your students.

    Tip: Looking for more speaking practice? These pair perfectly with this list: our 120 Would You Rather questions for quick warm-ups, 12 fun speaking activities to get quieter classes talking, and conversation questions using conditionals if you want to work grammar into the discussion.

    Conversation Topics for Adults and Teens

    Adults and teens usually know more about advanced topics than children (politics, religion, etc.) That being said, knowing more on these topics doesn’t necessarily translate to being able to speak about these things easily so don’t assume they can do everything. Be aware of your student’s level and be prepared to reframe a question if they are struggling to understand. 

    Work

    • Where do you work?
    • Do you enjoy your job?
    • Do you use English for your job?
    • Tell me about your last job.
    • What do you think is the most difficult job in the world?
    • What do you think is the easiest job in the world?
    • Where would you work if you could pick any job?
    • Would you still work if you won the lottery?
    • Do you think robots will replace all the jobs in the future?
    • What kind of job should have the highest salary?

    In this post, you’ll get 20 topics and activities for Business English lessons.

    Music

    • Do you listen to music?
    • When did you start listening to music?
    • Do you play a musical instrument?
    • What do you think the future of music will be like?
    • If you could meet any musician, who would it be?
    • Why do people like music?
    • If you could erase a musical genre, which would it be?
    • Do you think musical success comes from working hard or luck?
    • What was the first album you bought?
    • Have you ever downloaded music illegally?

    Holidays

    • What is a holiday?
    • Do you often go on holiday?
    • Where did you last go on holiday?
    • Where would you like to go on holiday next?
    • Do you prefer relaxing or having an adventure on your holiday?
    • Is it weird to go on holiday by yourself?
    • What is the best food you’ve eaten while on holiday?
    • Can you imagine what holidays 500 years ago were like?
    • Would you like to go on holiday to space?
    • What do you think the future of the holidays will be like?

    Technology

    • What is technology?
    • What do you think of when you hear the word ‘technology’?
    • How has technology changed in the past?
    • How has technology changed your life?
    • Could you live without technology?
    • Find the full list of technology questions here

    Conversation Topics for Kids

    To engage a child in conversation, you have to enter their world. What is fun for them? What do they like to do? Using words/phrases like “wow”, “That sounds tasty”, “Awesome” can show you are listening to them and make things more fun which will get them saying more!

    Pets

    • Do you have a pet?
    • What do you think pets do in the day?
    • What do pets eat?
    • Are cats better or dogs?
    • What is the best name for a pet?
    • Would you like a pet spider?
    • Would you like to be an animal? Which one?
    • Why do we have pets?
    • Do you prefer cute or fun pets?
    • What is the best present for a pet?

    School

    • Do you like school?
    • What is your favorite subject?
    • What is your least favorite subject?
    • Who is your favorite teacher?
    • Why do people have to go to school?
    • Do you like homework?
    • What would you do if you were the headteacher?
    • How could schools be more fun?
    • How long are the summer holidays?
    • Can you learn and have fun at the same time?

    Movies

    • What is your favorite movie?
    • Who is your favorite character?
    • Who is your least favorite character?
    • Do you like Disney movies?
    • What was the last movie you saw at the cinema?
    • How often do you watch movies?
    • Do you wish you could live in a movie?
    • Why do you watch movies?
    • Do you prefer reading books or movies?
    • Do you watch any movies in English?

    Conversation Topics for Beginners

    Keeping the topics simple for beginners is a must at the start. Talking about their hobbies and family can help, as these are areas they may have already experience in talking about. If a student is really struggling, then giving them phrases to use such as “I like …” can help get the ball rolling.

    Food

    • What is your favorite food? Why do you like it?
    • Do you like to cook? What dishes can you make?
    • What foods are popular in your country?
    • Do you prefer eating at home or at restaurants? Why?
    • What is a typical breakfast in your home?
    • Have you ever tried food from another country? Did you like it?
    • Do you like spicy food? What spicy dishes have you tried?
    • What foods do you dislike? Why don’t you like them?
    • What is a traditional holiday food in your culture?
    • If you could only eat one food for the rest of your life, what would it be?

    Hobbies

    • What do you like to do?
    • Do you do any sports?
    • What types of movie do you like?
    • Do you play video games?
    • What do you usually do with friends?
    • Is learning English a hobby or work?
    • Do you have any unusual hobbies?
    • Do you have enough time for your hobbies?
    • What is a common hobby?
    • What do you think is a boring hobby?

    Family

    • Do you live with your family?
    • How many people are in your family?
    • Are you close with your family?
    • How often do you see your family?
    • What do you do with your family when you see them?
    • Is your family important to you?
    • Which is more important, friends or family?
    • Who is the weirdest person in your family?
    • Are families less important nowadays than in the past?
    • What would happen if we didn’t have families?

    Home

    • Where do you live?
    • What is there to do in your city?
    • What is your place like?
    • What is your neighbourhood like?
    • Are there any parks near where you live?
    • Have you ever lived elsewhere?
    • How many rooms does your place have?
    • If you moved, where would you like to live?
    • Would you prefer to live in the city or country?
    • Would you like to live abroad?

    Use information gap activities to help your students practice speaking: read our guide.

    Weird and Funny Conversation Starters

    Nobody wants to speak about the same mundane topics, especially if they’re an advanced student. Being able to mix it up is a great attribute to have as a teacher. Not only will you have memorable lessons with these conversation starters, but it will really test the ability of the students to think about topics they aren’t used to (instead of rolling off easy answers about familiar topics.)

    Fails

    • What’s the most epic fail you’ve ever witnessed in person?
    • Have you ever had a funny cooking fail? What happened, and how did it turn out?
    • What’s the most hilarious fashion fail you’ve ever seen or experienced?
    • Have you ever had a technology fail at the worst possible moment? What was the situation, and how did you handle it?
    • What’s the funniest sports fail you’ve ever seen, either in person or online?
    • Have you ever had a humorous translation fail when trying to communicate in a foreign language? What did you say, and what did you mean to say?
    • What’s the most amusing autocorrect fail you’ve ever experienced or seen?
    • Have you ever had a funny fail while trying to impress someone you liked? What happened, and how did they react?
    • What’s the most comical pet fail you’ve ever witnessed or heard about?
    • Have you ever had a hilarious DIY or home improvement fail? What went wrong, and how did you fix it?

    Zombie Apocalypse Plan

    • What is your zombie apocalypse plan?
    • Who would you take with you?
    • What would be your weapon of choice?
    • What would you do if a friend got bitten by a zombie?
    • What would you do if you got bitten by a zombie?
    • What food would you take with you?
    • Do you think governments should have a zombie apocalypse plan?
    • Do you think everyone should have a zombie apocalypse plan?
    • Is a zombie outbreak a likely scenario?
    • Why do you think there are so many movies and TV series based on zombies?

    Superpowers

    • If you could have a superpower, what would it be?
    • What do you think is the weirdest superpower in comic books?
    • Are some superpowers too powerful?
    • Would you like a superpower where you could turn things into gold by touching them?
    • What is the weakest superpower in a comic book?
    • Have we already seen every kind of superpower possible in a comic book?
    • Are there some people in the real world that have superpowers? (doctors etc)
    • Would you like a superpower where you could turn things into chocolate?
    • Would it be better to be super strong or super smart?
    • Would you like the power to travel through time?

    Magic Lamp

    • If you were granted 3 wishes, what would they be?
    • Is wishing for more wishes cheating?
    • Should there be any other rules for people granted wishes?
    • Have you seen any movies with a magic lamp?
    • Do you think there is a better object that could house a genie?
    • Why are we interested in stories of people having wishes?
    • Have any of your wishes come true in real life?
    • Do you make a wish when you blow out the candles on a cake?
    • Is it bad luck to tell someone what your wish is when blowing out the candles?
    • What other ways do people make wishes?

    Controversial Conversations Topics

    These are topics that you need to be careful with and use your judgement based on the student’s background. You need to wait until you know a student to find out what material is appropriate for them. That being said, If used correctly, then these can be really interesting and get the student thinking about “real issues”. 

    Technology and Society

    • Do you think social media has had a positive or negative impact on society? Why?
    • Should governments have the right to monitor citizens’ online activities for security purposes?
    • Is technology making people less social or more connected?
    • Do you believe that artificial intelligence will eventually take over many human jobs?
    • Should parents limit their children’s screen time and use of technology?
    • Is online privacy a fundamental human right, or should people accept less privacy in the digital age?
    • Do you think technology is making people smarter or more dependent on devices?
    • Should schools incorporate more technology in the classroom, or focus on traditional teaching methods?
    • Is the rise of fake news and misinformation on the internet a serious threat to democracy?
    • Do the benefits of technological advancement outweigh the potential negative consequences for society?

    Find more questions about social media and questions about technology here.

    Death Penalty

    • What do you think about the death penalty?
    • Do you know which countries still use the death penalty?
    • Why do you think some countries use the death penalty?
    • Do you know of any famous executions?
    • Should the death penalty be outlawed?
    • If we removed the death penalty then what punishment should replace it?
    • What is the most humane form of execution?
    • What would your “last meal” be?
    • Does the fear of the death penalty reduce crime?
    • How has execution changed over the years?

    Abortion

    • What is abortion?
    • Should abortion be legal?
    • Why do you think some people are “pro choice”?
    • Why do you think some people are “pro life”?
    • What do you think of abortion in cases where the baby was conceived due to rape?
    • What do you think of abortion in cases where the Mother’s life is in danger (due to being pregnant)?
    • Should the father “get a say” in the matter of abortion?
    • What advice would you give to a family member who was thinking of getting an abortion?
    • Should people be allowed to protest against abortion?
    • What do you think the future laws on abortion will be?

    Corruption

    • What is corruption?
    • Is there corruption in your country?
    • Why does corruption exist?
    • Would you consider taking a bribe?
    • Would you consider offering a bribe?
    • Are some types of corruption better than others?
    • Which countries have the most corruption?
    • Which countries have the least corruption?
    • Are there any stories of corruption that you can remember?
    • Is it possible to get rid of corruption entirely?

    Get a list of 110 “Would you rather” questions for your conversation lessons.

    Why Every Teacher Needs a List of Starters

    If you want to improve your student’s speaking ability, you need to master the art of conversation. You have to know how to get your students speaking, move the conversation forward, provide feedback and make it all feel natural. You also need engaging topics, and that is where this guide comes in.

    One of the problems that can face a teacher is knowing what to talk about. What do you do when you’ve finished talking about work, the weather and then realize that only 5 minutes have passed!

    This guide has everything you need to make sure you never run out of topics and most importantly, you always have something interesting to say.

    It is a good idea to pick a particular topic for a class (or even have your student pick if you want more engagement from them). Once you have that topic, then move through the questions, trying to get as much from each one as possible. 

    Browse our ESL teacher resources section for more tips and printable lesson materials.

    Additional Tips for Your Conversation Lessons

    Here are some additional tips to make sure your students are getting the most out of their conversation lessons and will be excited about coming back for more. Some of these will take time to internalize and get right but be aware of them and experiment to get them just right.

    Don’t feel like you have to stick rigidly to the list of conversation starters. If a question takes you down a different conversational thread then go with it. The important thing is that the student is talking, you can always return to “the script” later.

    Correcting a student immediately can often be useful, but in conversation, it can really kill the flow as well as a student’s confidence if done too often. A good idea is to make notes of any major problems and then mention them after a particular section instead. On top of this, try not to interrupt a student once they are speaking. For each answer, try to milk everything out of them that you can before you have “your turn to speak”.

    As well as the frequency of correction, consider the amount being corrected. Don’t feel like you have to correct EVERYTHING. Especially if a student is starting out and is a bit nervous. Pick a few problems areas and focus on that, if you mention too many things at once it can be overwhelming and can really lower a student’s confidence.

    Be strict when a student gives you short answers. If a student gives you an answer like “yes” then force more out of them with “yes… because” or “no… but”. The idea is to get them using the language more.

    Try to inject some personality when using these ESL conversation topics. It should feel more like a conversation rather than a robot giving an interview.

    Some students will struggle with certain subjects as they just don’t know enough about the topic. If it’s a bit of a challenge then push through but if they can’t even talk about a topic in their native language then it may be an idea to move on to another subject.

    Allowing a student to pick a topic can be a great way of engaging them more. This also has the added benefit of helping a younger student (such as a teenager) feel more empowered as they can make their own decisions.

    Get 18 statesman tips on giving great conversation for teens and adults in this post.

    Final Thoughts

    There you have it!

    All you need to make sure you never run out of things to say. Get these printed out as your go-to cheat sheets and bookmark this page so you can easily come back to them for future classes.

    Hopefully, these ESL conversation starters and questions will spark your own ideas for topics you can use in class. If you are teaching one-to-one, you could even write niche topics especially for that student’s interests (e.g skateboarding, knitting or chess).

    Remember, match the topics to the student’s level, keep it fun and once they start talking don’t get in the way!
  • Equipment Needed for Teaching Online: The Buying Guide

    Equipment Needed for Teaching Online: The Buying Guide

    So, you’ve decided that you want the freedom to teach online, from anywhere, great!

    But what supplies exactly do you need to get started? How much do you need to invest? There is so much equipment and different brands to sift through, what a potential headache!

    Luckily, we’ve put together the essential list of what you need to get up and running, from hardware to software and everything in between.

    Let’s get started with our list of the equipment you really need for teaching online.

    Equipment for Teaching Online: all You Need

    Interview: What Equipment do you Need to Teach Online?

    First, say hello to Harold. Owing to his IT skills and background, he was hired in 2018 by ALO7 to provide IT support to its many online ESL teachers based in USA. This is a secondary role he is tasked with in addition to teaching online for the company.

    Harold has troubleshooted hundreds, if not thousands, of technical issues with online ESL teachers and their equipment. This gives him a unique perspective into what type of equipment online teachers use, what works well, and what to avoid.

    In this 25-minute video interview, Harold talks about everything you need to teach online. He covers a range of equipment and other technical aspects, including: computer, internet requirements, headsets, webcams, green screen… and some others aspects of his life as an ESL teacher.

    Desktop Computer

    It goes without saying that you will need a computer to teach online. While many online teachers use laptops, we recommend investing in a desktop computer instead.

    Desktops are not only more cost-effective than laptops, but they are far more easily upgradeable, and thus have a longer lifespan. The temptation to buy a laptop to teach online will be high, but the cost of owning a laptop will be much higher, over time.

    There may be other reasons to own a laptop, though. So, be crystal clear about your specific goals with online teaching, and decide what’s perfect for your use case.

    You need to make sure the computer you buy ticks certain boxes. Let’s look at those minimum requirements:

    Computer Requirements

    • Hard drive: 128 GB or more, to store lesson plans, files, videos, etc.
    • Memory: 8 GB or more
    • CPU: Intel i5 or higher

    Don’t save at the wrong end. Live video conferencing eats up a lot of memory and processor power, so having a powerful computer is vital.

    Read our guide on the best computers for online teaching.

    Laptop Computer

    Laptops are extremely convenient as they don’t require much space and are portable, so you could theoretically teach from anywhere!

    If these advantages outweigh the cost advantages of a desktop computer, a laptop is right for you.

    However, if you want to save some time and mental energy then no worries, we’ve rounded up a list of the best computers for teaching below:

    Budget Laptop

    Don’t let this low price tag fool you, the Acer Aspire 5 is powerful and solid enough to give you the performance you need in your online lessons. Not only that, the widescreen will make it easy to arrange your windows mid-class, keeping you stress-free and in control.

    2021 Newest Acer Aspire 5 Slim Laptop

    [asa tpl=”flat_box_horizontal”]B08WX9M8GP[/asa]

    Premium, Ultra-portable Laptop

    This is the laptop for those who are on the go. It’s thin and light, versatile (can be used as a laptop or tablet) and it comes with LTE, meaning you don’t need to worry about getting disconnected from the Wi-Fi mid-lesson!

    Microsoft Surface Pro 8

    [asa tpl=”flat_box_horizontal”]B09DJSF748[/asa]

    Read our in-depth guide to selecting a laptop for online teaching if you want to dig deeper.

    Headset

    Most online ESL companies require their teachers to wear a headset, and many of these companies expect their online teachers to wear a headset that has a boom mic.

    This is partly due to the expectation that wearing a headset with a boom mic provides better audio quality; but also partly because wearing one makes you look like a professional online teacher in the eyes of the company and students.

    Fortunately, a good wired headset with boom mic should not cost you more than $50, and there are many options to choose from. High-quality Bluetooth headsets will cost you more, somewhat above $100.

    Don’t buy cheap ones: They’ll easily break, or they have poor sound quality which is a no-go for online teachers.

    We’ve again done the research for you already, and rounded up the top 3 headsets used when teaching English online. So relax, pick the one that feels right for you and get teaching!

    Wired Headset

    Plantronics Blackwire 3320 Wired Headset with Boom Mic

    [asa tpl=”flat_box_horizontal”]B085D7KPFT[/asa]

    Bluetooth Headset

    Jabra Evolve 65 MS Wireless Headset

    [asa tpl=”flat_box_horizontal”]B00ODRSN0A[/asa]

    For a broader selection, check our guides on buying headsets for online teaching, as well as microphones for online teaching.

    Fast and Reliable Internet

    A fast and reliable Internet connection is a must for online teaching. Your Internet connection largely depends on the service quality in the area where you live, but for the majority of online teachers working from home, this will not be too difficult a requirement to meet.

    Still, a few things you need to ensure about your Internet connection is that it meets the online ESL company’s minimum upload and download speeds, but also has a low ping rate (latency). Generally, you should be aiming for upload and download speeds of 10Mbs or higher, and a ping rate less than 100ms.

    Some online ESL companies also require their online teachers to use a wired connection, because connecting to the Internet with an Ethernet cable generally means a faster, more stable connection.

    Read our complete guide to meeting Internet requirements for online teaching here.

    Webcam

    Modern laptops include a built-in webcam which saves you a lot of hassle in this area, phew!

    But… what if you are using a desktop computer which doesn’t have one? What if your employer requests a separate, external webcam (I’ve had it happen before), or maybe you just want to provide extra quality videos to your students. What then?

    No need to make many words here: We’ve been using this Logitech webcam for years, and it flawlessly does its job.

    Logitech C920x Full-HD Pro Webcam

    [asa tpl=”flat_box_horizontal”]B085TFF7M1[/asa]

    Online Teaching Software

    Ok, now you’re set up with all the hardware needed to teach, but what do we need software wise?

    If you teaching company does not provide an own teaching platform, you will need to use one of these video conferencing tools:

    Good Lighting

    Because you are teaching online, lighting plays an important part at your workstation. Some online ESL teachers go overboard with their lighting setup, but in truth, your lighting setup does not need to be elaborate or expensive.

    At a very basic level, you can do well with one or two inexpensive LED desk lamps and position them to get the best illumination on your face and body. Your aim is not to glow in the dark here, but rather to ensure your students can see you clearly.

    The positioning of your lights is just as important as the brightness of your room. We recommend LED lights for most online teaching setups because they don’t emit as much heat, last longer, and are generally brighter than other types of lights.

    Some LED lights also give you the ability to adjust the light temperature between cool and warm colors; this is especially useful if you intend to use a green screen while teaching online, but also not a bad feature to have for just about anyone teaching online.

    See our recommended LED lights for online teachers here.

    Chairs

    You’re all set for technology now but what about your office?

    Maybe you already have a comfortable set-up which you can use; if so, then this is the area you can save a bit of money.

    However, bear in mind that you will sit in your office chair for (hopefully) many hours of the day. It needs to be comfortable and appropriate for your teaching style.

    Your chair should provide exceptional support for your back and neck, meaning that an investment in this chair now will result in not paying out to a chiropractor 6 months from now!

    Once again, we’ve selected a recommendable mid-range priced option for your, saving you the hassle!

    Komene Ergonomic Office Chair

    [asa tpl=”flat_box_horizontal”]B091MS2XMC[/asa]

    Read the full guide about comfortable chairs for teachers.

    Props and Teaching Aids

    Once you have the essentials out of the way, don’t be afraid to spruce up your teaching space. These things, while cheap, offer a massive boost in presentation which your students will certainly appreciate.

    Your props should be relevant to the age group of the ESL learners you teach, and should provide opportunities to elicit responses and encourage interaction from your students. They can also be excellent for warm-up activities, showing and telling activities, and games.

    Online ESL teachers should be equipped with props and teaching aids, including:

    • Puppets
    • Soft toys
    • Play food
    • Flash cards

    We’ve put together a helpful list of the best teaching props.

    Green Screen

    Although a green screen is not a necessary piece of equipment for teaching online, having one can make a huge difference to your virtual classroom as well as student engagement.

    With advances in technology, software is getting better at layering your background with images and videos, without having to use a green screen. But it’s not yet perfect, and a green screen still gets you better results for the time being. Besides, they are an inexpensive investment for the value they bring to your online classroom professionalism.

    Read our guide to learn how to buy and use a green screen in an online classroom here, and how to use ManyCam.

    Conclusion

    Now you have everything you need to teach online!

    Hopefully, you should already have some of these things on hand which leaves you with only a few things to pick up. After that it’s a case of gaining experience and establishing yourself as an online guru!

    The next step is to check out this guide on creating your first lesson plan.

    Good luck and happy teaching!

  • 17 Fun ESL Vocabulary Games for Adults and Kids

    17 Fun ESL Vocabulary Games for Adults and Kids

    What are your methods for teaching vocabulary?

    Drills? Flashcards? Yuck! Boring!

    While these can certainly be effective, they can be a quick way to lose your student’s attention if you spend too much time on them in a class.

    So what can you do then? The answer?

    Play some fun ESL vocabulary games with them!

    In this huge listicle, you’ll find 17 great ESL vocabulary game ideas (suitable for adults, teens, and kids) with detailed instructions to include in your lessons.

    ESL Vocabulary Games for Kids and Adults

    ESL Vocabulary Games for Kids… AND Adults, too?

    Games are a great way to get your students to engage and use the language without fighting for their attention every few minutes.

    Well, that’s great for children I hear you saying, but what about adults?

    Well, as surprising as it may sound… Adults enjoy having fun too!

    In fact, a number of the games here are what adults often play while socializing with friends or family anyway so they may already be familiar with them in the native language.

    That being said, while some of these vocabulary games can be great for adults, this isn’t the case for all of them.

    Some games on this list can be a little silly and adult students would most likely feel more than a little patronized if they were to play them. The same could be said for some games which may be too “boring” for children.

    For that reason, this list also has information about the appropriate target student. It mentions:

    • student level (from beginner to advanced)
    • type of lesson (group and/or one-to-one)
    • student type (children and/or adults)

    Make sure to read each game carefully before trying it in your class. Make a note of any realia/resources you may need and if possible practise how you will run the class so there aren’t any surprises in the classroom! Let’s get started.

    1. Whispers

    • Student level: Pre-Intermediate to Advanced
    • Type of lesson: Group
    • Student type: Children & Adults

    The idea of “whispers” is to get a message from one end of a line of people to the other. To start: –

    1. Person 1 needs to whisper a message to person 2 (without anyone else hearing)
    2. Person 2 then needs to whisper the message to person 3 etc until we reach the end of the line.

    This game can get difficult because some mistakes creep into the message which can lead to a message which is vastly different at the end than it is at the start.

    Once the message reaches the end, the final person reveals what they think it is. This often results in hilarity!

    This game trains the students to be able to understand messages in situations that aren’t so clear. It also trains them to try to understand a sentence using context. As long as the students can form sentences then they will be ok with this game.

    2. Describe It

    • Student level: Intermediate to Advanced
    • Type of lesson: Group or Individual
    • Student type: Adults

    With “describe it” the idea is to give a student a word. This can be anything you want really but nouns and verbs are going to be easier than things like adverbs and prepositions. Once the student has their word, they then have to describe it without using the word itself!

    Whoever manages to guess this correctly then gets to go next and you can keep going until everyone in the class has had a turn.

    The benefit of this game is that it forces students to use synonyms/antonyms that they might not use usually. It also helps them to develop the skill of using the language to try to express something even if they don’t have that particular word in their vocabulary.

    This game is a little more difficult than the others and is better suited to intermediate to advanced learners. Coupled with the fact that you may lose some attention from children, this is better aimed at adults.

    3. Tongue Twisters

    • Student level: Pre-Intermediate to Advanced
    • Type of lesson: Group or Individual
    • Student type: Children & Adults

    Tongue twisters are a fun way to practise new vocabulary!

    In case you don’t already know what they are; A tongue twister is a sentence (or several) that is very difficult to say (usually due to a sequence of similar sounds).

    An example of this would be “she sells seashells by the seashore”.

    These are both great fun and extremely useful as they can be used to train pronunciation for new vocabulary. They are effective with adult students but due to their silliness, it’s no surprise that kids love them!

    While there are already plenty of tongue twisters out there, you will likely have to create your own, specific to the vocabulary you are learning. (hint – don’t try to cram all of the TL into one sentence, pick one new word for each tongue twister.)

    To add a more competitive element to it, (besides just saying the sentence without mistakes) you can time the students and get them to try to go faster and faster each time!

    4. I went to the supermarket…

    • Student level: Beginner to Advanced
    • Type of lesson: Group
    • Student type: Children & Adults

    This game is a great one to flex those memory muscles! It goes something like this:

    1. Create a circle of students.
    2. Student 1 starts by saying “I went to the supermarket and I bought [some bread].” (this [ ] can be anything they choose.)
    3. Student 2 then says “I went to the supermarket and I bought some bread and [an apple].” (They have to say what the previous student said but then they choose a new object for themselves.)
    4. Student 3 then says “I went to the supermarket and I bought some bread, an apple and [some cheese].”
    5. You then continue around the circle with the students adding more and more items until somebody isn’t able to remember all of the list.

    You can choose to either reset the game once the list can’t be remembered or… for a more competitive element you can choose to reset the list minus the student who couldn’t remember. You can then repeat this until there is a “definite winner”.

    As this game is more to do with memory and doesn’t necessarily involve complex vocabulary, it is suitable for students of all ages and levels.

    Illustrated Resources for Teaching ESL Vocabulary

    5. I Spy

    • Student level: Beginner to Pre-Intermediate
    • Type of lesson: Group or Individual
    • Student type: Children

    “I spy with my little eye…” If you didn’t play this as a child then you missed out! But fear not, you have a chance to catch up with this fun game now.

    1. Student 1 first picks an object in the room (without saying what it is). For example, maybe they see a “clock”.
    2. They then have to say the phrase “I spy with my little eye, something beginning with…” and say the first letter of the word [c].
    3. The other students have to guess what it is and whoever is correct becomes the next person to play.

    Keep going until everyone has had a turn to play. This game can be fairly simple if there are common words such as “pen”, “book” etc.

    However, if you really want to bring more of a challenge, then bring some props with you or load up an image on a projector with many items.

    This game is good when learning basic vocabulary and is better suited to beginners and more specifically children.

    6. Word Association

    Student level: Pre-Intermediate to Advanced
    Type of lesson: Group or Individual
    Student type: Children & Adults

    This one is great to stimulate some creativity. It is also a very simple idea.

    1. Student 1 says a word. It can be anything but for this example, we will say “green”
    2. Student 2 says a word that is related to Student 1’s word. “Grass”.
    3. You can then continue around the chain with each student adding a related word to what the previous person has said.

    The rules are simple. You have to be able to explain why a word is related. You also can’t repeat a word that has already been said! To make this one harder you can also include a timer.

    7. A-Z Categories

    Student level: Pre-Intermediate to Advanced
    Type of lesson: Group or Individual
    Student type: Children & Adults

    In this game, the teacher picks a category such as (fruit, countries, languages, etc). The idea is then for the students to think of something for each letter of the alphabet.

    So if we picked the category “countries” then it would go like this:

    1. Student 1: “America”
    2. Student 2: “Belgium”
    3. Student 3: “China”

    You can then continue until all of the letters have been completed. Some beginners will be fine with something like “food” but some categories can be more difficult so bear this in mind when picking a topic.

    You may also want to consider cultural backgrounds. “Countries” is a good topic because although they have different names in different languages, they are known by everyone. However, a topic like “bands” can become more difficult as students may want to pick their local favourites which might not be known by others.

    8. Match

    Student level: Beginner to Pre-Intermediate
    Type of lesson: Group or Individual
    Student type: Children

    For this game, you need two sets of cards. The first set of cards will have pictures of various things (e.g ball, house, etc), the second set will have the vocabulary on. As you probably have guessed by now, the student’s aim is to match the pictures up with the vocabulary.

    You can vary this one a bit depending on how many are playing.

    1. With just one student playing you can simply time how long it takes them to match them all and then get them to try and beat that record the second time around.
    2. With more students, you can divide them into two teams. Whichever team gets the most pairs wins. (You may prefer to have the teams have one student up at a time to make sure things don’t get too crazy!)

    This one is for children. It works especially well with complete beginners because the explanation needed is minimal, demo the game to them and they will take to it like ducks to water!

    9. Word Grab Race

    Student level: Beginner to Intermediate
    Type of lesson: Group
    Student type: Children

    To set this game up you again need a collection of cards with the vocabulary on. Mix all the cards up (while still being able to see them all.) Next, divide your students into two teams. A student from each group will have their turn first.

    When the teacher says the word, the chosen student from each team has to run to the front and find the correct card with the word on from the pile. Once they have brought it back to the group both teams will then switch the active player.

    This is repeated until all of the cards have been captured. The team with the most at the end wins.

    To make this harder, instead of the teacher saying the word you could show a picture (on a screen) or hold up an object. This forces the students to use the vocabulary and understand what it means.

    10. Hangman

    Student level: Pre-Intermediate to Advanced
    Type of lesson: Group or Individual
    Student type: Children & Adults

    Hangman takes a little bit of explaining but… once your students understand it then they will love it!

    The basic point of hangman is for the students to guess a word (picked by the teacher).

    They take turns guessing a letter each. If the guess is correct (the letter is in the word) then the teacher will write the letter on the board, if the guess is wrong then a part of “the hangman” is drawn.

    There are 8 parts to the drawing:

    1. Draw the post (an upside-down “L”).
    2. Draw the head (a circle) underneath the horizontal part of the post.
    3. Draw the body (a vertical line under the head).
    4. Draw arm 1 (a stick from the body).
    5. Draw arm 2 (another stick from the other side of the body).
    6. Draw leg 1 (a stick at the bottom of the body).
    7. Draw leg 2 (a stick on the other side at the bottom of the body).
    8. Draw the noose (a line joining the head to the post).

    The students need to guess what this word is before the picture of the hangman is complete. If they guess it correctly before the hangman is complete then they win, if not then they lose.

    If you want to include the students further then whoever wins the round can have a turn at drawing the hangman in the next round.

    This game is fun regardless of age, group size or ability (as difficulty can be altered by using harder or easier vocabulary).

    11. Stand up / Sit Down

    Student level: Beginner to Intermediate
    Type of lesson: Group
    Student type: Children

    For this game, you will need either a board and projector or some realia. First of all, make a line of chairs with the students sat down (facing the teacher).

    1. You will then show either an image or hold up an object.
    2. Next, you say either the correct vocabulary or a different word.
    3. If what you say and what is shown is correct then the children stand up, if not then they stay sat down.

    To add a competitive angle to this you can have the ones who get it wrong lose the game and leave the round, repeat this until there is a winner. Alternatively, if everyone is very good then you could do the last student to stand up / sit down lose that round.

    This game is ideal for children, they love getting involved and moving around. It is a great way to win pre-schoolers back if you find you have lost their attention part way through a class.

    12. Spelling Throw

    Student level: Beginner to Intermediate
    Type of lesson: Group
    Student type: Children

    The idea of this game is to get the students to spell a word out one letter at a time, each student takes it in turns saying each letter though which is what makes it difficult.

    To begin, you first need to arrange the students in a circle (either seated or standing). You will also need a ball. For this example let’s say the chosen word is “tiger”.

    1. Student 1 – “t” *throws the ball to student 5
    2. Student 5 – “i” *throws the ball to student 3
    3. Student 3 – “g” etc

    This continues until the word is complete. Again, like with the other games you could do a knockout rule where if a student gets the wrong letter then they are out of that round (repeat until there is a clear winner).

    If this game is slightly too easy for the students then you can introduce a timer system where they will only get a few seconds to answer, if they don’t answer in time then they are also out.

    This game is best suited to children, they will enjoy using a ball to interact with. It is also more suited to beginner levels (especially when learning how to spell.) Keep this one away from adults or advanced students unless you want to hear some patronized groans!

    13. Draw It

    Student level: Beginner to Intermediate
    Type of lesson: Group or Individual
    Student type: Children & Adults

    Great fun with children and adults alike. Similar to “describe it”, the idea is for the student to express a chosen word without saying it. The difference here is that we are now drawing instead of describing.

    Obviously we will need something to draw with for this. Pen and paper would work fine if we are struggling for resources but it would be better to use something bigger so it’s easier for the students to see, so try to grab a whiteboard!

    Once you have a chosen student, tell them the chosen word (without anyone else hearing), they then have to draw it. The other students have to guess and the first one to get it right can then have their turn. Keep going until everyone has played at least once.

    The advantage of this game over “describe it” is it can be a lot easier for beginner students to draw something than to try to think of a way to describe it in English. That being said if your students are advanced, they may benefit more from the added difficulty of “describe it”.

    14. Word Search

    Student level: Beginner to Advanced
    Type of lesson: Individual
    Student type: Children & Adults

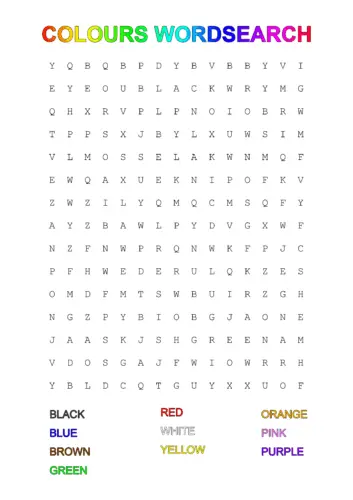
    These take a little longer to prepare but when it comes to actually playing, they are as easy as they come.

    For anyone that doesn’t know what a word search is, you basically have a grid of squares. Inside each square is a letter. At first glance, it will appear as if you are staring at a giant mess of random letters. However, there are words hidden inside this mess that must be found.

    Although this game could, in theory, be done in groups, it is one that is better suited towards individual students. It can be hard for some students to wait for their turn without shouting out that they’ve found one (especially true with children!).

    The great thing about a word search is that they are very easy to play. Even if you use advanced vocabulary, the ability to look for a word is still the same so this game is suitable for students of all levels.

    colours wordsearch
    Click to download the PDF of this Colours word search

    15. Synonyms

    Student level: Intermediate to Advanced
    Type of lesson: Group or Individual
    Student type: Adults

    With synonyms, the point is to give a student a word, and they have to give you a synonym for that word in return. (E.g. teacher says scalding, student says hot). For this, you will need to do some research and make sure you know some synonyms for the TL of that lesson.

    A very basic idea, but we have a lot of room to work with this. Here are some things we can change:

    • Add a time limit (e.g the student has 3 seconds to reply)
    • Time limit for the whole group (e.g how many can the group get in 3 minutes)
    • In a group, the student (who just answered) could ask the next student
    • Use antonyms as well
    • Have the students ask the teacher

    This game is dependant on the students having at least a medium-size vocabulary so I would advise sticking to medium to advanced level students. Also, while this game is fun to an extent, it is more so for adults. Some children may lose concentration with this one so only play with them if you know you can hold their focus.

    16. Shiritori

    Student level: Intermediate to Advanced
    Type of lesson: Group or Individual
    Student type: Adults

    The classic Japanese game – Shiritori! You need very little to play this game, which makes it ideal as a backup activity as well.

    Simply set up the chairs in the classroom so that everyone can see and hear each other clearly. A circle arrangement is a great choice as it allows everyone to hear each other and there’s an obvious order to whose go it is.

    1. Choose a student or go first yourself
    2. The first person (A) says a word. This can be something that was taught in the class if you want to reinforce that. Or, if this is a backup activity then it can be any word.
    3. The next person to the left (B) will then say a word that starts with the last letter of A’s word. So if A said “boat” then B could say “three”.
    4. The game carries on around the circle until you reach the original student again.
    5. At this point you can either end the game there or carry on if you have time.

    A very basic idea but we have a lot of room to work with this. Here are some things we can change:

    • Add a time limit (e.g the student has 3 seconds to reply)
    • Time limit for the whole group (e.g how many can the group get in 3 minutes)
    • In a group, the student (who just answered) could ask the next student
    • Use antonyms as well
    • Have the students ask the teacher

    This game is dependent on the students having at least a medium-size vocabulary, so I would advise sticking to medium to advanced level students. Also, while this game is fun to an extent, it is more so for adults. Some children may lose concentration with this one so only play with them if you know you can hold their focus.

    17. Charades

    Student level: Beginner to Intermediate
    Type of lesson: Group
    Student type: Children & Adults

    In case you haven’t played charades before, this is how to play:

    1. Select a student to be “a word”, e.g. red, an apple
    2. Without speaking, this student has to get the other students to guess the word.
    3. They can elicit the answer by using body movements, pointing to things in the room etc. Basically anything, as long as they do not speak.
    4. Whoever guesses the answer first gets to be “it” in the next round.

    This is a great game for beginners as it works better with beginner vocabulary (run, sit, 4 etc.) 

    Beware, you may struggle with more complex vocabulary… (try acting out the word situational!)

    18. Vocab Bingo

    Student level: Beginner to Intermediate
    Type of lesson: Group
    Student type: Children & Adults

    Prepare Bingo sheets with grids and add one word to each square. Select the grid size (from 3×3 to 6×6) and the words according to the level of English of your students and the expected duration of the game.

    Write all words you’ve added to the sheets on a list; maybe add some more. Call out the words in random order, and have the students mark the words when they hear it.

    They can use a pen, or better: put little items on the squares. This is more fun, and you can reuse the sheets.

    The first person to mark each word on his sheets wins.

    You can make this ESL vocab game a bit harder: Don’t call out the exact words in the squares, but synonyms, or opposites, or any kind of related words (for example when you call “rain”, they have to mark “umbrella”).

    Conclusion

    So, there we have it, 18 games for you to try in your classes.

    Make sure to pay attention to the suitability for each game and most importantly practise these before you get in the classroom.

    Hopefully, these will also have sparked your creative juices so you will be able to think up some of your own.

    Remember to keep it fun, educational and engaging!

    If you want to find activities to build classroom community, you can have a look at this article.

  • 120 Would You Rather Questions to Start an ESL Conversation (PDF)

    120 Would You Rather Questions to Start an ESL Conversation (PDF)

    Do you want interesting questions to get the ball rolling with your ESL students?

    Are you tired of asking the same basic questions about where your students live, what hobbies they have etc?

    “Would you rather” questions are a great way to inject more fun into your speaking lessons and be “the interesting teacher”. 

    Here we have 120 fun questions for kids, teens, and adults as well, to get you started along with a follow-up question for each to keep the conversation going.

    Also useful: Want to keep the conversation going? Try our 180 conversation starters for every level, or these speaking activities when you need something more structured.

    The Power of Would You Rather Questions

    The idea is simple:

    You ask a student a question and they have a choice of two possible answers: “Would you rather be a bird or a fish?”.

    The student answers the question but… it’s important they explain WHY.

    The explanation of why they chose their answer is what really tests their ability to produce the language (rather than giving you a series of one-word answers).

    These questions are extremely useful; they are fun which engages the student more. They also get students to use the language outside of what they’re used to which will help them feel confident speaking in a wider range of situations.

    They are a great stepping stone between very basic “yes or no” questions and completely open questions which could be a little intimidating for less advanced students.

    These questions work great as a warm up to a more in-depth subject in a speaking lesson or even to round things off with some fun at the end of a particularly difficult one.

    As these are separated into different topics it may even be a good idea to use them in lessons that relate to that particular area. 

    Ok, without further ado, let’s begin!

    General Would You Rather Questions

    1. Would you rather have more time or more money?

    Would you play a lottery that had a prize of time?

    2. Would you rather be able to sing beautifully or speak fluently in a chosen language?

    Which do you think is harder to master?

    3. Would you rather be the world’s fastest runner or own the world’s fastest car?

    Which do you think would be most useful?

    4. Would you rather be able to fly or swim without needing to hold your breath?

    What’s the longest you can hold your breath for?

    5. Would you rather go to the cinema or watch a concert?

    What’s your favourite film?

    6. Would you rather be stuck inside on a good day or stuck outside on a bad day?

    What do you do when the weather’s bad?

    7. Would you rather be poor and happy or miserable and rich?

    Can money buy happiness?

    8. Would you rather travel to somewhere relaxing or somewhere interesting?

    Where did you last go on holiday?

    9. Would you rather play video games or play sports?

    What was the last thing you played?

    10. Would you rather be super fast or super strong?

    What would you do with that power?

    Funny Would You Rather Questions

    1. Would you rather be a mouse on holiday or a lion at work?

    Which do you think would be more difficult?

    2. Would you rather have a house made of chocolate or a house made of french fries?

    Which do you think would be easier to clean?

    3. Would you rather have the power to make others laugh or to make yourself laugh?

    Are there any comedians you know who already have this power?

    4. Would you rather stink or have everybody else stink (except you)?

    How much deodorant do you think would be needed to hide the smell?

    5. Would you rather marry a fish or a potato?

    Which do you think you would argue with more?

    6. Would you rather fight Santa or a reindeer?

    Do you think you’d still get presents after?

    7. Would you rather dance with a sloth or a chimpanzee?

    Do you think they would enjoy the dance?

    8. Would you rather slip on ice or a banana peel?

    Which one do you think is funnier?

    9. Would you rather laugh so hard you cry or cry so hard you laugh?

    Do you often cry when you laugh?

    10. Would you rather have an onion for a head or a cabbage?

    Do you think it would be hard to wash your face?

    Difficult Would You Rather Questions

    1. Would you rather win £1,000,000 or have your friend win £3,000,000?

    Do you think they’d let you win the money if they were in your shoes?

    2. Would you rather travel to the past or to the future?

    What about if you couldn’t return to the present?

    3. Would you rather have lots of money but not be able to buy food or have plenty of food but no money?

    Is there anyone you can think of who would pick the opposite?

    4. Would you rather be best friends with a celebrity or have your dream job?

    Have you ever met a celebrity?

    5. Would you rather fall into a cactus or walk on glass?

    Do you have a strong tolerance to pain?

    6. Would you rather climb Mount Everest or run three marathons?

    What’s the most exercise you’ve ever done?

    7. Would you rather not shower for a week or not brush your teeth for a week?

    What’s the longest you’ve gone without showering before?

    8. Would you rather be trapped in a room full of spiders or snakes?

    How long do you think you could stay in there for?

    9. Would you rather play a sport professionally or be an actor / actress?

    Which do you think pays more?

    10. Would you rather be a king for a day or a mayor for a month?

    What would you do in that time?

    Weird Would You Rather Questions

    1. Would you rather have a pillow as a pet or a piece of cheese?

    Which do you think would look funnier when taking for a walk?

    2. Would you rather be abducted by aliens or kidnapped by vampires?

    Which is more likely?

    3. Would you rather be a plant or a rock?

    Do you think life would be easier than being a human?

    4. Would you rather have a pig’s brain in a human body or a human brain in a pig’s body?

    Do you think it would be fun to switch for a short while?

    5. Would you rather wear a hat made of jam or shoes made of chocolate?

    Would you eat it after you have finished wearing it?

    6. Would you rather live on the moon or at the bottom of the sea?

    What kind of work could you do there?

    7. Would you rather be a cartoon or a puppet?

    What’s your favourite cartoon?

    8. Would you rather be sat next to a dog or a chicken on a plane?

    Would it be better than sitting next to a human?

    9. Would you rather live in a world where everything is upside down or where everything is blue?

    What would some of the challenges be living in such a world?

    10. Would you rather clean your teeth with spaghetti or a banana?

    What do you think your dentist would say?

    Food Would You Rather Questions

    1. Would you rather eat cheese and chocolate or beef and icecream?

    What’s the worst food combination you’ve ever made?

    2. Would you rather eat hamburgers everyday or never again?

    Which option do you think is healthier?

    3. Would you rather eat an amazing meal in a bad restaurant or a bad meal in an amazing restaurant?

    What’s the best restaurant you’ve ever eaten at?

    4. Would you rather be hungry or thirsty?

    What’s the longest you’ve gone without food and drink?

    5. Would you rather go out for dinner or eat a takeaway?

    What was the last thing you ate from a takeaway?

    6. Would you rather eat ice cream on a hot day or drink hot chocolate on a cold day?

    Which flavour of ice cream is your favourite?

    7. Would you rather be a chef or a waiter?

    Which do you think has the harder job?

    8. Would you rather eat three days worth of food in a day or a day’s worth of food over three days?

    Which do you think is healthier?

    9. Would you rather eat chocolate for an entire day or broccoli?

    What’s the most chocolate you’ve ever eaten?

    10. Would you rather eat peas with chopsticks or soup with a fork?

    Have you ever tried to eat with chopsticks? Did it work?

    Controversial Would You Rather Questions

    1. Would you rather end world hunger or have your friends and family live forever?

    Do we do enough to help those who are hungry?

    2. Would you rather everyone life forever or have people die painlessly at a certain age?

    How long would the planet last if we all lived forever?

    3. Would you rather imprison an innocent person or accidentally release a guilty person?

    Have you ever been blamed for something you haven’t done?

    4. Would you rather kill one person to save a thousand or do nothing?

    What’s the hardest decision you’ve ever had to make?

    5. Would you rather eat a (recently) dead body to stay alive or stay hungry?

    What’s the grossest thing you’ve ever eaten?

    6. Would you rather legalise drugs or outlaw guns (in all countries)?

    What are the gun laws in your country?

    7. Would you rather allow stem cell research (and possibly save lives) or disallow the research (possibly resulting in casualties)?

    How much do you know about stem cell research?

    8. Would you rather have evolution taught in schools or creationism?

    Which did you learn in school?

    9. Would you rather everyone have the right to marry or just heterosexuals?

    When did you last attend a wedding?

    10. Would you rather everyone have access to healthcare or only those that can afford it?

    When did you last go to the hospital?

    Clothing Would You Rather Questions

    1. Would you rather wear too many layers in summer or not enough in winter?

    What do you usually wear when it’s really cold?

    2. Would you rather wear clothes that are comfortable or clothes that look good?

    What’s the most comfortable clothing you own?

    3. Would you rather give unwanted clothes to charity or sell them?

    What was the last item of clothing you got rid of?

    4. Would you rather buy clothes brand new or from a second-hand shop?

    What’s the best bargain you’ve ever found?

    5. Would you rather fix your own clothes (e.g. darn a sock) or replace them?

    Do you have any clothes that need fixing or replacing?

    6. Would you rather wear something cool or something funny to a fancy dress party?

    What’s the best fancy dress costume you’ve ever worn?

    7. Would you rather have fewer clothes (that you love) or a wide collection of clothes (that aren’t your favourite)?

    What item of clothing could you not live without?

    8. Would you rather wear a hat or gloves in the snow?

    What do you usually wear when it snows?

    9. Would you rather make all of your clothes or borrow all of your clothes?

    What do you think the easiest thing to make would be?

    10. Would you rather all of your outfit be the same colour or the same material?

    What is your favourite material to wear?

    Geography Would You Rather Questions

    1. Would you rather live somewhere hot or somewhere cold?

    What’s the weather like where you live now?

    2. Would you rather live in a country with lots of money or beautiful scenery?

    What do you think is the most beautiful country?

    3. Would you rather visit five countries in five days or two countries in two weeks?

    Where would you go?

    4. Would you rather live near a volcano or near a swamp?

    Which do you think would have cheaper property prices?

    5. Would you rather be the leader of a small country with a lot of money or a big country with little money?

    Which is the smallest country you know of that is wealthy?

    6. Would you rather live near the ocean or near a field?

    Are there any oceans near where you live now?

    7. Would you rather live in a good neighbourhood that is far from work or in a bad neighbourhood that is close to work?

    How do you usually travel to work?

    8. Would you rather live in a quiet neighbourhood without many amenities or live in a noisier neighbourhood where there is plenty to do?

    What amenities are near your house?

    9. Would you rather go on holiday to somewhere far away or somewhere close to home?

    What’s the furthest you’ve ever been from home?

    10. Would you rather live in an area that is prone to earthquakes or one that is prone to flooding?

    Have you ever experienced an earthquake?

    Technology Would You Rather Questions

    1. Would you rather go without your phone or without internet access for a week?

    What’s the longest you think you could go without using the internet?

    2. Would you rather use the microwave or the oven to cook your meals?

    Which one is easier?

    3. Would you rather have a massive TV or a powerful computer?

    How big is your TV?

    4. Would you rather work with computers or work without them?

    What’s the longest you’ve worked at your computer before (in one sitting?)

    5. Would you rather play video games on a console or on your phone?

    What’s your favourite video game?

    6. Would you rather have a broken washing machine or a broken fridge?

    Which do you think breaks down more often?

    7. Would you rather have a fast internet connection or a stable connection?

    How fast is your internet connection at the moment?

    8. Would you rather be able to program computers (software) or build computers (hardware)?

    Can you usually fix your computer if something goes wrong?

    9. Would you rather drop your phone into a puddle from a short height or onto a dry floor from a tall height?

    Have you ever broken your phone?

    10. Would you rather stay in a hotel without a TV or without a shower?

    When did you last stay in a hotel?

    Movies Would You Rather Questions

    1. Would you rather star in a western movie or a sci-fi movie?

    What is the best sci-fi movie of all time?

    2. Would you rather be a director or an actor/actress?

    Which do you think would pay better?

    3. Would you rather watch a movie at the cinema or own the physical copy (Blu-ray etc)?

    How often do you go to the cinema?

    4. Would you rather watch a romance movie or a comedy?

    Do you ever watch rom-coms (romantic comedies)?

    5. Would you rather watch a movie or a series?

    What’s your favourite series?

    6. Would you rather watch a horror movie alone or with someone else?

    What’s the scariest film you’ve ever seen?

    7. Would you rather eat popcorn or crisps when watching a movie?

    Why do we eat such noisy food when we watch movies?

    8. Would you rather be the star of a small movie or an extra in a huge movie?

    Do you think it would be fun to be an extra in a movie?

    9. Would you rather have free access to a cinema or have your own cinema room at home?

    How often would you watch movies if you could see any movie for free (at the cinema)?

    10. Would you rather watch a movie adaption of a video game or play the video game adaption of a movie?

    What’s the best movie about video games you’ve seen?

    Dating & Relationship Would You Rather Questions

    1. Would you rather marry someone who is beautiful or rich?

    Do you think money is important in a relationship?

    2. Would you rather have a romantic or an exiting date?

    What kind of gift would you bring with you?

    3. Would you rather go on a date, accompanied by your mom or your dad?

    Do you talk with your parents about your feelings?

    4. Would you rather date someone who is talking all day long or someone who hardly says a word?

    Are you a talkative person?

    5. Would you rather have 5 kids or no kids at all?

    Why?

    6. Would you rather marry someone who is boring and loyal or passionate and cheating on you?

    What’s your main criteria when choosing your partner?

    7. Would you be rather honest and maybe hurt your partner or tell a lie to make them feel good?

    Do you think white lies are acceptable?

    8. Would you rather marry someone who is exactly like yours or completely different?

    Opposites attract – do you think this saying is true?

    9. Would you rather ask someone out or have someone asking you out?

    In your home country, is it common for women to ask men out?

    10. Would you rather find true love or live a long, healthy single life?

    In your eyes, what makes a happy life?

    COVID-19 Pandemic / Lockdown Would You Rather Questions

    1. Would you rather stay at home for three months or life your normal life, but install an app on your smartphone through which the authorities can track all your movements and contacts?

    Do you think data privacy is important?

    2. Would you rather vaccine old people or young people?

    Why?

    3. Would you rather work in an office or at home every day? (or: have school lessons at school or at home?)

    Which job did you like most and why?

    4. Would you rather lose your job or have a COVID-19 infection?

    What things in life are you afraid of?

    5. During a lockdown, would you rather stay at home alone or with other people you don’t like?

    Being home alone, what do you usually do?

    6. During a lockdown, would you rather stay in an urban apartment or in a cabin somewhere isolated in the countryside?

    How would your ideal home look like?

    7. Would you rather cook your meals yourself or get them from the same delivery service every day?

    How often do you eat out?

    8. Would you rather only read books or watch TV for four weeks?

    What do you think about movies from book adaptions?

    9. Would you rather develop a remedy for cancer or for COVID-19?

    In your opinion, which is the most dangerous disease?

    10. Would you rather wear a face mask or keep 1.5 meters distance when you meet your friends?

    What’s your favorite topic when you talk to your friends?

    Need more ESL conversation starters and questions? Click here.

    Wrap-up

    There we have it, more “would you rather” questions than you can shake a stick at!

    As I have said in my other list of questions, once you’ve gotten a feel for using these, try using them as an influence to create your own topics. You could create questions that are even more personalised and relevant to your student’s interests.

    Browse all our ESL teaching resources.

    Happy teaching!

  • Material Magnetism: How to Keep Your ESL Students Coming Back for More

    Material Magnetism: How to Keep Your ESL Students Coming Back for More

    What’s the most important thing that will keep your students coming back for more lessons?

    Is it your well designed grammar exercises? Your refined pronunciation drills? Or maybe your charisma?

    These are all great, but unless you build lessons that are relevant to your students, you will eventually lose them.

    In this article you will learn exactly how to find the perfect material and match it with your students, keeping them happy and making your retention rates stay sky high.

    How to Create Magnetic  ESL Lessons: The Teacher Guide

    How to Find Magnetic Material

    1. Learn About Your Students

    Each student has their own reasons for learning English, they have their own interests and own motivations. They are investing their time and money in you because they believe that you can help them move towards their goals.

    So, how do you find out what your students’ goals and interests are? Well, there’s this beautiful thing called conversation that can be used to ask these things called questions… 

    Joking aside, I use the first part of a trial class to do my investigation. One of the earliest questions I ask is

    “Why do you want to improve your English?”

    Now, this is quite simple and you will usually get similar basic answers:

    • “For work”
    • ”For study”
    • “Want to speak with friends”

    This will give you a rough idea, but you will need to dig deeper. 

    For example, if they say they are learning for work then you need to find out how they use English.

    • Do they just send the occasional email to foreign clients?
    • Do they have to give presentations?
    • Do they have to manage a team?

    Get as much information as you can. This will help you much more when you structure your lessons later on.

    Paul… the Software Engineer (A)

    Paul is a software engineer. He works in a local team where he speaks his native language (German) but occasionally has to send emails to English speaking workers from divisions in other countries. He isn’t sure about his grammar and would like to appear as professional as possible when communicating with these people.

    It’s also vital to ask what they do for work / study. Once you know the field of study / work then you can use vocabulary / terms that are specific to that field. This will add massive value to your students who are taking one-to-one lessons. Even if you are teaching a group class, you can find areas that are relevant to as many of your students as possible.

    Janet… the Architect (B)

    Janet is a college student who wants to one day be an Architect. She has decided to study Architecture in the UK (providing she passes her IELTS). As well as helping her with her exam it turns out that expanding her vocabulary relating to Architecture is something she would be interested in.

    Finally, find out your students’ hobbies. Tying lesson material to a student’s interests is a quick way to get them hooked on your lessons!

    Ben… a Fan of Sitcoms (C)

    After some discussion, it turns out that Ben is a huge fan of American sitcoms. He finds them funny but can’t always understand what’s happening. Although he didn’t say he is specifically wanting to improve his English for the purpose of watching sitcoms, he seems much more interested when you mention you would like to include these things into your lessons.

    2. How to Build ESL Lessons

    Once we have plenty of information to go on, we are ready to make our lesson plans. First, it’s a good idea to think about which area you want to develop and then get the materials to fit that.

    Let’s look at our examples again:

    Paul… the Software Engineer (A)

    Paul mentioned already that he wants to improve his grammar. With regard to him needing to improve it for work emails, it makes sense to focus on writing ability.

    Now, from here, what would you do?

    We could set some exercises and role play some scenarios for Paul to reply to. However, if Paul has some past emails from work or ones that he needs to work on then it makes sense to use this as your source material. This is as relevant as it gets, you are using material that the student would be using on a regular basis in their English-speaking world.

    This is now moving on to our second step, finding the right material. This was fairly simple with Paul as we already had the material to work with.

    What could we do with Janet in Example B though?

    Janet… the Architect (B)

    We mentioned already that Janet would benefit from expanding her vocabulary relating to architecture. For this, it’s as simple as finding material that has a lot of relevant vocabulary. This can be found in Architectural news articles and magazines. We can have Janet read these articles, check her comprehension of certain words and then get her to use these words in a sentence to drill them to memory.

    Finally let’s look at the kind of student who has a hobby (such as watching sitcoms) you want to incorporate into a lesson and the ways of doing this:

    Ben… a Fan of Sitcoms (C)

    The student could write a review or summary of a lesson. You could discuss the episode in class, favourite parts etc. for the purpose of speaking. Your student could read scripts (found online) to check pronunciation and comprehension when reading. You could also have your student listen to the episode without looking at the screen and then summarise the situation to focus on listening.

    Not only are these developing the students’ skills in a relevant way but because it’s fun for them you will find them to be highly motivated and more likely to keep going with their studies!

    3. Reviewing Your Lessons

    This last step is equally as important as the other two. We need to review and refine what we do.

    Sometimes the activities we are doing aren’t as effective as they could be and need some tweaking. Often our students’ life situations change and we need to adapt to keep ourselves relevant. Let’s look at those examples one last time:

    Paul… the Software Engineer (A)

    After studying with you for a year it turns out that Paul doesn’t actually send that many emails anymore but he now reports to a different boss who speaks in English. We asked how he was finding the lessons when we discovered this news. Now we can adapt the lessons and focus more on speaking to keep things relevant.

    Janet… the Architect (B)

    After asking how things were going for Janet at the start of the lesson we discover that she has an interview for her dream university, great! The interview is in English so let’s put the vocabulary on hold for now and we can practise interview techniques and have a few mock interviews in class.

    Ben… a Fan of Sitcoms (C)

    Although Ben likes using a wide range of skills in class, he still struggles with speaking the most. Due to this we can focus more on his speaking fluency and pronunciation. We can still have the lessons focus on sitcoms but we are now making the skill being developed more relevant to him.

    In each of these cases we found out about these changes just from asking questions.

    In example B (Janet) we discovered this news just from some light chit chat at the start of the lesson. This is a great time to find things out in a natural way. Just by asking about your student’s week and what’s happening, they will tell you plenty to inform your decisions about future lessons.

    In example A (Paul) and example C (Ben) we got this information by having a review session at the end of class. It’s also important to have more structured reviews occasionally. Pick a certain frequency (for example every 5 lessons) and then ask questions such as:

    • How are you finding the lessons?
    • Are the lessons the right difficulty?
    • Are there any exercises you would prefer to do more or less of?

    Asking these things and adjusting the lesson accordingly will ensure your lessons are perfectly tuned to your students and will keep your retention sky-high!

    Bonus Tips for Business ESL Lessons

    As we saw in Example A (Paul), these principles work really well when teaching business English.

    Let’s take this one step further and see how we can provide even more value to these students.

    Occupational Niche

    Learning about a student’s occupational niche is what will really make you stand out from general online courses or other online teachers regurgitating the same cookie-cutter business lessons.

    You have a student that wants to improve their English to help with their work. Sure, they will need the basics:

    • Making arrangements
    • Sending Emails
    • Answering the phone

    But to really help them shine, you need to learn about your student and what it is they actually do at work.

    Learn About Your Students’ Role in the Workplace 

    Make sure to ask these questions:

    • What do they do? 
    • Who do they have contact with? 
    • What equipment do they use?

    From here, we can find vocabulary that is going to be extremely useful and relevant to their role. 

    You don’t need to learn everything there is to know about the role. Just a little background reading will go a long way in showing your students that you care about their language development.

    Let’s look at 3 different example students and how we can find the right vocabulary for them:

    Jane… the Doctor (D)

    Jane is studying to become a Doctor and will study in an English speaking country soon. She will need a lot of specialist vocabulary.

    Even without being specialists in the subject, we can find articles on medicine and health online. We can then have her read these articles to check her pronunciation and find new words for her vocabulary.

    Dennis… the Web Designer (E)

    Dennis has just started work as a web designer for a large multinational company. He deals with clients and colleagues from English speaking countries often, and wants to build his confidence when speaking with them.

    With a bit of background research into web design through a google search, we’ve managed to find some useful vocabulary to test him on in class.

    We can also make sure to have conversations on topics related to web designing for him to practise this new vocabulary.

    Thomas… the Finance Manager (F)

    Thomas is applying for a few jobs in the finance sector and wants to be prepared for his interviews.

    After getting him to send over the details for the jobs he is applying for, we have some very niche vocabulary that we can test him on.

    We can also include this vocabulary in a mock interview so he has even more relevant practice with the vocabulary.

    It’s worth noting that none of this takes a massive amount of preparation time. You can find this stuff in minutes but the good impression of being a prepared teacher will last with your student forever! If you’re still struggling to find material for these lessons then here are 20 business activities and topics to help you get started.

    Conclusion

    This is the stuff that really makes one-to-one lessons different from a group class.

    If you use generic material that doesn’t connect with your students then expect them to find someone else that does.

    However, spend a little time learning about your students, their dreams, their motivations. This small investment of time and energy at the beginning will pay dividends so many times over later down the line!

  • Must-Have ESL Books for Teachers (and Students)

    Must-Have ESL Books for Teachers (and Students)

    There are so many ESL resources out there, books especially. 

    But, which are the best? The essentials? The desert island books that no ESL teacher should be without?

    Let’s take a look at the need-to-own ESL books so that you can be confident you are giving your students the very best, every lesson.

    Each book is labelled with the target ability level and type of student it is best suited for, along with a roundup of the pros and cons.

    This will enable you to find the perfect book for your students and always be delivering the right material.

    Must-Have ESL Books: for Teachers and Students

    Essentials

    Magic Time 1 & 2 (Beginners – Preschool)

    [amazon fields=”019401617X” value=”thumb” image_size=”large” image_class=”my-aawp-img” tracking_id=”j4t_jimmyesl-20″]

    [amazon link=”019401617X” title=”The Magic Time books” tracking_id=”j4t_jimmyesl-20″] are perfect for preschool/kindergarten students. Written by Kathleen Kampa and Charles Vilina (and released by Oxford University Press) these two books give you a reliable resource to help with the very youngest of students.

    These books are made up of colourful scenes, fun games, catchy music and movement ideas which focus on building speaking, listening, and pre-writing skills in a fun and inviting way.

    As this book is aimed at preschoolers, you will find that the book doesn’t race along, trying to cram in as many concepts as possible. Rather, it is designed to build a solid foundation for later English language learning and ensure that your students will have fun discovering the language for the first time.

    In each chapter, you will find two vocabulary pages made up of mostly nouns, along with a simple sentence that introduces some new grammar. 

    In the first level, there are two verb pages and a phonic alphabet section every three chapters. Then, in the second level, there is one verb page and phonic alphabet practice every chapter. As well as this, there’s a review section every 3 chapters to help test retention.

    Pros

    • Great games and fun, bright scenes which are perfect for young students.
    • Great pace, doesn’t rush things and builds a solid foundation for future learning.

    Cons

    • Focuses mostly on speaking and listening. While you can dabble with writing and reading, these are not heavily featured.

    [amazon link=”019401617X” title=”Buy Magic Time books on Amazon” tracking_id=”j4t_jimmyesl-20″]

    Let’s Go (Beginners – Children)

    [amazon fields=”0194626180″ value=”thumb” image_size=”large” image_class=”my-aawp-img” tracking_id=”j4t_jimmyesl-20″]

    [amazon link=”0194626180″ title=”The Let’s Go series” tracking_id=”j4t_jimmyesl-20″] is arguably the best choice for children just starting to learn English.

    It was first released in 1990 by Oxford University Press and it is now used in over 160 countries around the world and is up to its 5th edition. As you can see it has had plenty of time to refine its formula and has gained massive popularity since its first release.

    Each chapter takes a topic such as family, food, colours etc and utilises conversations and questions to put emphasis on spoken English from the start. Every chapter finishes with a review so you can test your student’s progress as you advance throughout the book.

    Each chapter has a phonics section, designed to help independent reading. After a new area of phonics is introduced, there are accompanying stories, songs and chants to give the student even more practise with that sound.

    If that wasn’t enough, there are a host of games, homework and other activities which give plenty of variety to keep your students engaged and having fun throughout your classes. 

    Pros

    • The bright colours and fun text makes these books perfect for young learners and particularly beginners.
    • Great for developing spoken English and pronunciation.

    Cons

    • Although good for beginners, this is not a good choice for teens or adults. The songs and bright imagery may obviously be a little patronizing!

    [amazon link=”0194626180″ title=”Buy the Let’s Go book on Amazon” tracking_id=”j4t_jimmyesl-20″]

    American English File & New English File (Beginners – Teens/Adults)

    [amazon fields=”019477614X” value=”thumb” image_size=”large” image_class=”my-aawp-img” tracking_id=”j4t_jimmyesl-20″]

    [amazon fields=”019438425X” value=”thumb” image_size=”large” image_class=”my-aawp-img” tracking_id=”j4t_jimmyesl-20″]

    Another Oxford University publication. The American English File is the result of Christina Latham-Koenig and Clive Oxenden’s collaboration. 

    The series starts from beginner (A1) and advances through to C1 with an emphasis on grammar, vocabulary and pronunciation in each lesson.

    Each chapter introduces a theme (hello, we’re Canadian, what’s in your bag etc.) Each of these themes is practical that can be used in day to day conversation. Grammar, vocabulary and pronunciation are then used to support the newly introduced topic.

    There are two versions of this series: [amazon link=”019477614X” title=”American English File” tracking_id=”j4t_jimmyesl-20″] focuses on American English, while [amazon link=”019438425X” title=”New English File” tracking_id=”j4t_jimmyesl-20″] focuses on British English. This allows you to use this material regardless of which style you teach.

    While this series is a little less colourful compared to something like the Let’s Go series, there are still plenty of diagrams and images to make it more inviting to your older students and things are laid out in an inviting and easy to understand manner.

    Pros

    • Includes plenty of material.
    • Suitable from beginners to advanced.
    • Great balance of grammar and vocabulary.

    Cons

    • Not appealing for younger students.

    [amazon link=”019477614X” title=”Buy the American English File book on Amazon” tracking_id=”j4t_jimmyesl-20″]

    [amazon link=”019438425X” title=”Buy the New English File book on Amazon” tracking_id=”j4t_jimmyesl-20″]

    Market Leader (Business – Adults)

    [amazon fields=”1408237032″ value=”thumb” image_size=”large” image_class=”my-aawp-img” tracking_id=”j4t_jimmyesl-20″]

    Despite having an elementary book, [amazon link=”1408237032″ title=”Market Leader” tracking_id=”j4t_jimmyesl-20″] is very much an intermediate to advanced level series. 

    It will cover the basics such as introductions but will move through at a fairly quick pace, so make sure your students already have a good foundation of the language.

    That being said, the focus of this series is business. Your most likely students will be people already somewhat comfortable with English and just need to finetune things to make their work-life easier.

    This is the series that excels at that.

    The Market Leader series covers the 4 major skills (reading, writing, listening and speaking). What’s more, these are all done in the context of business, utilising meetings, phone calls etc. to make these situations extremely relevant to your students.

    Another plus is the audio and transcripts for conversations throughout the book. Not only are these great to work within lessons but can be useful for a student wanting to train their listening skills outside of class.

    Pros

    • Ideal for intermediate to advanced students.
    • Niche material for business English.
    • Covers the 4 core skills (reading, writing, listening and speaking).

    Cons

    • Not suitable for beginners.

    [amazon link=”1408237032″ title=”Buy the Market Leader book on Amazon” tracking_id=”j4t_jimmyesl-20″]

    Check Your English Vocabulary for IELTS (Advanced – Teens/Adults)

    [amazon fields=”1472947371″ value=”thumb” image_size=”large” image_class=”my-aawp-img” tracking_id=”j4t_jimmyesl-20″]

    Written by Rawdon Wyatt, [amazon link=”1472947371″ title=”this bestselling coursebook” tracking_id=”j4t_jimmyesl-20″] is designed to give a huge boost to an IELTS student’s vocabulary.

    Although this could, in theory, be used for any student, it is mainly suited to those preparing for the IELTS exam.

    Not only does it teach words and phrases that are great in general situations (such as IELTS speaking), it also teaches very niche vocabulary that is needed for things like the written IELTS section. 

    Part 1 of the academic writing section can be challenging, as students need a very scientific, objective way of communicating. This book gives both the vocabulary necessary to excel in such areas as well as plenty of exercises to strengthen and reinforce this area.

    The exercises are really well written and the book is written in such a way that it can be useful in class as well as in self-study time. This makes it ideal for students preparing for IELTS as they will spend a lot of time studying by themselves as well as with a teacher.

    Don’t think of this as purely a vocabulary resource either, as this book also covers grammar, comprehension and spelling.

    Pros

    • The perfect resource for IELTS students.
    • Well written exercises and relevant vocabulary.
    • Contains IELTS-style Speaking and Writing tasks with sample answers.

    Cons

    • Very specific to IELTS students, so other resources may be better for other students.

    [amazon link=”1472947371″ title=”Buy the IELTS coursebook on Amazon” tracking_id=”j4t_jimmyesl-20″]

    Grammar Books

    As well as the essential resources above, here is a selection of bonuses that can also be a great addition to your teaching armoury!

    English Grammar in Use

    [amazon fields=”0521189063″ value=”thumb” image_size=”large” image_class=”my-aawp-img” tracking_id=”j4t_jimmyesl-20″]

    Do you want to brush up on your grammar? Or maybe you just want a solid reference for when you build your grammar lessons. Whatever the case, [amazon link=”0521189063″ title=”English Grammar in Use” tracking_id=”j4t_jimmyesl-20″] is the only book you need, to cover anything you need to know with regards to grammar.

    It’s laid out beautifully and as well as solid definitions for each topic, it also contains a host of exercises which are great for in-class or for setting as homework.

    [amazon link=”0521189063″ title=”Buy the English Grammar in Use book on Amazon” tracking_id=”j4t_jimmyesl-20″]

    English Phrasal Verbs in Use

    [amazon fields=”1316628094″ value=”thumb” image_size=”large” image_class=”my-aawp-img” tracking_id=”j4t_jimmyesl-20″]

    Here’s one for your advanced learners (C1 – C2) that want to take that extra step in improving their fluency. [amazon link=”1316628094″ title=”English Phrasal Verbs in Use” tracking_id=”j4t_jimmyesl-20″] has around 1000 phrasal verbs, split up into various topics (such as work, nature, food etc). 

    As well as the explanations, exercises are included to help retention and build confidence in their use. This is great to be used in class or even to recommend to students who want to expand their phrasal verb collection in their own time.

    [amazon link=”1316628094″ title=”Buy the English Phrasal Verbs in Use book on Amazon” tracking_id=”j4t_jimmyesl-20″]

    Activity Books

    ESL Games for the Classroom

    [amazon fields=”1641521090″ value=”thumb” image_size=”large” image_class=”my-aawp-img” tracking_id=”j4t_jimmyesl-20″]

    Do you struggle with coming up with ideas for fun classroom games? This is where [amazon link=”1641521090″ title=”ESL Games for the Classroom” tracking_id=”j4t_jimmyesl-20″] comes to the rescue. Giving you 101 activities, split up into 6 categories (speaking, listening, reading/writing, vocabulary, spelling and grammar). 

    These games require minimal preparation so you can start using them immediately to take the stress out of lesson planning. 

    [amazon link=”1641521090″ title=”Buy the ESL Games for the Classroom book on Amazon” tracking_id=”j4t_jimmyesl-20″]

    Dictionaries

    New Oxford American Dictionary

    [amazon fields=”0195392884″ value=”thumb” image_size=”large” image_class=”my-aawp-img” tracking_id=”j4t_jimmyesl-20″]

    You don’t always have access to a computer to check definitions and pronunciation. This is where having a physical resource can save you! 

    The [amazon link=”0195392884″ title=”New Oxford American Dictionary” tracking_id=”j4t_jimmyesl-20″] contains more than 350,000 words and phrases. With plenty more notes and illustrations etc, to say this is thorough would be an understatement. The most important part I’ve found is the phonetic spelling which allows me to check when I have my doubts on the pronunciation of a particularly rare word!

    [amazon link=”0195392884″ title=”Buy the New Oxford American Dictionary on Amazon” tracking_id=”j4t_jimmyesl-20″]

    Teaching & Education

    Exploring Psychology in Language Learning and Teaching

    [amazon fields=”B01HOFFTV8″ value=”thumb” image_size=”large” image_class=”my-aawp-img” tracking_id=”j4t_jimmyesl-20″]

    If you have been teaching for a while and really want to step up your teaching game then this is essential reading. 

    It not only looks at the psychology of learning but specifically the psychology of learning with regards to language. [amazon link=”B01HOFFTV8″ title=”Exploring Psychology in Language Learning and Teaching” tracking_id=”j4t_jimmyesl-20″] will illuminate what exactly happens inside the head of a language learner and I’ve found myself seeing every lesson in a different way since reading it.

    [amazon link=”B01HOFFTV8″ title=”Buy the Exploring Psychology… book on Amazon” tracking_id=”j4t_jimmyesl-20″]

  • How to Make a Lesson Plan for Teaching English (The Definitive Guide)

    How to Make a Lesson Plan for Teaching English (The Definitive Guide)

    How can you build effective lessons and feel in control of the class?

    Lesson plans are essential to planning and ultimately giving great ESL lessons.

    But isn’t making lesson plans long and arduous? Well… not if you do things the right way!

    In this article, you will learn to make a lesson plan for teaching English from scratch that is both effective and won’t eat up all of your time and energy!

    ESL Lesson Planning: The How-To Guide

    Can You Teach Without a Lesson Plan?

    The short answer is yes, you can teach a lesson without a plan. However…

    You shouldn’t!

    With one-to-one students, you usually have more freedom. If things don’t go quite right you can usually just keep talking and keep the flow going while working out what to do next.

    In fact, I have a few students who just want to practise their free conversation and I just turn up and talk for an hour without anything planned.

    However, for the majority of students (especially groups), not planning a lesson is not an option.

    You need a clear idea of what you want your students to learn and how you are going to help them achieve that goal. The only way to do this is with a lesson plan.

    Remember that you may think you’re saving time by not planning anything (or planning minimally) but you’ll regret it when you are in the middle of a stressful, unplanned lesson.

    As Benjamin Franklin once said,

    “By failing to prepare, you are preparing to fail.”

    How to Create a Lesson Plan From Scratch

    Does it matter which tool you use to create your lesson plan?

    Not really, no.

    The important thing is that you can easily and quickly create your plan, make adjustments (if necessary) and bring it to class with you.

    You could…

    Use Pen & Paper

    This is the low-tech option but still popular, especially if you can’t get access to a computer.

    You also have the advantage that you don’t have to worry about making a printout or bringing a laptop with you to class etc.

    Use Word Processing Software

    You can use Microsoft Word or any other popular application you would use for writing anything else.

    Simply type it up and then either print a copy at the end or find some way of bringing it to class (laptop, mobile phone, classroom computer, etc.)

    Use an Online Storage System

    I started using Google Drive for my lesson plans a few years ago and haven’t gone back since!

    The documents app has everything I need to type up my lessons and I know that everything is stored online which makes it easy to access.

    Think About Presentation

    Bear in mind that you should think about who will be looking at your plan. If you are working in a school or with an assistant then it is likely that others will see it.

    Make sure it is neat enough that others can understand it and maybe spend some time on the presentation and making it look pretty. 

    However, if you are a freelance teacher then presentation doesn’t matter so much. As long you can make out what’s written and can follow it easily, you can have it look however you want!

    Once you have decided on your tool to make your lesson plan, you then need to focus on what you actually will include in your plan.

    Essential Parts to Include in an ESL Lesson Plan

    Once you have the right tool for the job it’s important to focus on what you will include in your lesson plan. Some of these can be optional but pay attention to the essentials that will be marked.

    In theory, you can do these in any order you want. However, going through in the order provided here will make your life a lot easier.

    Parts of a Lesson Plan

    • Date and time
    • Class and Student Name, Number of Students
    • Lesson Aims
    • Lesson Duration
    • Lesson Activities
    • Bonus Activities
    • Resources Needed

    Here’s how a simple lesson plan template could look like:

    plan

    Date and Time

    It may seem trivial but you want to make sure you have the right lesson plan for the right lesson.

    Get into the habit of including date and time to avoid confusion and turning up to class with the wrong plan!

    This is also useful when the lesson plan needs to be filed after class (e.g. in a school).

    Class and Student Name

    Again, it comes down to making sure you are matching the right plan to the right class. This also helps you visualise your learners as you are making your lesson plan.

    Number of Students

    This one isn’t important if you just teach one-to-one lessons (obviously). However, if you are teaching group classes then the number of students in your class will need to be taken into consideration when planning activities.

    Lesson Aims (Essential)

    Ask yourself:

    “What do I want my students to do at the end of this class that they couldn’t do before?”

    This is your lesson aim and is one of the most important considerations when designing a lesson plan.

    This can be seen as “What is the point of this class?”.

    For vocabulary lessons, the lesson aim may be a list of words or maybe a certain concept if teaching a grammar lesson.

    Whatever the reason is, make a note of it and always keep it in mind when you make any other decisions about the lesson plan.

    Lesson Duration (Essential)

    How long do you have to do the lesson?

    In order to effectively plan your activities in class, you need to know how much time you have to work with.

    Lesson Activities (Essential)

    Create a list of every activity you plan to do in class. This needs to be precise and include things such as warm up, free conversation, explaining homework at the end, etc.

    State how long each activity will take in minutes.

    Obviously it is unlikely you will be able to stick to this exactly, things change and you need to go with the flow. However, try to stick as closely as you can to it and you will find your life will be much easier.

    It doesn’t need to be said but, this needs to be done after your lesson aims, as they will dictate what activities will be appropriate for that class.

    Bonus Activities

    As well as planning your lesson activities, it’s a good idea to include some bonus activities that can be done in case you finish the class early.

    You don’t want to run out of planned activities halfway through a class and have to improvise a class to a room of 30 students!

    Get a couple of backup activities planned and take them to each class. A small amount of planning now will give you peace of mind in the long run.

    Resources Needed (Essential)

    Make a list of everything you need and pay attention to the details. 

    As well as noting down that you need printouts for that crossword, did you think about whether the students have pens or will you need to bring them? Do you have backups of lesson materials? A backup USB drive of the presentation etc?

    Be prepared with all of this because there’s nothing worse than having to run out of class 5 minutes in because you forgot something small!

    How to Structure an ESL Lesson

    Ok so we know all of the details needed for the lesson plan but… how do we actually structure the activities in the class?

    This is very much dependent on the type of class you are teaching and your style. As I’m teaching mostly one-to-one advanced students and my students require different things, my lesson plans vary quite a bit.

    However, for “traditional” classes (groups from beginner to intermediate level) you will likely want to follow the classic PPP model which is mentioned extensively in TEFL courses.

    What is PPP?

    PPP is an acronym for presentation, practice, and production.

    It is a popular model for teaching foreign languages and is one of the most popular teaching models used in TEFL courses.

    Let’s look at each section in more detail with 5 great ideas for each!

    Presentation

    In our first section, presentation, we show the students something. It could be:

    Ideas for Presentation

    • A short, fictional story
    • A video
    • An object (a piece of fruit, a toy, etc.)
    • A roleplayed conversation between the teacher and the assistant
    • A news story

    It could be anything, as long as it can stimulate a discussion about what you want to teach in the class. 

    For example, if I want to teach the past simple tense vs the past continuous, then I could find a story that uses both of these and highlight them.

    Practice

    In the next section practice, we give students a chance to use the new concept in a controlled environment. We could use:

    Ideas for Practice

    • Gap-fill exercises (a sentence with a word missing that a student has to fill)
    • Sentence correction (students find the mistakes in an incorrect sentence)
    • Sentence rearrange (students have to put the jumbled words of a sentence in the right order)
    • Synonym matching (students have to match a word with its synonym)
    • Word select (again, there’s a gap in a sentence but there are a selection of words to choose from)

    The idea is that students can play with the new concept but they still have the “training wheels” on.

    Production

    The final stage, production, is much freer and allows the student to use the new concept with less help. Think of exercises like: 

    Ideas for Production

    • Writing an essay (set an essay question; can be very good for homework assignments, too)
    • Free conversation (split students into pairs and have them talk freely while incorporating the new concept)
    • Asking questions (either ask the students yourself or split them into groups)
    • Roleplays (split students into pairs and give them roles to act out)
    • Information exchange (split students into pairs and have them find out certain information from the other)

    This section is usually the most challenging as the students have much less support compared to the practice stage. However, it is essential for preparing students to use these new concepts in the real world.

    Useful Tips for Lesson Planning

    It’s Better to Overplan

    When you are first starting out it is much better to over-plan everything.

    Where will the students be sat? How long will it take to hand out the exercise sheets? Will you allow time for questions?

    Start by overplanning and as you get more comfortable teaching, you can start taking out things that you don’t feel you need.

    Don’t Reinvent the Wheel

    There are plenty of pre-existing lesson plans out there just begging for you to use.

    If your school or establishment has its own then you can use those and adapt them. 

    Have a look online for any free or paid downloadable lesson plans and even share them with other teachers.

    You can keep these lesson plans as but you will likely want to tweak them to fit your class. 

    The point is, why struggle when the work is already done for you?

    Browse our section of ESL teacher resources for lesson plans, worksheets, and other printables.

    Include Lots of Student Activities

    Make sure to include plenty of activities that get the students involved. 

    It’s difficult to write a lesson where you are talking for an hour straight and still managing to keep your students hooked and learning well.

    When you include more student activities you find it’s easier to write the lesson, reduces teacher talk time and your students are more likely to learn effectively.

    Make a Template

    Once you have a lesson plan design that works, you can then use that as a template for the next lesson plan.

    This can be a big timesaver as you don’t have to make everything from scratch each time.

    Make Backups

    Make sure you have a backup in case you lose your main plan. I used to keep digital copies of my lesson plans on my mobile phone so that I could check that in case anything happened.

    Also, make sure your assistants have their own copy of the plan so they know what should be happening at each step in the class.

    Practise the Activities

    It’s especially important to practise the activities if it’s the first time doing them. As well as being able to perform the task properly in class, it allows you to see how long it will take.

    This timing is important when planning your lessons as it allows you to be more precise with organising the timing of the activities and have a smoother flowing lesson.

    Don’t Skip the Warmup

    Whether you are teaching one-to-one or a room full of students, you shouldn’t skip the warmup. This is a chance to prepare the students for the lesson and flow naturally into the topic of the day.

    Make sure to factor this into your plan. For larger classes, you may way to keep things a little more controlled and spend one or two minutes on the warmup.

    For one-to-one classes, I usually aim for around 5-10 minutes as it allows me to personalise things a little more and build rapport. 

    The important thing though is this needs to be built into the timing of the lesson plan!

    Need ideas? Read our posts on warm-up activities and icebreaker activities.

    Make Room for a Review Section

    I have found it to be vital to include review sections in class.

    A lot of language learning is a memory game, this means that not only does a student have to learn a definition of a word or grammar concept but they have to remember it too.

    If your student doesn’t revise then these things will escape the memory frighteningly quickly.

    For this reason, I always build in a review section nearer the start of the lesson to check their knowledge of what we did in the previous lesson.

    You can check pronunciation and definition of words or even a “Can you remember what we did in the last lesson?”.

    As long as you are getting the students’ brains to reactivate some memories from what has been done before then they are more likely to remember these things in the long run.

    Example Lesson Plan

    Now we’ve covered everything that you need to create effective lesson plans.

    Let’s look at an example lesson plan about IELTS Speaking Practise to give you an impression of how (simple) a lesson plan can look like!

    example-lesson-plan

    Conclusion

    There we have it, everything you need to start building your very own lesson plans from scratch.

    Remember to experiment with the different parts you need for a lesson plan.

    Once you have something that works, use that as a template for future lesson plans to make your life even easier!

  • 15 Tips to Limit Teacher Talk Time and Get Students Talking in the ESL Classroom

    15 Tips to Limit Teacher Talk Time and Get Students Talking in the ESL Classroom

    A good teacher should try to say as much as possible in a lesson to give as much information as possible… right?

    WRONG! 

    In this article we will look at why limiting teacher talk time in a class is a good thing.

    You will also find 15 essential tips on how to start limiting your own teacher talk time and create better ESL speaking lessons for your students.

    So… let’s dive in!

    How to Limit Teacher Talk Time: 15 Tips

    Why Should You Limit Teacher Talk Time?

    Just because you are the teacher it doesn’t mean you need to be in front of a blackboard talking at your students for an entire lesson.

    This can maybe work well with certain concepts like grammar or when training listening ability but for building speaking skills we need more input from the students.

    Naturally, in a conversation, there can only be one person speaking at a time. If you are speaking then the student is not and if they aren’t talking then how can they build their speaking ability?

    Limiting teacher talk time will create the void needed for students to speak. Allow yourself to step back and listen to your students. Make notes on how they can improve and then guide them the right way.

    This may be a different mindset than what you’re used to but is essential for students who want to focus on building their speaking fluency.

    And… if you are teaching online then newsflash, this will be a large proportion of your students! Get this right and they will keep coming back for more.

    The Tips to Get Your ESL Students Talking as Much as Possible

    Now you are in the right frame of mind to begin helping your students build those speaking skills.

    Let’s look at some top tips to get us speaking less and get them speaking more!

    1. Ask Open-ended Questions

    This first one is simple. Instead of asking closed-ended questions that are going to elicit… well… short answers at best, we should ask open-ended questions.

    Look at the difference between these:

    “Do you prefer chocolate or vanilla ice-cream?”

    “What would you do if you won the lottery?”

    How many possible answers could a student give for the first one? Two at most with some variation on sentence structure, right? 

    The second question, however, has so many possibilities and the type of answer will usually be a lot longer.

    Here’s a list of interesting conversation starter questions you can use to get a student talking.

    2. Use the Words Because and But

    Now, having open-ended questions is great and all but it doesn’t guarantee success.

    In our last section, we looked at answering what a student would do if they won the lottery. They could still answer with a short “I would invest it.”

    This is where our magic words because and but come in.

    Whenever a student gives you an answer that is too short, you can get a little more out of them by adding one of these words on the end.

    Again, back to our example:

    Teacher: “What would you do if you won the lottery?”

    Student: “I would invest it.”

    Teacher: “Because…”

    Student: “Because that way I would get even more money.”

    It can also take a different direction when we use but:

    Teacher: “What would you do if you won the lottery?”

    Student “I would invest it.”

    Teacher: “But…”

    Student: “But maybe not all of it because I would want to buy some clothes first.”

    3. Use the Words Tell Me and Describe

    This is where things start to open up even more. When you tell a student to tell you about something or describe something then you are likely to get a fairly lengthy answer. 

    Coupled with the fact that the teacher really doesn’t need to say that much, this is a powerful tool for levelling the student / teacher talk time balance.

    We can add on follow up “tell me / describe” questions like so:

    Teacher “Tell me about where you live.”

    Student “I live in a small house in the city.”

    Teacher “Describe the layout of your house.”

    Student “It has three bedrooms, a bathroom and a kitchen… etc.”

    4. Have the Students Ask You Questions

    It’s very easy for things to sound like an interview when students follow your lead and only answer your questions.

    Try mixing things up by getting them to ask you questions and engage more of their speaking side than just answering things.

    Make sure your answers aren’t too long though. Remember that the shorter your answer, the more questions your student will have to think up to keep a conversation going.

    I like to use this at the beginning of a class when doing some warm-up chitchat. I spend 5 minutes or so asking about my student’s week and then tell them to ask about mine.

    5. Step Into a Supervisory Role

    Consider your role in the classroom. In order to get the teacher talk time down, you will need to switch into a supervisor role. 

    In this position, the students will have been set a task (roleplay, interview each other, free talk, etc.) and your job is to simply make sure they are doing the right thing and only step in when necessary to make occasional corrections. 

    Finding the right balance for how often you should intervene is a skill you will develop with time.

    You want to give your students enough space to be able to work things out but at the same time, you need to correct any major errors. 

    You will also need to check that they aren’t doing things such as speaking in their mother language or simply staying silent and not trying!

    6. Have the Students Read the Lesson Explanations

    I like to do this in my grammar lessons. Instead of reading everything out to a student and having them nod along, I like to get them to read it.

    Not only are they learning grammar but we are getting them to read these things themselves which allows us to check their pronunciation at the same time, very effective!

    Bear in mind that reading aloud tends to lower comprehension ability. For this reason, you may want to take over explaining when you get to really tough parts.

    Alternatively, you can tell your students that they can read it again in their head if they struggled to understand something when speaking out loud.

    7. Be Encouraging!

    Speaking English can be very intimidating for some students.

    They might not be naturally confident speakers in their own language, let alone in a language they don’t feel confident in!

    The biggest worry is likely to be making mistakes.

    Some students want their work to be perfect and the thought of making a mistake means that they will think it’s better to say fewer things well than risk saying more and messing everything up.

    You need to explain from the beginning that this is the best environment for them to make mistakes.

    It’s better to make those mistakes now where an English Teacher can correct them than later down the line in a more critical situation.

    8. Be Strict With Bullies

    Coming back to groups, this can be worse as not only are students thinking about what their teacher thinks but also their peers.

    Again, make it clear to your students that making mistakes is fine but making fun of others will not be tolerated.

    This is vital as if your quiet students get picked on for their mistakes by others then they are going to be even less likely to want to speak up.

    Be strict with any bullies from the beginning!

    Learn how to set classroom expectations effectively in this post.

    9. Use a Ratio of 3:1 for Talk Time

    This is the ratio of student to teacher talk time that you can aim to keep to for a specific exercise.

    Tell your students that for every sentence you speak, they must speak for three sentences when replying (3:1). 

    If your student replies with less than this ratio, simply wait…

    It may feel awkward at first but your students will soon get the hang of it and realise that they have to fill that gap. Which leads on to another important tip…

    10. Enjoy the Silence in Conversations

    In order to get some students talking, you will need to create some gaps in the conversation and this can feel awkward at first, very, very awkward.

    You may be used to having to fill this gap with more speaking but you will have to turn that mindset off.

    For a conversation to work you will obviously need to say some things, ask questions, etc.

    But if a student gives an answer that is too short, if they try to quickly pass the “talking baton” back almost immediately then you will need some pauses in there.

    Nobody likes this awkward feeling of “somebody should be talking” and sooner or later your student will say at least a little something else to keep the conversation going. 

    In order to get to this point though you will need to desensitise yourself from that awkward feeling and try to become comfortable with it so that only the student feels slightly awkward.

    We need to shift the thinking from “nobody is talking so the teacher is making things awkward” to “nobody is talking so the student is making things awkward”.

    11. Split the Class Into Smaller Groups

    Obviously, in order to practise speaking in a group class, you will need to split everyone into smaller groups. 

    Now, you could split people into groups of 4-5 students and have them speak that way. If you do this then you’ve reduced teacher talk time but we are still left with students waiting for their turn to speak.

    However, if you split your class into pairs then this increases the student talk time even more.

    Something to consider the next time you do group work in class!

    12. Have the Students Teach the Teacher

    This is something I’ve started doing recently and am enjoying good results with it.

    When going through your lesson, check your student’s comprehension of a word, phrase or concept by getting them to explain it to you (as if you didn’t know).

    This can be quite difficult for them as they may only have a rough grasp of what it is anyway.

    That being said, if they can power through and find a way to explain it to you then not only will they have boosted their speaking ability (explaining difficult things) but you should also find that their concept of that thing will have deepened as a result.

    As the Roman philosopher Seneca said: “While we teach, we learn”

    13. Have the Students Teach the Class

    Similarly, you can have students explain things to other students. I’ve been using this to wonderful effect in my group classes.

    Conduct your class, as usual, let’s say you are doing some reading practise. Your student comes across an interesting word that you want to check their comprehension of.

    Simply ask them if they know what that word means. If they know it, then great, they can explain it to you (as mentioned in the point above).

    If they don’t know it then don’t just give them the answer, open it up to the rest of the class…

    “Does anybody else know this word?”

    Now you are not only enlightening student A on the definition of a word but student B is building their ability to explain things (and strengthening their understanding of the word in the process).

    Is there such a thing as killing three birds with one stone?

    14. Get Out the Timer

    This is something that would work better in a one-to-one class but could see some benefit in a group class.

    Bring out a timer so it is in sight of both you and the student.

    You will then ask questions and the student will need to talk for a set amount of time. You will only begin speaking again once the time is up, which forces the student to keep going even if they get stuck.

    This is great as it gives you a measurable target you can use to increase speaking stamina.

    Start with a short time such as thirty seconds and over time bring the time up until it’s up to several minutes.

    As well as being great for general speaking practice, this is a great tool for anyone studying the IELTS where examinees are expected to speak for up to several minutes without any aid from the other person.

    15. Always Have Backup Conversation Activities Prepared

    You will inevitably finish a lesson earlier than expected at some point and need to find some way to fill the time.

    Have some simple conversation activities prepared, for example:

    • Split the students into pairs and get them to find out 5 things about the other person.
    • Split the students into pairs and have them find out about the other’s day.
    • Split the students into pairs and have them plan an ideal holiday.

    Add some more to your list, and you will have your own, great “get out of jail free” cards!

    Check our section of ESL teacher resources for more speaking activities.

    Conclusion

    Again, one of the biggest things you can do is become comfortable with the idea of not having to speak all of the time.

    Once you create that space then you will start to see it filled with your students’ words instead and that’s where their speaking ability really grows!

    Experiment with these tips, don’t be afraid to mix and match or even try some of your own ideas out!

  • The Definitive Guide on Teaching English Pronunciation (PDF)

    The Definitive Guide on Teaching English Pronunciation (PDF)

    How often do your students say they struggle with pronunciation… It’s a lot, right?

    English can be really tough in this area and mastering how to teach it will really step up your game as a teacher.

    By the end of this article, you will know the pronunciation fundamentals that every teacher needs to know.

    You will learn effective activities and be given the resources needed to get the most from your student’s pronunciation. 

    So, without further ado, let’s get started!

    Objectives of Teaching Pronunciation

    When focussing on pronunciation it’s important that we focus on that… pronunciation. 

    This is different from accent reduction where the aim is to sound “like a native”. This goal can take many many years as well as a very high level of immersion.

    The point of pronunciation is that we understand which word the speaker is trying to say.

    We do this by focusing on things such as word stress, vowel sounds and consonant sounds.

    As mentioned, English is tough because although there are some rules, they tend to get broken so often. Added to that, there are plenty of words that sound different to how they are written and it’s a recipe for confusion!

    Incorrect pronunciation can lead to mild discomfort at best, and at worse, we could have some incredibly dangerous mistakes.

    E.g. A Dr that tells a Nurse to give a patient eighty milligrams of a drug instead of eighteen (because they missed out the n sound at the end!)

    International Phonetic Alphabet

    One invaluable tool that you will want to familiarise yourself with (if you haven’t already) is the International Phonetic Alphabet (IPA).

    This is a method of spelling words based on how the word sounds as opposed to how it is represented in a language.

    For example, cough is spelled /kɒf/. Here it is very easy to see that the final consonant sound is an /f/ and not some kind of g.

    Let’s look at other ways gh is used:

    • Ghost = /ɡəʊst/
    • Through = /θruː/ (silent)
    • Laugh = /lɑːf/
    • Bighead = /ˈbɪɡ.hed/
    • Hiccough = /ˈhɪkʌp/

    If you can introduce this to your students and show them how to find the phonetic spelling of words on a website like the Cambridge Dictionary then it’s similar to teaching them how to fish (rather than simply handing the fish over).

    How to Teach Word and Sentence Stress

    Teaching stress can be difficult depending on your student’s mother language. 

    For a student whose mother language is Russian, it can be fairly simple to explain which syllable the stress should fall on in a particular word. This is because Russian uses variable stress; this is similar to English where the stressed syllable can change in a non-predictable way.

    For students from languages such as Polish or Finnish where the stress is on a fixed syllable each time, you will need to explain the difference first.

    Then there are languages such as Mandarin or Thai where you will need to explain the concept of stress from the beginning as they more or less lack lexical stress altogether.

    Word Stress (Lexical Stress)

    For most intermediate and advanced students you will simply need to pronounce a chosen word with the correct stress and then have your students memorise it.

    Make sure to test these on a regular basis or have your students use some form of memory aid such as ANKI.

    ANKI

    ANKI is a free piece of software that is incredibly efficient at helping someone memorise large amounts of information. Very useful in language learning!

    It would be a good idea to look at some constants, such as how compound nouns will have the stress on the first syllable of the first word most of the time.

    You can also use the IPA spelling which gives the stress of a word with an apostrophe, useful for your students to check while doing self-study.

    For beginner students, you will need to explain things from the beginning.

    Pick a couple of words that have the stress on different syllables, say them out loud and ask your student if they can hear the difference.

    This works better if it’s a verb / noun pair.

    Examples: Verb-Noun-Pairs to Practise Word Stress

    to increase (verb) /ɪnˈkriːs/ — Increase (noun) /ˈɪn.kriːs/

    to record (verb) = /rɪˈkɔːd/ — Record (noun) = /ˈrek.ɔːd/

    to permit (verb) = /pəˈmɪt/ — Permit (noun) = /ˈpɜː.mɪt/

    to accent (verb) = /əkˈsent/ — Accent (noun) = /ˈæk.sənt/

    to digest (verb) = /daɪˈdʒest/ — Digest (noun) = /ˈdaɪ.dʒest/

    to overlap (verb) = /ˌəʊ.vəˈlæp/ — Overlap (noun) = /ˈəʊ.və.læp/

    They should be listening for a slight raise in pitch as well as raise in volume on the stressed syllables. Once they can hear it, get them to repeat what you are saying.

    Sentence Stress (Prosodic Stress)

    Although word stress is arguably the more important of these two to get right, eventually your more advanced students will benefit from learning about sentence stress.

    A great way to do this is to take a sentence that has plenty of variations of meaning depending on where the stress falls.

    Example: Sentence Stress Excercise

    Jim stole the chocolate cookie. = It was Jim who stole the cookie (not someone else).

    Jim stole the chocolate cookie. = It was theft that was done (not something else).

    Jim stole the chocolate cookie. = It was a chocolate cookie that was stolen (not another flavour).

    Jim stole the chocolate cookie. = It was a cookie that was stolen (not another chocolate flavoured thing).

    After using some examples you can ask your students to give you a sentence that has a particular meaning.

    E.g. Who was it that stole the cookie? Which cookie was stolen? etc.

    How to Teach Vowels

    When teaching vowels it’s important to consider your student’s mother language. 

    A lot of European languages have the same words with similar spelling. However, vowel sounds can shift in English. 

    A common example is the word chocolate. In many European countries, this word has a more pronounced ‘a’ vowel sound, this will often sound like the ‘a’ in late. However, in English, this is pronounced as a schwa: /ˈtʃɒk.lət/. 

    A schwa

    …is the unstressed vowel sound found in words such as the, about and pencil.

    This will not be the first time you will have to tell your students that a vowel is pronounced as a schwa instead of the vowel they are used to pronouncing in their own language.

    We can split our vowels into two groups: monophthongs and diphthongs. Let’s take a look at the differences and how to teach them.

    Monophthongs

    Monophthongs are the simple vowel sounds that you might find in words such as cat, boom and tree. 

    You will know when you are producing a monophthong as the shape of the mouth will stay the same.

    Have a look at your mouth as you produce the vowel sound in the words not (monophthong) and no (diphthong). In the vowel sound of not, your lips will stay in the same place. However, when you produce the vowel sound in no, you will find that the opening of the lips reduces.

    Get your students to do the same so that they can see and hear the difference.

    It would be handy to have a list of words that cover all of the monophthongs used in English. This way you can quickly test that your student can make all of the sounds.

    After this, you will need to do reading practise so that your students can associate those sounds with words when they read by themselves.

    Diphthongs

    Diphthongs are often known as gliding vowels. To make these sounds we take two monophthongs and then move between them to get our final sound.

    Examples are the vowels in words such as buy, lay, bow.

    Although many languages utilize diphthongs, they are non-existent in languages such as Japanese.

    For this reason, your students may struggle when introducing these sounds as they will naturally hear them as two different vowels and may give them too much separation.

    To break this habit you can have the student pronounce each monophthong separately and then gradually reduce the gap between them until you have a fast, smooth glide.

    How to Teach Consonants

    When looking at consonants it is common practise to separate these into two groups: voiceless and voiced sounds. Let’s look at the difference.

    Voiceless Sounds

    Voiceless consonants are sounds that nearly exclusively use just the teeth, tongue and lips to make the sound.

    These usually sound “harsher” and include:

    Voiceless Consonants

    • /k/
    • /f/
    • /p/
    • /s/
    • /t/
    • /ʃ/(sh)
    • /tʃ/(ch)
    • /θ/ (th)

    Most students shouldn’t have any problems reproducing these sounds. That being said, if the sounds they are producing seem too soft then you can ask them to really force the air out. Start by exaggerating and producing an overly forced sound and then soften it until it sounds natural.

    Voiced Sounds

    Voiced consonants are a lot softer in comparison. They still utilise the teeth, tongue and lips but the difference is that they bring the voicebox into play.

    You can check if you are making a voiced sound by placing your fingers on your voice cords. If you feel them vibrate quite a bit then it is likely a voice sound.

    Voiced consonants in English include:

    Voiced Consonants

    • /b/
    • /d/
    • /g/
    • /dʒ/ (j)
    • /m/
    • /n/
    • /v/
    • /w/
    • /j/ (y)
    • /z/

    Voiced and Voiceless Pairs

    Once you have established the difference between voiced and voiceless sounds you can introduce voiced and voiceless pairs. 

    Some voiced and voiceless sounds go together. They have the same teeth, tongue and lip movements. The only difference is that one doesn’t use the voicebox and has a more forceful sound.

    An example of this is /d/ and /t/. Get your students to say both of these sounds and notice the difference between them. When producing these it is important that there is enough of a difference so that the listener can differentiate them. 

    You can demonstrate this importance by using a phrase such as “He is Ted.” vs “He is dead.”

    As you can see, this slight change in consonant sound produces a very drastic difference in sentence!

    You can then give a list of other example pairs: 

    Examples: Voiced/Voiceless Pairs

    “My car has a dent.” vs “My car has a tent.”

    “I sent her a card.” vs “I sent her a guard.”

    “I need a pill.” vs “I need a bill.”

    “This is a gold chain.” vs “This is a gold Jane.”

    “I will visit the zoo.” vs “I will visit the Sue.”

    Activities

    After teaching the basics of pronunciation you will need ways to drill this information to memory.

    Remember that your students will often be unlearning habits from their native tongue which are ingrained in their minds as well as their muscles.

    This can take time so always reassure them when they make mistakes that it doesn’t need to be rushed.

    You find a selection of activties here – and even more in our dedicated list of ESL pronunciation activities.

    Tongue Twisters

    Advantage: Very targeted practice for specific sounds

    Disadvantage: Sentences are less natural and not likely to be encountered in English

    Tongue Twisters are one of my favourite ways to drill pronunciation.

    You can take a very specific sound or pair of sounds (e.g R/L for Japanese students or V/W for students of Slavic languages). You then get your students to read through the sentences slowly and each time they read, try it a little faster.

    Examples: Tongue Twisters

    “She sells seashells by the seashore.”

    “Red lorry, yellow lorry, loud lorry, run!”

    “Peter Piper picked a peck of pickled peppers.”

    “Veronica went away to view a vase”

    “They thought the thistles touched their tongues though.”

    These will be difficult at first because there are so many tricky sounds but the idea is doing focussed difficult practice like this will make everything else seem easier. Similar to how lifting heavy weights in a gym makes everything else feel lighter after.

    Word Lists

    Advantage: Can be used for very common words with a particular sound

    Disadvantage: Can get boring quickly

    Word lists are much simpler in nature. We now just have a list of words that have the target sound in them.

    These are great for examples and are essential in associating certain sounds with certain spellings.

    That being said, reading a list of words can get a little boring quickly. For that reason maybe pick 10 or so, spend a few minutes on practising the pronunciation and then move on.

    Reading

    Advantage: Can test a wide range of sounds

    Disadvantage: The sounds are so varied so it’s not great for practicing a specific sound

    Now, this is a much more natural activity. Find a piece of text from the news, a story or wherever you want.

    Have your student read out loud and just make a note of any words that aren’t quite right. After a few paragraphs, check these words with your students. 

    Sometimes a student doesn’t know the correct pronunciation of a word and sometimes they just made a one-off mistake.

    For this reason I like to ask them to read that word again without saying the pronunciation myself to see whether we need to spend time memorising it later.

    Movie Mimicking

    Advantage: Great for practising with a reference

    Disadvantage: Less mentally engaging

    Take a movie clip (youtube is a great source for this) and play a sentence and then have your student copy along.

    This is called mimicking and is great at achieving correct pronunciation and can also be used for accent reduction.

    This one can work well in class for short periods of time but I prefer to set this type of activity for homework when the student can do it in their own time.

    Flashcards

    Advantage: Incredibly efficient

    Disadvantage: Takes a bit of time to set up

    This is a very powerful way of memorising pronunciation (a must in English where the words can be spelt so differently from how they sound.)

    We will use ANKI for this. First, help your student to set up ANKI and create their first cards.

    On side A: Write the target word (e.g. challenge)

    On side B: You can either spell the word phonetically, get a recording of the word and attach it to the card or both! (e.g. /ˈtʃæl.ɪndʒ/)

    Now, your student will have a reminder to revise these words as well as the reference for each one. For each review, they will be shown either side A or B and will have to recall what the other side is.

    I recommend helping them set up ANKI in class and then sending them the reference files etc as homework.

    Go this way if you need activities to teach English grammar, too.

    Resources

    When teaching pronunciation you are going to need text… a lot of text!

    This section will give you the places to find articles, stories etc to practise with your students.

    I’ve also curated a list of the best books to help develop your pronunciation teaching skills and get the very best out of your students.

    News Websites

    BBC News

    As mentioned already, BBC news is a great resource.

    It is continually being updated with new stories, it is well written and uses a wide range of vocabulary that is ideal for testing all sounds that are pronounced in British English.

    Wired Magazine

    I like Wired magazine as it is more specific to technology.

    This is great if you have a student that has a passion for this area or works in this industry. It allows you to test their pronunciation on niche words that they will often use, very useful!

    News in Easy English

    News in Easy English is my go-to website when I need to check the pronunciation of a beginner student.

    Most of the language used is fairly simple and is a great way to get the foundations locked down.

    Books

    How to Teach Pronunciation

    This is essential reading for teaching pronunciation. [amazon link=”0582429757″ title=”How to Teach Pronunciation”] covers the basics (such as vowels and consonants) all the way to more advanced topics such as intonation and connected speech. 

    It also includes sample lessons to give you immediate ideas on how to start applying these concepts in your lessons.

    Cambridge English Pronouncing Dictionary

    Exactly as it sounds, the [amazon link=”0521765757″ title=”Cambridge English Pronouncing Dictionary”] contains over 230,000 words and gives the IPA spelling for each. Extremely useful if you are learning how to read and write using the IPA and if you need to check the pronunciation of a word without access to the internet. 

    As well as the pronunciation list, it contains essays, notes and a glossary explaining various aspects of pronunciation.

    Pronunciation Contrasts in English

    [amazon link=”1577666410″ title=”Pronunciation Contrasts in English”] is a great book for highlighting the differences between certain sounds.

    The authors have brought together the experience of 50 ESL teachers as well as their own experience in teaching and present clear concepts and patterns to help teach non-native students. 

    This is the ideal choice for teaching minimal pairs and other such similar sounds.

    Summary

    So you should now have a much clearer idea of how to teach English pronunciation to your students.

    Remember that you will find a lot of students who choose to self-study and are happy building their grammar and reading skills alone.

    However, pronunciation is one of the areas that has been the most in-demand with my students.

    Being able to provide feedback and explain pronunciation concepts in a concise and easy to understand way has kept my students coming back for more.

    Get this right and you will find the same happening for your lessons!

    Browse the full archive of ESL teaching resources.

  • 12 Great ESL Listening Activities & Games

    12 Great ESL Listening Activities & Games

    Do you struggle with finding interesting ways to teach ESL listening skills?

    Maybe you have an activity or two already but you want to be able to mix it up and keep things interesting.

    By the end of this article, you will have 12 interesting English listening activities that you can use with ESL students of various ages and skill levels.

    We even selected some great resources for your next listening lesson!

    ESL listening exercises free worksheets

    Why are Listening Skills so Important?

    Listening makes up one of the four core areas of language: reading, writing, speaking and listening.

    If our students’ listening isn’t good enough then they are missing out on a quarter of their language ability!

    Listening is needed in order to do things such as watching movies, listening to music and having conversations.

    The problem is that this skill can easily become underdeveloped. Visual tasks such as reading and writing may seem more comfortable and so students may prefer to give these more time.

    While this may be easier in the short run it means that those skills become a lot stronger but their listening gets left in the dirt.

    We need to make a conscious effort to give listening skills the attention they deserve!

    This article has a list of plenty of listening exercises that you can begin using today and let your student’s listening skills play catch up!

    Browse our full archive of ESL teacher resources and worksheets.

    12 Low or No Prep ESL Listening Activities

    Here is the list of activities, exercises, and games that you can start using with your students to improve their listening skills.

    Everything has been arranged into different groups to make finding the right activity for the right student even easier. Let’s begin!

    Listening Exercises for Beginners

    Gap Fill (Cloze Testing)

    Start by writing out a sentence but omit some of the words. Each student needs a copy of this sentence.

    Next, you simply read the sentence (including the missing word) and the students fill in the missing word.

    Difficulty can be increased by omitting more words, speaking quicker or changing which words you leave out.

    For example, if you have a sentence such as “I like to … cake” it is fairly easy to guess a word like “eat”, there are only so many words that would make sense here.

    However, if we instead have a sentence like “I like to eat …” then all of a sudden there are so many more words that could fit there which makes it harder.

    Always review the students’ results and use them as feedback for creating the next set of exercises.

    Resource tip: Here is a selection of sample gap-fill texts.

    Odd Word Out

    With this activity, you need to first take a piece of a chosen text. 

    You then need to create another version of this text for the students and in this version, you will need to change some of the words.

    You then read out loud the text from your copy and the students have to circle which words are different.

    This is a great activity as it trains the students to really focus on the sounds and how they match the words.

    You can increase the difficulty by either using more difficult text, using a longer piece of text or by increasing the number of incorrect words.

    Bonus points if the students can tell you what the correct word should be that you said!

    Resource tip: Here you can find some easy stories to use for this exercise.

    Choose the Right Picture

    This activity is great for building listening skills with simple vocabulary. It’s very easy to set up too!

    You first need a selection of pictures, one for each piece of target vocabulary. Each picture needs a corresponding letter. For example, if we have 26 pictures then we can use ‘A’ for the first picture and ‘B’ for the next picture etc.

    If this is done with more than one student then put all of these pictures on one or two sheets of paper and make copies for everyone.

    You then simply need to say one of the words from your selection and your students need to write the letter for that picture down.

    For complete beginners, it’s better to say the target words in isolation but you can increase the difficulty by giving them phrases or sentences with the target word “hidden in them”. After a while, you could even include more than one target word to really ramp up the challenge.

    Download vocabulary flashcards on classroom objects, body parts and shape names here.

    Listening Activities for Advanced Students

    Summarise

    For this exercise, you will first need to have a piece of text with plenty of information. News articles are great for this.

    You then either need a recording of the text being spoken or a script so that you can read it yourself.

    Students will have to listen to what is being said, understand it and then write down a summary of the most important parts.

    This can be quite a difficult task as there are a number of different skills students need to employ but it is extremely useful for comprehension.

    In fact, this activity makes up part of the PTE exam so is especially great if you prepare any students for that.

    Resource tip: My favourite site for news stories is BBC news.

    Movie Star

    First, you will need a movie clip with just two characters speaking (around 1-2 minutes).

    Next pair two of your students and assign one of the characters to each student.

    Your students will get a chance to watch the clip now and they will have to make notes on the dialogue.

    Once they have made their notes they will then have to perform the scene themselves.

    Now obviously it is unlikely they are going to get it word for word. Instead, you need to focus on them conveying the important parts of the scene. Make sure to tell them this in advance so that they don’t feel too stressed about trying to memorise every single word.

    If you want to increase the difficulty then try this without any visual, just allow the students to listen to the scene. This makes it much harder as there is no visual context for what’s happening.

    Also, you can choose a film that is less likely to be known by the students to make things even trickier.

    Resource tip: You can either curate your movie collection to find some good scenes or even easier just search for them on youtube!

    Take a Message

    This is an activity which is extremely practical as it’s something that will need to be done in a workplace for example.

    Your student will play the part of a secretary. The boss isn’t in right now and so they will need to take a message for later.

    For the telephone message, you can ring the student from another room. If this isn’t possible then ring from at least the other side of the room and facing away from each other so that they don’t get any visual clues.

    This is similar to the “Summarise” activity but this time the quality of the call will be degraded as it’s coming from a telephone. This is also a conversation so the student will also have a chance to ask you to repeat details or confirm certain things.

    This activity is a great chance to teach your students some stock phrases such as “I’m sorry, could you repeat that?” as well as teaching them how to spell things using the NATO phonetic alphabet (alfa, bravo, charlie).

    Memory Race / Running Dictation

    Start by printing out some short pieces of text. You need to stick these around the classroom.

    Next, split your students into pairs. Student A is the “fetcher” and student B is the “writer”.

    Student B has to stay at their desk with their pen and paper. They are in charge of writing down the information they hear from student A.

    Student A has to walk (or run if it’ safe!) to where the paper is. They then have to read and remember as much of it as possible before telling student B the information to write down.

    They will need repeated trips to get it all, so it is motivating for them to remember as much as possible.

    The first team to get their paper written down (with relatively few mistakes) is the winner!

    This game is great for waking your students up and getting them moving about.

    Remember to switch over so that everyone gets a turn.

    Resource tip: Try using some short stories for this exercise.

    Here’s a more detailed instruction on running dictations.

    Listening Games for Children

    Simon Says

    If you haven’t played Simon says before then let me break down the rules to this classic children’s game.

    First, the teacher will say “Simon says” followed by a verb phrase, e.g. “Simon says jump”. The students then have to do the actions. 

    You can make this competitive by having a student lose a point if they do it wrong, or if they’re the last.

    However, if you’d prefer to keep a more relaxed environment (possibly better with younger students) then even just having them copy you will be fun enough as it gets them moving around.

    Resource tip: The wikipedia page has a list of the names of this game in other languages so that your students can recognize it immediately!

    Treasure Hunt

    Another active game to wake up your younger students.

    The idea for this game is for the teacher to say a word, e.g. “clock”, the students then have to get to that item as quickly as possible.

    In order to make this a little more difficult, you could just say a letter and the students have to run to something that has the same first letter. E.g. if you say “b” then the students could run to the board or to a ball. 

    Resource tip: If there aren’t enough things in the classroom then you can print out some vocabulary cards and hide them around the room.

    Call & Response

    This one is good for training listening memory and can be a lot of fun for kids to be loud!

    Simply take a word or short phrase, say it out loud and get them to shout it back to you as loud as they can!

    This is very high energy so is great if you catch them falling asleep.

    This works even better if you use a song or a chant to bring the energy levels up and make it even more fun!

    Again, the length of the phrase can influence the difficulty. You could warm up with single words before making longer phrases later on.

    E.g 

    “hello” … “hello”

    “I’m happy” … “I’m happy”

    “I’m happy to meet you” … “I’m happy to meet you”

    Resource tip: Here’s a long list of great call and response ideas.

    Listening Activities for Adults

    “Drinking” Game

    This is based on the classic drinking game where every time someone says a designated word you have to drink.

    Now we can’t exactly do the same here (unless you have a very particular kind of student!) so we will have to replace the drinking alcohol with some other kind of activity.

    You could take a sip of water or coffee instead or you could act out some kind of activity, e.g. every time somebody says the word “fall” you have to clap your hands.

    Once you have the rules set out you then need the audio. For this, you can either find your own audio material on youtube etc or you can simply read it yourself.

    Bear in mind that if you do read it yourself then your attention will be split between reading and focussing on the student’s ability.

    Resource tip: Here is a list of useful podcasts you can use for this exercise.

    Transcription

    This one is a little less fun but ideal for more serious students.

    Simply take a piece of text, and read parts at a time with the student writing or typing what you are saying.

    For this, I start slow by saying one word at a time with a gap in between each. After a while move up to doing two words with a gap in between and keep increasing the number of words.

    The idea is to eventually get to a point where the student can transcribe entire sentences.

    Once you have finished with a sentence then go through and mark it.

    This is a good time to talk about logic in sentences.

    For example, if they wrote down “Yesterday, I went to the peck and had a picnic.” then we could talk about why “peck” is not such a good choice here. We are expecting a noun and specifically a place.

    Once we have gone through the type of word that should go there then they are more likely to end up with the right word “park”.

    Resource tip: The Guardian is constantly updated with relevant news articles.

    Meeting Minutes

    In this exercise, you are roleplaying a meeting. 

    The teacher’s role is to speak on a particular topic for 5 minutes or so and the students have to listen and create minutes of the “meeting”.

    The purpose of this exercise is for students to scan for the most important information and make a note of it.

    The minutes they create can be basic bullet points as long as they have correct and relevant information. You can also give them a few minutes to tidy up their notes at the end.

    This exercise is great because it is very relevant to utilizing listening skills in a real-world environment so the students will benefit greatly from this.

    To mix things up you could also get one of the other students to speak in the meeting and have everyone else create minutes from them.

    Resource tip: This page has plenty of roleplays and activities for meetings.

    Conclusion

    As I’ve said before, this is an area that can be easily neglected especially if your students aren’t doing much in the way of self-study.

    Make sure to revisit their listening skills often to keep everything even.

    Find great ESL speaking activities for your students here.

    Also, it’s a good idea to familiarize yourself with as many of these as possible so that you are able to mix things up and keep your classes interesting and fun for your students.

    Free Worksheets with Listening Exercises

    Head over to our list of ESL listening worksheets.

  • Teaching English Online to Japanese: The 101

    Teaching English Online to Japanese: The 101

    Do you want to teach English online to Japanese students from home?

    Maybe you’re interested in the culture, the people or you’re learning the language and want the chance to use it in class.

    But where do you find them online? And once you get a trial lesson, what do you teach them?

    This article gives you all you need to know about finding your new Japanese students, considering their needs when planning lessons and some of the cultural differences you may need to deal with.

    Let’s go!

    Teach English Online to Japanese Students:  The How-To Guide

    The Best Online-Platforms to Teach English to Japanese Students

    You will likely meet Japanese students on the same platforms you teach many of your other students.

    These are online marketplaces, where you can create a teacher profile and students can book a lesson with you. Basically, you are free to set your own hours and rates.

    For every book lesson, the platforms take a cut of your rates.

    The three most popular online teaching platforms, and some of their pro and cons, are:

    Verbling

    verbling

    On Verbling, teachers retain a higher percentage of lesson payment but there are fewer students available than other options.

    They also include any required teaching tools such as video call, whiteboard etc on the website which makes things easy.

    Apply to teach with Verbling here.

    Preply

    preply

    On Preply, teachers retain a lower percentage of lesson payment in the beginning and only get paid better after a few hundred lessons or so.

    The advantage is that it has more students and has started to include lesson materials, meaning less work creating lesson plans.

    Once you are matched with a student you can use Skype to conduct your lessons.

    Apply to teach with Preply here.

    Italki

    italki

    Italki is harder for a teacher to join so may not be available at the start of a career.

    The advantage is that it seems to be more popular for students so you can possibly find more work.

    Similar to Preply, you will need to use external software such as Skype to teach your classes.

    Apply to teach with Italki here.

    Platforms That Specialise in Teaching Japanese-only Students

    As well as these, there are dedicated companies that specialise in teaching Japanese-only students. 

    Bear in mind that these websites are aimed at Japanese natives. As such, the websites will usually be in Japanese.

    Some offer an English language option but for others, you will need to know the language to a certain degree (or be happy using a translator!)

    How to Navigate a Site Without Knowing Japanese

    If you don’t know Japanese then there are two ways to make a website decipherable.

    Change the Website Language

    1. Look for a box that says “日本語”. This means “Japanese” and is where we will change the language.
    2. After clicking on this box, search for “英語”. This means “English” and after selecting this option you should get the website in English (if this is an option they offer).

    Use Google Translate

    1. Search for the website in Google
    2. Look for the option next to the website that says translate.
    3. After selecting this, google will take you to its own translation of the website. It won’t be perfect but it will be good enough to make your way around.

    Ok, so now we know we know how to read the websites, let’s compare them:

    Eigox

    Overview: Eigox
    StudentsMostly adults
    Teacher RequirementsNative Speaker
    Pay per hour~$13
    Schedule10 hours per week preferred
    Application Linkhttps://www.eigox.jp/recruitment/tutor
    eigox

    I have experience teaching on Eigox and it has its ups and downs.

    The positives are that the lessons are fairly relaxed, most of the time it is a free conversation and when it isn’t you are provided with a lesson plan and all of the materials.

    The pay is fairly decent (around $13 an hour) and you are free to set your own hours.

    The negatives are that there isn’t a massive amount of work, there is no way to synchronise the calendar with anything else so you have to update your hours each week if you take lessons elsewhere. 

    They also have a cancellation policy where if you have to cancel a lesson then you not only forfeit payment for the class and are put on the watch (fair) but you also have to pay the cost of the class! 

    I had this happen once after a double booking occurred (I hadn’t updated my schedule on Eigox). I had to cancel the class and when I found that I would have to pay out from my next paycheque I decided that it wasn’t for me.

    Eigopower

    Overview: Eigopower
    StudentsMostly children
    Teacher RequirementsNative Speaker, 1 year of experience
    Pay per hour~$5-12
    Schedule–
    Application Linkhttps://www.eigopower.net/WTE/site.cgi?m=inqfrmshw
    eigopower

    Eigopower offers between $5 and $12 an hour.

    Not the worst available but certainly not the best. The website also isn’t one of the most professional, there are more than a few spelling mistakes to be found. 

    That being said, the entry requirements are fairly low (preferring one year of teaching experience) and their emphasis seems to be on teaching children so another bonus if you are wanting to specialise in that area.

    I would say that you don’t want to stay on this platform forever but it looks like an accessible job if you are just starting out. 

    Ecom

    Overview: Ecom
    StudentsHighly motivated children and adults
    Teacher Requirements2 years of experience + business experience
    Pay per hour~$16-20
    Schedule~20 hours per week
    Application Linkhttp://www.myecom.net/teachers/
    ecom

    Ecom looks to be one of the more higher-end companies.

    Their focus is on quality over quantity and as such require more experience (2 years) but for higher pay ($16-20 an hour).

    Their focus is on business English as well as exam preparation for IELTS, TOEFL etc. Most of their students are businessmen.

    One of the disadvantages (at least for myself) is that they are looking for people who can commit to 20 hours a week.

    This is great if you are looking for a sole “employer”. However, for those that have other students and are looking to supplement with a few extra hours, this may not be ideal.

    Another drawback is that they seem to be a lot more popular amongst teachers than the others. A great sign that they are a quality platform but it means the likelihood of getting a spot is reduced.

    Go after this one if you have a bit of experience but getting in may prove a challenge!

    What Are the Logistics for Teaching English Online?

    There are a few things that you will need to bear in mind when working with Japanese students (and companies).

    Technology and Workplace

    The first thing if you haven’t got set up already is the hardware. You will need a computer connected to a decent speed internet connection. The internet speed doesn’t need to be the fastest but it does need to be stable.

    You will also need a headset and webcam (if one isn’t already built into the computer). These can be picked up fairly inexpensively.

    Once you have these then download your chosen video call software (I recommend Skype). This will allow you to, first of all, attend the interviews for the companies you want to work for as well as to conduct the lessons themselves.

    When you attend the interview make sure you are presentable. Have a plain or tidy background, with good lighting and make sure to smile!

    Time Difference

    Some of your students will be Japanese natives living and possibly working abroad. In these situations, you may work with a few that match your time zone but the vast majority of Japanese people live… well in Japan.

    Depending on where you live, this could be a small time difference or like me (UK) there could be a large time difference. 

    It actually works as an advantage for me as I work mornings and afternoons which is ideal for Japanese students who want to do lessons in the evening (after work). 

    Wherever you are, you need to factor this in when choosing your work schedule.

    Payment

    If you work on a website that caters to students from all countries then you don’t need to worry too much as you’ll likely be paid in a familiar currency such as dollars via PayPal.

    If you work for a Japanese company though you are likely to be paid in Japanese Yen.

    This was the case when I worked for Eigox. It was still via PayPal which made things a little easier but be aware of current currency rates and if any charges apply when looking at the remuneration of a teaching position.

    Communication

    Skype is widely common in Japan and I have used this for contact with most of my Japanese students as well as companies.

    Read our beginner guide on teaching English online with Skype.

    Don’t worry if you can’t type Japanese as plenty of people use rōmaji (Latin script) to spell their name on skype.

    Special Characteristics of Japanese Students

    You will find some similarities in the manner of personality between your Japanese students. This is something that you will get a feel for as you gain more experience. 

    However, just like any other student, Japanese students come in all shapes and sizes so don’t go into a first lesson assuming you know exactly how they will be.

    Adults

    In my experience, adults are usually very polite, punctual and attentive. Most of my adult Japanese students are learning for business reasons and so being generally knowledgeable in this area will be greatly appreciated.

    Teens

    Teenagers will usually be quite polite and like teens from other countries you can still win them over by connecting with them on their interests. Also, remember not to patronise and you should have no problems.

    Children

    I have found that teaching Japanese children is a lot more similar to teaching any other child online. They may be a little more polite and respectful but you have to remember that they are still children and you will still need to “win” their attention.

    What Japanese Students Are Expecting of You

    Like with any other student, punctuality and professionalism are expected from you. 

    With some adults, you can spend more time building rapport and be a bit freer with the activities in the lesson whereas others prefer to “get down to business” and be doing exercises and drills rather than talk about what they had for dinner yesterday. 

    Like most other children, Japanese children don’t really have expectations of how you should be. If you manage to make the lesson fun and keep the momentum going (and the parents see they are making progress) then you’ll do just fine. 

    There is a cliche that teachers in Japan dictate the class without a great deal of opportunity for freethinking from the class.

    While this can be true for some, Japanese students know that you are a foreigner and appreciate being able to learn in a more relaxed atmosphere with free conversation and learn about your culture.

    That being said, I have found it takes a few lessons for them to warm up to you and open up so just try to relax and give it time.

    Cultural Differences Between Japan and the West

    Although there are big differences between Japan and the west, there aren’t too many cultural differences that you will need to worry about in class.

    It’s quite hard to commit a faux pas in English but there are a few things we need to consider.

    Hand Gestures

    First of all, let’s talk about counting with fingers.

    Usually, we start with fingers bent and then extend each one to count. In Japan, it’s the opposite. They start with all fingers extended and curl each one when they count.

    Another thing to consider is when pointing to oneself. We are used to pointing to our chest usually to express “me”. In Japan, it is the norm to point to one’s nose in this situation instead.

    Lastly, with regard to gestures, it is perfectly normal to use a thumbs up to indicate a good job.

    However, avoid the thumbs down at all costs! In Japan, it is the equivalent of “go to hell” which obviously isn’t going to go over well if used!

    Here’s a short and fun video about other hand gestures that have a different meaning in Japan:

    Comprehension

    This can be a similar experience with students from other countries. You ask if they understand something and you will get a “yes” a lot of the time. The problem is that this isn’t always a “real yes”.

    Some students would rather say yes to avoid disrupting the flow of the class or avoid disappointing the teacher. Or maybe they just weren’t listening at that point and feel that to mention that would be rude.

    It is important then, that instead of asking “do you understand”, you should ask questions that check for comprehension “could you tell me what this means?”, “could you give me an example sentence using this concept” etc.

    Names and Titles

    Lastly, we should look at naming conventions in Japan.

    It’s common for Japanese to address one another with title suffixes, similar to the way we use Mr/Mrs, etc in English. 

    There are a number of these suffixes depending on position and status but the most common is “san”. If we wanted to use this title with our student Tanaka then we would call him Tanaka-San.

    Japanese Title SuffixMeaning
    sanMr/Mrs
    samaa more formal form of “san”
    senseiused for teachers and experts such as doctors

    That being said, your students know that you are not Japanese and so don’t expect you to use this (I often don’t).

    It’s useful, however, to be aware that they will likely use these suffixes when talking about yourself and other friends and colleagues.

    To show respect it may be a good idea to ask from the start whether they would prefer you to use this suffix with them.

    Which Topics Should You Teach?

    Like any student, the topic you teach depends on what your student already knows and what they need to know.

    It’s worth bearing in mind that English is taught as a compulsory subject from the age of around 10 in Japan. Therefore, you will find that anyone from that age upwards will have at least a basic grasp of the language.

    If you are teaching a child from the very beginning then you will want to start with basic vocabulary, phonics and getting them used to the language.

    With grammar, you will likely need to emphasise the importance of articles, plural forms and things like subject-verb agreement.

    These are things that just don’t exist in the Japanese language and so even seasoned English learners can struggle with these areas.

    I have found that although adults usually possess a somewhat wide vocabulary and are adept at using English grammar, they tend to struggle with pronunciation a little more than children.

    For this reason, I spend a great deal of time with exercises that strengthen pronunciation.

    teaching English pronunciation online to Japanese
    Me, during an online English pronunciation lesson (Photo: Jonathan Race)

    Pronunciation

    Pronunciation needs its own section as it can be extremely difficult for a Japanese learner moving to English. First of all, they will have to learn to make new sounds which their mouths aren’t used to making.

    On top of this, the pronunciation of English words can be drastically different from what is expected of the spelling. 

    L / R

    This is one of the biggest challenges for a Japanese learner’s pronunciation, differentiating between “l” and “r”.

    The reason why this is difficult is that the Japanese language doesn’t have these sounds. There is a sound that is somewhere between the two and this is usually what is used when a beginner Japanese tries to use these sounds.

    It’s important when teaching this that you explain the position of the tongue, lips, and jaw at the beginning, middle and end of the sound. Use diagrams or show them your mouth to help.

    Once they have the basics down you then need to drill this to make it become second nature. For that, tongue twisters can be a huge help and I usually set aside a few minutes at the start of every lesson to do that.

    Diphthongs

    This is another big change between the two languages. Diphthongs (gliding from one vowel sound to another e.g. the vowel sound in “my”) don’t exist in Japanese. Every vowel sound is a monophthong (e.g. the vowel sound in “egg”).

    It can be easy to “cheat” these diphthongs if you are a Japanese learner by simply going from one monophthong to another. That is after all what diphthongs are.

    However, in order to get these vowels to sound natural, we need to work at increasing the speed between the two. 

    If there is a particular diphthong that your learner is struggling with then start by getting them to make the initial vowel sound and then the final found sound separately.

    You can then practise going between these two sounds slowly and gradually speed it up.

    Consonants

    Lastly, with regards to pronunciation, we need to look at consonants.

    If you aren’t familiar with the Japanese language then you need to know that the consonant sounds come at the beginning of their syllables with a vowel after (e.g. “banana”).

    Because of their familiarity with this, it makes it difficult when moving to a language which has consonants at the end of words.

    You may find words like “lot” becoming “loto” or “bad” becoming “bado”.

    These can be improved by first making the student aware of the sound they are making compared to how it should be.

    After that, you can help them practice cutting the vowel sound at the end of the word shorter and shorter until it no longer exists.

    Consonant clusters are especially difficult (e.g. “crisps”).

    For these, you may want to have the student practise making the consonant sounds with just their mouth (no voice box) before getting them to piece them together.

    Take each sound one at a time and again gradually speed it up until it sounds right.

    Last Thoughts

    As I’ve said in this article, you can learn about common grammar and pronunciation mistakes that Japanese learners tend to make.

    However, remember that each student is unique and will have their own optimum way of learning.

    Another thing you should consider if you haven’t already is learning the language. Now, learning Japanese is a huge undertaking but even just learning the basics will give you a massive understanding of the pronunciation and syllabary from where your learners come from.

    My knowledge of the language has been indispensable when teaching Japanese learners and it has allowed me to find and fix issues quickly and effectively. 

    Even if you don’t choose to go down that route though you can learn these things over time with enough experience.

    Best of luck in the classroom, またね!(see you later!)

    Go this way to learn more about starting an independent online teaching business.

  • Teaching English Online with Skype: The 101 Guide

    Teaching English Online with Skype: The 101 Guide

    You’ve decided to start teaching online and you’re ready to start finding some students, great!

    But what’s the best software to connect with your students?

    You’ve heard of Skype and want to get set up. Or… Likely you have been using Skype for a while but want to be able to do more with it.

    In this article, you will learn everything you need to know about teaching English online via Skype and getting the most out of it.

    After reading, you will be able to give professional lessons and know exactly what to do when you encounter any technical problems.

    Teaching English Online with Skype: The 101 Guide

    Why Teaching English Online with Skype?

    So why should you even use Skype? After all, there are plenty of choices when it comes to video call software.

    Well, first of all, it’s free. You don’t need to pay to install it and you don’t need to pay any subscription charges to keep using it.

    Secondly, it’s available across the majority of platforms: PC, Mac, iOS, and Android. So, it’s likely going to run on your chosen system, whatever that may be.

    It also has plenty of users so it’s likely your students will already have an account, meaning less work for them to do to take your class.

    Skype is also the standard for a lot of online teaching platforms so you will want to make sure it is installed for those lessons (if you haven’t already installed it for the interview stage or personal use).

    Finally, it has plenty of useful features such as screen sharing, session recording and sending files, etc. which give you more tools to work with in your lesson.

    Hardware Requirements

    So what do we need in order to run Skype?

    The first thing you need is a computer. Skype isn’t a major resource hog so you don’t need to worry too much about RAM (512MB+) or CPU power (1GHz+). 

    However, if you are using other teaching resources and have multiple tabs and applications open then you certainly don’t want things freezing in the middle of a class due to a slow computer so try to get at least a model from the last 5 years.

    A larger screen is another thing to consider in order to help you balance using Skype with your other teaching resources. This is especially the case with a laptop where screens can get quite small; I couldn’t imagine using anything less than my 15” screen on my laptop.

    There is so much more we could go into with computers, although there isn’t room for it in this article, here is a great look at the best computers for online teaching.

    Which Headset and Camera to Choose

    Another important thing you’ll need is a good quality headset to make sure your communication is clear. The Logitech H340 Headset is one of the standards and as well as being a quality USB headset, it’s also pretty cheap! 

    If you can spend a little more, the Plantronics Voyager Focus UC-M B825 is another great choice. It comes with a few more bells and whistles such as the ability to end and start Skype calls right from the headset’s controls.

    Finally, you need to make sure you have a webcam set up so your students can see you. Most laptops will have this feature built in but if not (or if you are on a desktop) then the Cam Sync HD 720p is an excellent, low-cost choice for quality 720p video.

    Read the in-depth guide on equipment need for online teaching.

    Installing and setting up an account

    With the hardware sorted, now we are ready to set up Skype and this process couldn’t be easier:

    1. Download

    Download Skype from the website. You can’t miss the big “Get Skype…” button on the homepage. If the page hasn’t detected your operating system then go to the “Downloads” page at the top to select the correct version.

    Download Skype

    2. Create Account

    Create a free account for Skype. Go to the top right of the screen and in the “sign in” section you can click “sign up”.

    Sign in to Skype
    Create a Skype account

    3. Sign In

    Sign in to Skype using your details. Once your download has completed you can open up the app and click “sign in” with the details from before. 

    Remember! These details are going to be shown to every student and employer you contact so be careful with the information you use. Keep it professional and friendly.

    When you create your username just pick your first and last name. “sk8rBoi69” doesn’t scream professional teacher. 

    On the same subject with profile pictures, make sure the lighting is good, don’t obstruct your face and remember to smile.

    Skype profile
    My Skype Profile name and picture.

    Workplace

    Once your system and account is set up we need to look at your workplace.

    You want to see your environment through your student’s eyes. Would you prefer a teacher who had a messy room with tacky posters? Or would you prefer to see a clean, professional environment? Exactly!

    Background

    First of all, you want a tidy background. It doesn’t have to look like a Cambridge library but at the very minimum needs to be neutral without any distractions.

    You need adequate lighting. You want your students to see you clearly but too much light can be a little unflattering. Experiment with having the curtains open at different amounts or having additional lamps to get a light level that works for you.

    That’s how the student sees me and the “classroom” during the Skype lessons.

    If you want to use an artificial background, consider using ManyCam software, which works with any other video tool like Skype.

    Noise Level

    You also need to pay attention to noise levels. 

    If you have a choice of rooms in your house then find the one that is the quietest. 

    If you don’t have a choice then try to keep the windows closed. Also, inform anyone else living there that you will be doing a lesson (if they are noisy) and ask (politely) to be quieter for the next hour or so.

    Another thing, don’t do your lessons in the local starbucks! 

    Sure the coffee’s arguably great but your students won’t love the background noise and I don’t think the other customers will appreciate your overly-passionate lesson about prepositions! 

    Equipment

    If you need things such as realia or a whiteboard for your lessons then make sure they are nearby and easy to reach. You won’t want to be rummaging around in the next room trying to find your flashcards halfway through your class of 15 preschoolers.

    Learn more about the essential equipment for online teaching here.

    Comfort

    Lastly, we also need to look at comfort. You will (hopefully) be spending a lot of time at your workstation so you want to reduce the stress on your body as much as possible.

    Make sure you have water nearby, this is essential when you use your voice all day. Have a good quality chair and set it correctly; this will reduce any strain on your back etc.

    In order to avoid eye strain, screen brightness shouldn’t be set too high. 

    Volume shouldn’t be too high on your headset either to avoid ear fatigue. I generally find a setting where I can hear a student well but without it being excessive. 

    If I really need to focus on their pronunciation for a specific part then I can turn the volume up briefly to hear better and then turn it back down afterward.

    Clothes

    Wear appropriate clothing. 

    For a class of business students, it might be appropriate to wear more formal clothing. 

    For a class of preschoolers though you will want to make sure you are wearing something comfortable, for example, a polo, so you can be expressive.

    Tips for Conducting Great Online Lessons

    With everything set up let’s look at some ways to give the best lessons on skype.

    Before the Lesson

    “By failing to prepare, you are preparing to fail.”

    Benjamin Franklin

    The first thing you need to do is to plan the lesson. How long is it? What topic will you cover? What exercises will you do?

    Here is an example of a lesson plan I use:

    ESL lesson planner

    Activities are added with the amount of time taken for each one. The more information you have in the lesson plan, the more likely a class will go according to plan.

    Always have a backup activity or two in case you finish everything extra early. There’s nothing worse than finishing everything you had planned and realising you have twenty minutes left till the end. 

    The Start of the Lesson

    For adults, you can warm up by asking them about their week. For children, you can warm up with a game or maybe even a song. 

    Read this post for more tips for teaching English to kids online.

    Reviewing previous classes is usually a good idea near the start. You can’t expect a student to always revise in their own time and if they don’t, then they could easily forget what they have previously learned.

    The End of the Lesson

    Be mindful of the time during class, you don’t have to stick perfectly to your lesson plan but try to stay close to make sure you achieve your goals. 

    Have the homework prepared and ready to give at the end of the class. 

    Check the date and time for the next class at the end, this can be a good reminder if a student regularly forgets to book.

    Find tons of free teaching materials and lesson ideas in our ESL resources section.

    Maximising Skype Potential with Other Tools

    Now you’re all set up with the basics but there’s still more we can do to get the most from Skype.

    Familiarise yourself with the following tools and they can add heaps of value to your lessons.

    Screen Sharing

    Using screen sharing is a very useful (often time-saving) tool when you want to show your student’s a particular resource. 

    I use it to share exercise books, highlight sections on a website for reading exercises or just to troubleshoot. 

    To activate screen sharing during a call, press the “overlapped squares” icon in the bottom right of the screen during a call. 

    Skype screen sharing

    When you are using two screens, you can select which screen to share with the student.

    Send Documents

    Sending audio, video, and PDF files is very easy to do in Skype.

    Just drag and drop a resource into the chat, hit enter and off it goes. Or click on the “share files” icon and select a file from your hard drive.

    Send documents with Skype

    That’s how the student receives the files in his chat window:

    the Skype chat

    If your files are big then it might be an idea to send it ahead of the lesson so you don’t spend too long waiting for your student to download it.

    I usually send audio the most. I record myself reading a list of words for pronunciation and then send this to the student so they have a reference to practise with.

    Record Session

    It’s possible to record a Skype session. This is a great tool for your students to be able to review the class. You can also use it to reflect on the class and see if there’s anything you can improve in the way you teach. 

    Bear in mind, this isn’t done automatically. You will need to set the recording at the beginning if you want to make sure the session is captured. 

    Start the recording from the “other options” menu within the video window:

    Record a Skype call

    After canceling the call, the record file is saved to your computers hard drive. This may take a while, depending on the length of the recorded session.

    If this is the first time you are doing it with a student then it’s also polite (and more importantly legal) to inform them you are planning to record the session.

    Online Whiteboards

    You can even use a virtual whiteboard with Skype, like Idroo or one of these great online whiteboards for tutoring.

    This can be another way to improve interaction and can be great for engaging younger students.

    There are premium plans which cost but mostly you are also able to try it out or use basic features for free.

    Shared Workspace via Google Drive

    This guide wouldn’t be complete without mentioning the shared workspace in Google Drive. In case you haven’t heard of this already, it is an online storage space with a few nifty tools for word processing and spreadsheet editing, etc.

    Here’s a homework folder from one of my student’s on Google Drive:

    Google Drive

    The advantage with this is that you can share a link to a document you are working on and the student can see what you are editing and vice-versa. 

    This can all be done in real-time which can make the lesson even more interactive!

    I use this with most students to mark homework, essays, etc. It has a great “suggesting mode” which keeps a record of what you mark so that the student can see the before and after. 

    I even use Google Drive so much that I ended up doing all of my lesson plans in there too, it’s just so easy!

    Common Technical Issues

    Sooner or later you will encounter technical issues. You need to plan accordingly with the mindset of “when these things happen” and not “if they happen”.

    Let’s have a look at some of the most common issues and their possible solutions:

    You Can’t Hear Your Student 

    Use the chatbox to communicate if you aren’t sure they can hear you.

    Get the student to check the audio settings on their operating system and then check the audio settings inside skype.

    If these don’t fix it then ask if they have a spare headset they can try.

    Your Student Can’t Hear You

    Go through the same routine as above. Make sure to tell your student what you are doing via the chat and ask them to be patient while you fix the problem.

    Your Student Can’t See You

    Check if the light is on your webcam. If so then it is on and working.

    Check the video settings in Skype and make sure your camera is selected.

    Seeing the student isn’t as important unless you are doing some pronunciation work that requires you to see their mouth. As such, I tend not to spend too long trying to fix a situation if I can’t see them.

    Audio or Video Quality is Bad

    This is usually a connection problem. Check that you don’t have any other programs open that are using a lot of bandwidth. Make sure you are as close to an internet router as possible (preferably wired). Check these things with your student.

    Battery Dying on Laptop

    This is something that happens with my students sometimes. You often won’t know what happens as the call will drop immediately.

    If the call suddenly cuts then wait a while. The student will usually call back from their mobile or once they have a charger to let you know what happened. 

    When Everything Else Fails

    These are all specific fixes to common problems. If they don’t fix the situation then you can always try the classic – hang up and call again!

    For peace of mind, always have a backup internet connection (I use my mobile), have a backup device (again a mobile can be used in a difficult situation) and it may even be an idea to have a backup headset in case that fails.

    Skype Alternatives

    This guide is aimed at Skype and while the majority of users use this software, it’s worth knowing some of the others in case your student has a preference for something else.

    Zoom 

    Zoom video calls

    Zoom has a few more tools for viewing documents as well as more functions during group calls such as “virtual hand-raising”. Bear in mind that group calls exceeding 40 minutes require a paid subscription. 

    Google Hangouts 

    Google Hangout

    The great thing about Google Hangouts is that it can be used directly from a web browser without needing any installation. However, it is slightly more limited in that you can’t send files other than images.

    Mobile Video Call

    This option is not that professional. Not to mention, some people feel less comfortable about giving you their phone number than their Skype username. 

    That being said, I have used this option more than once as a backup when I have had problems with my computer. 

    Teaching Platform Software

    Some teaching platforms such as Verbling have built-in video software which can be really useful as the tools are more targeted towards teaching functionality. 

    The downside is that stability and speed are usually never as high as something like Skype.

    Online teaching software from "Likeshuo"
    Online teaching software from “Likeshuo”

    Getting Your First Students

    Okay so now you’re set up and ready to get teaching. The only thing we need now is some students! Let’s look at some of the most common ways of finding them.

    Work for a Teaching Company

    Working as a subcontractor for an online teaching company like VIPKID is a great option for guaranteed work. You sign a contract with a company and agree to work x hours a week. 

    Quite often you will even get the materials and syllabus which means less prep work. 

    However, it can take away some of the freedom of setting your own hours and being able to teach in a way that you prefer.

    Read the review of the best companies to teach English online to Chinese students.

    Read the 101 on teaching English online to Japanese students.

    Find Students on a Teaching Platform

    In this situation, you are essentially self-employed. The teaching platform will put you in touch with students for a fee. You then set your hours, price and design your own lessons. 

    Verbling teacher profiles
    ESL teachers advertising their lessons on Verbling.com

    This one gives you more freedom than working for a company but the cost is less stability as you aren’t guaranteed a minimum number of hours a week. 

    For this reason, It may be an idea to sign up to more than one teaching platform in order to “not put all of your eggs in one basket”.

    Find Students Yourself

    If you would prefer not to pay a third party for every lesson you give then try finding your own students. 

    You could make your own website, use social media or even post classifieds in newspapers or online on websites like Gumtree. 

    Once you are in contact with a potential student, offer the first lesson free or heavily discounted. Students like to “try before they buy” and this gives you a chance to convince them in a trial class.

    These are just some ideas to get your first students. There is plenty more material here on how to teach English online.

    Conclusion

    There you have it, you should now have your Skype account set up just right in an environment conducive to learning. If done correctly this should keep your lessons stress free and effective for many years to come.

    Make sure to play about with the tools in Skype and stay on top of updates for any juicy new additions that can make your lessons even better.

    Bear in mind, Skype is just the delivery system that connects you with your students. Once you have this area mastered you can focus on the content itself, high-quality teaching!

  • 33 Sure-Fire Strategies & Activities for Teaching English Grammar

    33 Sure-Fire Strategies & Activities for Teaching English Grammar

    Grammar… how do we teach it?

    Is it just reciting monotonously from a textbook and hoping that the students are on board?

    Can we make it more interactive and dare I say, even fun?

    Read on and find out yourself!

    Whether you’re new to teaching English (ESL) or are just looking for new ways to keep things fresh in the classroom, there is something in this guide about teaching grammar for everyone.

    After using some of these 33 strategies and activities, don’t be surprised if you’re soon being harassed by other teachers who want to know your secrets!

    Why Inspiring Grammar Lessons Are So Important

    Grammar in any language is important, that’s a fact and English grammar is no exception. Learning grammar can be no easy task and teaching it can be even harder!

    There are a number of reasons that can make teaching grammar a difficult task, including fossilized errors, irregularity of verbs, plurals, etc and vast differences between English and the student’s mother tongue.

    Another issue can come from the mindset of the students. If they have experienced dry, boring grammar lessons in the past then they will likely expect the same this time around.

    It is important for you to break the mold and allow your great grammar lessons to captivate and inspire your ESL students to get the best results from them.

    So… How do we do this?

    7 Sure-Fire Strategies and Survival Tips for Your Grammar Lessons

    Let’s have a look at some “survival tips” to help you and your students navigate the jungle that is English grammar.

    1. Teaching Grammar in Context

    One method of teaching which has had a lot of success is teaching grammar in context.

    This makes sense as we created “grammar rules” as a way to make sense of the patterns that we use in the language. They are not arbitrary systems imagined out of thin air.

    For this reason, it makes sense to see how these rules apply in the language.

    Use different example sentences so that students can see how we can use these rules. It’s important to show why these are useful and why someone would want to use these.

    It’s all well and good teaching a student the intricacies of the past perfect tense but if it hasn’t clicked in the student’s mind why they would want to use such a device then it most likely won’t get used in their active language skills.

    2. Teaching Grammar Rules Inductively

    Inductive teaching is a very useful tool when it comes to teaching grammar. Let’s have a look at how it works.

    We start with specific examples, such as sentences that all use a particular grammar point. The students then use these examples to come to their own conclusions about what the rule is.

    This is in contrast with deductive teaching, which starts by teaching the rule/s first and then looking at examples afterward.

    This teaching style is great as it starts with a real-world example that already gives the grammar device relevance. It then forces students to engage cognitively instead of passively taking in a presentation which they may or may not be on board with.

    The idea is that a student who engages in this way is more likely to understand and retain a particular point.

    That being said, while this method can be very successful with some aspects of grammar which are generally straightforward (such as adjectives), there are some areas of grammar (such as articles) where it may not be as effective due to the large number of rules and irregularities that can occur.

    3. Grammar Placement Testing

    One thing that needs to be known before we start teaching grammar is what the students actually know.

    For a class learning English as a foreign language from the very beginning, this is a lot simpler. We can somewhat assume the students are a blank slate and we just need to stick to the syllabus.

    Maybe some have had some prior outside tuition and have covered certain areas, these students can be assigned harder tasks to avoid boredom but the vast majority will be at the same level.

    If we are teaching one-to-one classes though, our job becomes a little more tricky. Not everyone learns grammar in a fixed order so the things a student knows can be a bit “random”.

    Even if they showed you a syllabus of what they have covered, there may be some areas that require doubling back on if they have forgotten or didn’t understand properly in the first place.

    How do we know which topics these are?

    This is where placement testing becomes extremely useful. The student is given a test designed to test them on a variety of different grammar points. From this, the teacher is able to see where the student’s weaknesses are and use that to form a plan of what needs to be studied.

    You’ll can take the online English placement test by Macmillan here.

    4. Teaching Grammar Through Writing

    Writing is fundamental for teaching grammar. When explaining structure you and your students need to see what is happening in order to make sense of it.

    The nice thing about practicing writing (compared to speaking) is that it gives the students time to think and work things out. You can plan worksheets beforehand to work through and these can also be used to set homework.

    Browse our archive of grammar worksheets here on JIMMYESL.

    5. Teaching Grammar in the Conversation

    There is something to using grammar by using conversation too.

    It may be worth doing this after the student has had a chance to practise with writing first to boost their confidence.

    A good idea is to have a free conversation session at the end of the lesson where you can use the new grammar concept. This is more likely to have the concept “stick” when the student speaks in the language in the future.

    Need ideas for conversational lessons? Here are 7 easy ESL speaking activities and a huge list of ESL conversation starters and questions.

    6. Teaching Grammar to Kids vs. Adults

    Teaching children and teaching adults can be two very different things!

    Let’s look at some of the differences.

    When teaching children, a big challenge is engagement. Expecting a class of 6-year-olds to sit still for an hour and watch you explain grammar points on a board is not realistic.

    Doing activities that get them physically involved (games), mixing up activities often and using examples with things like pictures will help draw them into the subject.

    Also, it’s a good idea not to drop too much on them at once. Maybe introduce the present simple tense into a class on verbs, instead of bombarding them on all of the simple tenses and their rules for a whole class.

    Teaching adults with regards to grammar can sometimes be easier. Adults tend to have a little more patience and are usually ok taking their time to focus on each point without needing a new activity every few minutes or a game to liven things up.

    That being said, some variety is still needed to keep them interested but there is less pressure in this area than with children.

    Adult beginners will usually go along with the tasks set and will only really ask things if they don’t understand something.

    Be aware though that the more advanced students can ask you a lot of background questions about a particular topic especially if they are very interested — e.g “why would we use the past perfect continuous instead of the past simple?” — so it’s a good idea to make sure you are prepared!

    7. Tackling Common Grammar Mistakes

    It’s important to tackle common mistakes early before they become fossilized, otherwise, it can be an uphill battle!

    Here are some of the common grammar mistakes you should watch out for with your students:

    • Adding “s” to noncount nouns
    • Missing articles
    • Improper placement of adverbs
    • Subject / verb agreement

    If you are teaching a particular grammar point then it is important to stop a student and correct them immediately if they make a mistake related to that grammar point.

    I’ve seen students self-correct after just a few of these interruptions so it doesn’t take long!

    To reinforce these points you can set homework (such as essay questions) that are designed to get the student to use the taught grammar.

    13 Great Games and Activities to Teach Grammar Rules

    Having a list of fun games and activities for your class is a necessity.

    Not only will you have great material for your lesson plans but you will also feel confident knowing you have something to fall back on if things don’t go according to plan or if you start losing the students’ attention.

    1. (Reverse) Taboo

    Subject: Adjectives

    A student has to get either the teacher or other students to guess a particular word by only using adjectives to describe what it is.

    Example:

    A ball – “round, bouncy”

    2. Sentence Expansion

    Subject: Adverbs

    Write a simple sentence. Then get the student to insert an adverb.  

    Example:

    “He eats sandwiches.” – “He eats sandwiches noisily.”

    3. Article Drop

    Subject: Articles

    Take a section of a text and remove all of the articles from it. The students have to put the articles back in where they think they should go.

    For a more competitive element, you could split the class into two teams who have to work together to complete the task first.

    Example:

    “[…] man went to […] shop and bought […] ice cream.”

    4. I want…

    Subject: Determiners

    Split the students into groups and get them to ask the other group for things like “that pen” or “those sweets” etc.

    Example:

    “Have you seen that boy over there?”

    “Do you like this pair of jeans?”

    5. He/she said…

    Subject: Direct and Indirect Speech

    Pair students up. Have student 1 say a sentence. Get student 2 to tell us what student 1 said. Carry on from student to student.

    If you are teaching one to one lessons then you could always use a scene from a movie and get the student to tell you what the actors said.

    Example:

    Student 1 “Yesterday I went to school.”

    Student 2 “Student 1 said he went to school yesterday.” – “I want an apple.”

    Student 3 “Student 2 said she wants an apple.” – “I like cats.”

    6. Fact Finder

    Subject: Gerunds or Present Participle

    Pair students up and get them to find out five facts about the other. These facts must be made up of at least one gerund or present participle.

    Example:

    “Jane likes snowboarding”

    “Ben is studying English”

    7. I Spy With My Little Eye

    Subject: Nouns

    A classic for beginners. Use the phrase “I spy with my little eye, something beginning with…” followed by the first letter of a noun that is in the room. The other students have to guess what the word is.

    Example:

    Student 1 “I spy with my little eye something beginning with ‘a’.”

    Student 2 “Is it an axe?”

    Student 1 “No.”

    Student 3 “Is it an apple?”

    Student 1 “Yes!”

    8. Voice Switch

    Subject: Active and Passive Voice

    Ask the students to convert a sentence from an active voice to the passive voice and vice versa.

    Example:

    “The man ate the cookie.” -> “The cookie was eaten by the man.”

    9. Whose Is It?

    Subject: Possessives

    Give an object (e.g. a ball) to a student and ask the others whose it is (“his”, “Jim’s”, etc).

    Repeat this a few times and then move on to splitting the class into groups so that this time it is now “theirs” / “ours” etc.

    Example:

    “Whose is this?”

    “It is Jane’s”

    “Good, and whose is this?”

    “It is mine.”

    10. Guess Who

    Subject: Relative Clauses

    You can use the classic game “guess who”. The rules are the same as the original. Each person has a collection of faces in front of them, they also have a card with one particular face on. They then each take it in turns to ask questions and find out which card the other player has.

    The difference with this game is that we have to use a relative clause in our questions.

    Example:

    The students have a selection of faces in front of them.

    They have to find out the chosen face by asking questions:

    “Do they wear glasses?” – “Is it someone who wears glasses?”

    11. Interview

    Subject: to-Infinitives

    Pair the students up and one can be the interviewer while the other can be the interviewee. The aim is to find out what the person being interviewed “likes to do”.

    After they have a few answers, students swap roles. This is designed to test “to-infinitives” so make sure the students use the “to verb” format in their answers.

    Example:

    “What do you like to do?”

    “I like to ski.”

    12. Delegation

    Subject: Causative Verbs

    Split the students into groups of three: the boss, the boss’s assistant, and the worker. The boss needs to get the assistant to ask the worker to do a task.

    Example:

    Boss: “Have Student C stack the documents.”

    Assistant: “Stack the documents.”

    Worker: “Ok.”

    Rotate this so everybody gets a turn.

    You can also have the students use “get” after a few repetitions. (Make sure to explain that “get” is more casual.)

    13. Simon Says

    Subject: Verbs and Verb Tenses

    This is a great one for getting the attention of younger learners when teaching verbs. Say the sentences “Simon says…” and then add a phrase after it such as “jump up”. The students then have to do what you say.

    Example:

    “Simon says ‘stand up’”

    *Class stands up

    “Simon says ‘sit down’”

    *Class sits down

    How to Teach Specific Grammar Areas

    Now that we have gone over an overview of grammar overall, it’s time to look at the methods of delivery for each specific area.

    It goes without saying that you need to be comfortable with whatever topic you are delivering so that you are prepared in case you get any of those “curveball questions”. These sections will look at the teaching of each topic. For the background information, there is a more in-depth resource list at the end of the article.

    1. Adjectives

    What are adjectives?: Describing words for nouns.

    “The tall building.” / “The ball is red.” / “That car is expensive.”

    Adjectives are quite straightforward. Most languages will have an equivalent so it is quite an easy concept to grasp. Getting the student/s to use the adjectives will prove very useful and will help them “stick” a bit better when they can be visualized.

    More info on adjectives.

    2. Adverbs

    What are adverbs?: Describing words for verbs, adjectives and other adverbs.

    “He suddenly woke up.” / “The car is very small.” / “She sings really well.”

    Now adverbs get a little trickier. Students often struggle with getting the order of words right with adverbs. A good idea is to split the adverbs up into groups (degree, time, manner, etc) and teach each group individually before moving on to the next.

    Seeing these adverbs used in context will be very useful and getting the students to identify which type of adverb is being used in a sentence will also help get them to think about their own word order.

    More info on adverbs.

    3. Articles

    What are articles?: They tell us if a noun is specific or general.

    “I have a car.” / “Do you want an apple?” / “I will take the day off work.”

    Articles are a simple concept to begin with. Most students who have spent any time with the language knows that we have to use them but they do get a fair amount of misuse. More exposure to the language and seeing lots of example sentences help to see how they are used.

    More info on articles.

    4. Determiners

    What are determiners?: Pointing words.

    “I want that one.” / “Do you want these?” / “No, I want those ones.”

    These are some of the first things a student will learn on their English journey. As it is likely to be children you are teaching, it may help to be a little more interactive and use props to help engage them in the lesson.

    More info on determiners.

    5. Direct and Indirect Speech

    What is direct and indirect speech?: Quoting speech

    “He said ‘hello’.” / “She said she would text me.” / I said that yesterday.”

    This is a great area to get your students interacting with each other and testing their listening skills at the same time.

    More info on direct and indirect speech.

    6. Gerunds and Present Participle (ing-form)

    What are gerunds and the present participle?: Making nouns from verbs

    “He is running down the street.” / “I am working in a school.” / “I like playing football.”

    These are good to teach at the same time. As they both have the same ending it is easy for students to get the two confused.

    This is where inductive teaching can play a valuable part.

    Put two sentences on the board, one of these sentences uses a gerund and the other has a sentence in the continuous tense.

    First, ask students if they can spot the difference. If they can’t guess it then start asking questions such as “where is the verb in this sentence?” or “where is the noun?”.

    Once you’ve drawn their attention to that and explained the difference then they should be able to guess any more examples you send their way.

    More info on gerunds and present participles.

    7. Nouns

    What are nouns?: Names / objects.

    “This is a ball.” / “Hello, my name is Tim.” / “There is a lot of information here.”

    It’s very easy to explain these to beginners and nouns are some of the first words that students learn. In English there are certain rules that have to be obeyed though such as:

    • Capitalization
    • Singular / plural nouns
    • Count vs Non-count

    We can also open things up by talking about topics such as compound nouns, collective nouns as well as abstract nouns.

    More info on nouns.

    8. Passive Voice

    What is the passive voice?: When something is done to the subject.

    “The cookie was eaten.” / “The signature was forged.” / “The person was murdered.”

    The passive voice is extremely useful when teaching students who are studying for things such as IELTS (that requires a high level of academic writing). It is worth setting these students essay questions for homework on a regularly basis and getting them to use the passive voice in their answers.

    More info on the passive voice.

    9. Possessive

    What are possessives?: Belonging words.

    “That is my car.”/ “This is yours.” / “The summer of love.”

    For beginners we can use flashcards or the students themselves to demonstrate the possessive form and it shouldn’t take too long to grasp. The difficulty usually comes in when trying to decide where the apostrophes go in things like singular and plural nouns. For this reason it’s a good idea to teach these around the same time as singular vs plural.

    More info on possessives.

    10. Relative Clauses

    What are relative clauses?: A clause that adds additional information to a sentence.

    “I went to the place where I was born.” / “I bought a dress that looks really nice.” / “This is that person who I told you about.”

    Relative clauses can be a messy area. It’s a good idea to take things slowly and lay the groundwork. First look at sentence structure, look at the differences between phrases, clauses and sentences. Once you have this locked down then you can build that and introduce relative clauses.

    As you get into more technical aspects of grammar like this it is a good idea to get the students to make their own sentences using the construct. With simpler aspects of grammar it’s very easy for them to see the value in a certain point and find the motivation to use it.

    When things get more difficult though they will need an extra push in seeing why it has use and why they should use a more difficult sentence structure (compared to using two separate simple sentences.)

    More info on relative clauses.

    11. The To-Infinitive

    What are to-infinitives?: Verbs that can be used as nouns or paired with other verbs.

    “I want to go.” / “He needs to do his homework.” / “She has to buy a ticket.”

    When tackling the topic of to-infinitives it is most likely a good idea to bring gerunds into the mix as they can sometimes act in similar ways. Start by introducing two sentences, one using a to-infinitive and one using a gerund:

    • I like skiing.
    • I like to ski.

    Once they have seen that you can use both in similar ways then the next obvious question is “why should we use one or the other?”. At this point you can introduce sentences where one is a preferable choice:

    • I want to play football.
    • I want playing football.

    You can explain the situations where gerunds are prefered and situations where to-infinitives are preferred. After that you can get them to correct mistakes, choose between a gerund or to-infinitive and then finally give them scenarios where they get a chance to form their own sentences with either type of verb.

    More info on to-infinitives.

    12. Causative Verbs

    What are causative verbs?: Making somebody else do an action.

    “I had my haircut.”/ “I got Jim to fix the car.” / “I got my house cleaned.”

    Causatives are usually a little more advanced but you can still have a lot of fun with them especially as there’s a lot of opportunity to get movement involved and act things out.

    More info on causative verbs.

    13. Verbs and Verb Tenses

    What are verbs and verb tenses?: Actions and when they happen in time.

    “I went to the shop.” / “I am going to the shop.” / “I will go to the shop.”

    You’re going to have a much easier time explaining things like tenses with a diagram related to time. It doesn’t matter whether it’s a timeline on a board or a clock, as long as it’s something visual to point at it will make your life a lot easier.

    More info on verbs and verb tenses.

    More Resources for Teaching English Grammar